

Introduction: Corn Flakes Packet Iphone/ Multimedia Device Stand


Ever wished to view movies, album art, picture slideshows .. away from your charger, on your coffee table, work desk. well, ..
Here I describe how to make a hopefully fairly robust stand made from a Corn Flakes Packet for your ipod/ iphone, squeezebox controller, mobile phone or most other handheld media devices.
It features two viewing positions for watching photos/ movies/ album art from your device, near vertical for distance viewing & 30 deg inclines for close up viewing.
It's not a new concept of course but I thank Piers for his design with the same basic geometry as I've used. original
nb the dimensions of the stand are good for the squeezebox controller and probably most other devices too. I've included the visio file in step 8 if you wish to modify or better. please post your results.
released under Creative CommonsAttribution-Share alike 3.0 license license
Step 1: Tools and Materials
You'll need:
A printout of the design from either jpeg or visio file
Sturdy ruler
Stanley knife
Corn Flakes packet or suitable card
scissors
cellotape
cutting board or suitable table protector
hobby glue (pva or similar)
Step 2: Transfer the Template Design to Card, Score Then Cut
My design template is designed on A4 paper size. If your using Letter size, scale the design suitably. Cut the card to a piece just bigger than your printed design. Tape the design onto the front face of the card in several places round the edge
Score the dashed lines with the reverse of the cutting blade, so that it leaves an impression through to the card. This will make folding neater & easier later.
Now cut round the perimiter using either scissors or the stanley blade & ruler. (I used a combination of both)
Finish off any bits you've missed with scissors
After taking the template away, you'll be left with the card ready for folding & glueing.
Step 3: Fold Along the Dotted Lines ..
Here you will see the scoring will help you fold along the dotted lines as shown in the diagram. carefully fold using the diagram below as a guide
Step 4: Glue & Assemble Base
Start by gluing the surface box that the device will rest on. Do a practice assemble, loosten, add a couple of blobs of glue along the inside face of the narrow side panels, then hold in position. Pva has the disadvantage of taking a some time to dry but the advantage of being able to wipe away any excess cleanly. hint.. be patient.
Step 5: Glue Base Stand Rhs to Base
Glue right hand side of stand to base flap. The stand should now sit upright with just the raer to deal with
Step 6: Rear Assembly and Glue
Apply a couple of glue spots on the tabs of the vertical upright & fold into position, holding the tabs against the sides until dry.
Now, for the final step but one, put a spot of glue on the remaining tab of the rear support. Hold with a pinch until dry
Step 7:
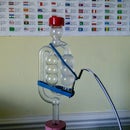
Place multimedia device on the stand, sit back & enjoy.
nb your can sit either vertically or tilted at 30 deg. to the vertical for two viewing angles. Place a marble down the back cavity will keep the stand stable if no player is present.
Step 8: Hints, Tips and Files and Links

When scoring in step3 apply enogh pressure to score bit not enough to cut!.
The neater your folds are, the better the end product will look.
Adding a marble to the cavity will make the stand sit in either position even without the device.
Again be patient when gluing
Have fun & post your results.
squeezebox controller at slimdevices
Piers origonal design at original
I've included the visio file incase you wish to modify but recommend keeping the angles unless your good at Maths


