

Introduction: A DIY Brake Bleeder Using Either Pressure or Vacuum


A brake bleeder is a handy one man device to change the hydraulic fluid in your car or motorbike.
Using either pressure at the reservoir or vacuum at the bleed nipple, turns this fiddly chore into a one man operation, removing the need to have someone in the drivers seat pumping the brake pedal, with all the shouting that accompanies it.
The added bonus is that it works just as easily on the brake or clutch, car or bike, as long as there's hydraulic fluid involved.
Having used both types of systems I have to admit that the vacuum version is superior and uses less components.
Caution:
When working with brake fluid observe the cautionary notices on the brake fluid bottle.
The working pressure for pressure bleeding brakes is approx 15 ~ 20 psi, 100 ~ 135 kPa.
Exceeding the working pressures on the brake reservoir/master cylinder can destroy/rupture the brake system seals.
The above cautions are unnecessary if you plan on using the vacuum type system.
Step 1: Parts Needed


- some sort of container to hold pressure and brake fluid.
- tubing and connectors ( Tyre tube connectors work well).
- an adapter plate/cap for the brake master cylinder/clutch cylinder.
You will need the following for the vacuum version:
- a vacuum pump (old fridge motor )
- a container to hold expelled brake fluid, prevents the vacuum pump from sucking up the old brake fluid.
- tubing and connectors
I used a windscreen washer pressure bottle from an old VW beetle, this has a max pressure rating of 35psi, more than adequate for our purposes.
Motive Products at www.motiveproducts.com/ does the complete range of power brake bleeders for those looking for ideas.
It can be seen that a garden pressure sprayer, with the addition of a gauge would make a dandy makeshift brake bleeder.
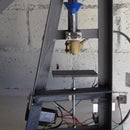
Step 2: The Vacuum System


The vacuum system attaches directly to the bleed screw on the slave cylinder, either brake or clutch.
I also removed the screws and wrapped them with Teflon plumbing/ thread tape, this seals the thread at the caliper better and prevents the vacuum sucking air past the threads which causes lots of tiny air bubbles in the tubing. This was a bit messy and doesn't really affect the hydraulic system as such but reduces the amount of vacuum needed to do the job.
Step 3: The Vacuum Pump

This was salvaged from the scrapyard and is a heavy duty aircon type Matsushita rotary piston type. I was originally using it for vacuum bagging model aircraft wings but it functions well for this application
The actual vacuum required is very slight and even a modified foot pump should also work.
Step 4: The Adapter Plate for Pressure System


My brake and clutch cylinder caps are of the rubber cap "pop off" variety, hence my use of a steel plate to clamp on top of the fluid reservoir.
If you have a screw on cap fitting, then its a much easier job to buy another cap to modify, instead of the whole cutting and drilling steel schlep.
When using a pressure bleed plate, or even a modded cap, the systems fills the brake fluid right up to the brim resulting in spills and mess when removing the plate.
The solution is to insert a tube in the bottom and release pressure at the bottle when you've completed the bleeding procedure. This will cause the fluid to drain back to the bottle if its at a lower level than the master cylinder.
Step 5: Some Closeups of Pressure System


Below are some closeups of the adapter plate and how it connects, a U bracket under the cylinder could also work.
Make sure that the plate is evenly clamped down or spillage will occur.
Step 6: Using the Pressure System

This is a posed setup just for illustration purposes, I'm not actually pumping anything here.
First test your entire setup off the car to make sure there are no leaks, it will really mess up your day and car, to have brake fluid spraying all over your cars paintwork, its very corrosive to paint.
Basically you fill the pressure bottle with new brake fluid, attach the hose and clamp the adapter plate onto the reservoir. Set the compressor pressure to approx 18psi ( 125 kPa ), connect a short drain hose to the bleed nipple on the slave cylinder to let it drain into a jar. Open the bleed nipple slowly, contents are under pressure, and when the fluid runs clear, it means all the old fluid has been purged from the system, dont forget to close the nipple again, or air will enter the system.
One should bleed the brake /clutch system if you experience a soft, sluggish or spongy pedal action, usually due to air in the system.
Brake fluid is hygroscopic(attracts water) , which results in moisture in the hydraulic fluid, a complete hydraulic system bleed is usually the fix required, or rusting of the brake pipes will occur.
New brake fluid is clear like water and the old moisture ridden stuff is a dirty dark brown color
Step 7: And Finally

Showing the new clear refreshed fluid in both the brake and clutch master cylinders.
Remember to remove the caps before beginning to drain the system and top up frequently with new fluid.
If after loosening the bleed screw the fluid still doesn't come out, then the wheel cylinder will have to be removed and cleaned out, its fairly easy using just hand tools, first clamp the rubber hose closest to the wheel where you're working to prevent all the fluid from running out


