

Introduction: DIY RC Android Sumobot (Sumo Robot)


Quadcopters, Hovercrafts, Drones, Helicopter, you name it, they are getting much more common these days. So I thought of building something new and unique for the DIY community. Sumobots! Weighing 1-3KG with a 19x16cm chassis, they push each other out of the ring with brutal force! An intense tournament setting, guaranteed to make you sweat from adrenaline! It's already considered a sport.
______________________________________________________________________
We have plans on raising a sumobot booth for our school's entrepreneurial fair (simulation), to be held this September. Also, we have high hopes of attracting customers, raising funds for charity! :D
Challange Mode:
Pay 10 php ($0.20), beat the unbeatable autonomous FAC3PALM with CALSONIC, the RC Bluetooth Sumobot. Winner gets a prize (ex. a cup of Icecream, soda, t-shirt & etc.)
Two Player Mode:
Pay 5 php ($0.10), and play with your friends, for fun! =D (includes 3 rounds)
______________________________________________________________________
From our past experiences in competitions and local school fairs, the crowd's energy tends to be high all the time, everybody wants to give it a try. People are attracted to the extreme collision and violence :)) just like in real-life wrestling and boxing. Imagine a science fair, with your booth gathering all of the attention of students and teachers. It somehow becomes the center of attraction/ main event :D
The bot was designed to compete in the autonomous division, I tweaked it just for fun and added a $8 bluetooth module. It's an Arduino-Android based, open source robot, you can pretty much do anything with it! The app is free from google-play (Bluetooth RC Car). It includes: 8 directional movements, a speed control slider, 3 toggle switches and can use the accelerometer for steering. With the proper tools & materials you can pretty much finish the bot within an hour.
You can save $41 by making your ownDIY Arduino Motor Shield[for only $8]
_______________________________________________________________________
What is a sumobot?
It is a sport in which two robots attempt to push each other out of the ring. The engineering challenges are for the robot to find its opponent by using infrared or ultra-sonic sensors), this falls in the autonomous division meaning RC devices are not allowed in this division, AI runs the sumobot. For the RC division, competitors are allowed to use remote controlled devices.
Aren't Sumobots Old? What's so unique about them?
Yes they are old indeed, it started around year 2008. But full-cover tutorials aren't easy to find. These sumobot's fabricational methods where hindered from hobbyists. People who compete internationally in "Robotics Competitions" tried everything they can to hide their tech from other competitors. That's the reason why these sumobots aren't popular, it's a game of secrecy in technology.
How fun are they?
After building at lest two of these babies and tried to gather a large group of friends, I bet you all are going to have an awesome time, shouting, cheering and sweating while fighting with these bots. Since it is an OpenSource bot, you can customize it, change the motors, the body's design, the sensors. This gives everyone's bot personalities!
______________________________________________________________________________________
SPECS:
- Has a 19x16cm Acylic Chassis (50mm Thick)
- Arduino UNO based (programmed with C++)
- 500-1200 RPM Metal Gearbox (High Speed & Torque)
- 30 Ampere Pololu Motor Shield (High Performance)
- 15 meter range bluetooth module (easy to use TX, RX)
- Powered by a 4 Cell recycled LiPo (Debloated Turnigy)
- 3x Sharp Proximity Sensors + 2 Ground Sensors
The project is so easy even a high-school student can make one :D
Please don't forget to vote! Cheers!
_______________________________________________________________________________________
My Testdrive/ Dry-run Video (Enjoy!)
[Don't Miss This! Must Watch!]
Step 1: Tools & Materials

Here's the list of my exact parts. Try to wait for a Christmas sale in Pololu.com, I saved 35% on their parts. In steps 2 and 3 alternatives will be given. Click on the material so see link.
Materials:
- Arduino UNO R3/ Arduino Leonardo -----------------------[$17 @Amazon, clone = $12]
- Pololu Dual VNH5019 Motor Shield (2x30A) -----------[$39 on Christmas/ reg=$49]
- 2x 500-1200 rpm 37D Metal Gearbox (19:1) -----------[$48, DX version = $27]
- JY-MCU Bluetooth Module (10-15m Range) -----------[$8.20]
- Ground/ Line Digital Sensors (Schmitt Trigger) -------[$4.60]
- 3x Sharp Proximity Sensors (Not Included in $90)---[$30 Optional]
- 2x Recyled Tamiya RC Wheels (Free - Inventory) ---[Recycled Free!]
- DIY/ Custom Gearbox, Aluminum Bracket -------------[Recycled Free! <Alternative Link $7]
- Recyled 4cell 1.3Ah LiPo (From Bloated Turningy)--[Recycled Free! <Alternative Link]
- 19x16 Acrylic (Thickness 50mm) --------------------------[$5 - Local Hardware Store]
- Super Glue Bottle (Gorilla 10ml) ----------------------------[$5 - Free If You have one]
Tools:
- Leatherman
- Dremel Rotary Tool
- Jigsaw (Blade for Acrylic)
Step 2: Choosing Your Metal Gearbox


In my opinion, Pololu is the best place to buy high quality metal gearboxes, they are expensive though. My second choice is DX.com, they sell a lot of cheap ones, but they only sell those with "high-torque: low-speed".
Links:
- Pololu List: Metal Gearboxes
- DealExtreme List: Metal Gearboxes
- I have the pololu gearbox 37D (19:1, 500RPM)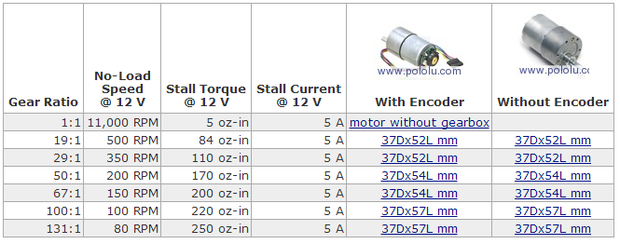
Ratio Dictionary:
- Torque = Provides a high output power. (ex. A truck needs high torque when climbing up a hill with a heavy load "1st gear")
- Speed = The RPM rating, swiftness of an object (ex. On a flat surface, race cars need a lot of speed to catch up "7th gear")
- When using the same motor setup, high-torque gearboxes have a lower speeds, while high-speed gearboxes have lower torques.
Step 3: Choosing Your Motor Driver

I had the Pololu Dual VNH5019 (High-Performance 30A Motor driver) for about a year now, it performs really well and doesn't even sweat/ heat-up. The Arduino R3 Motor Shield is also a great choice, but can only support 4A motors. DealExtreme on the other hand sells cloned versions for half the price, I haven't tried them yet but the reviews are good.
My Preferred Choices:
1st.) Pololu Dual VNH5019 (2x30 Amperes) - $49 ($35 Christmas)
2nd.) DX Dual VNH Clone (2x30 Amperes) - $24
3rd.) Arduino R3 Motor Shield (2x4 Amperes) - $25
4th.) DX, R3 Motor Shield Clone (2x4 Amperes) - $13
Want to save money? Make one for only $8.00! Read more about this in the next page!
Or go directly to my instructable guide: DIY Arduino Motor Shield [for only $8!]
Step 4: OPTIONAL: Make Your Own Motor Driver (for Only $8!)


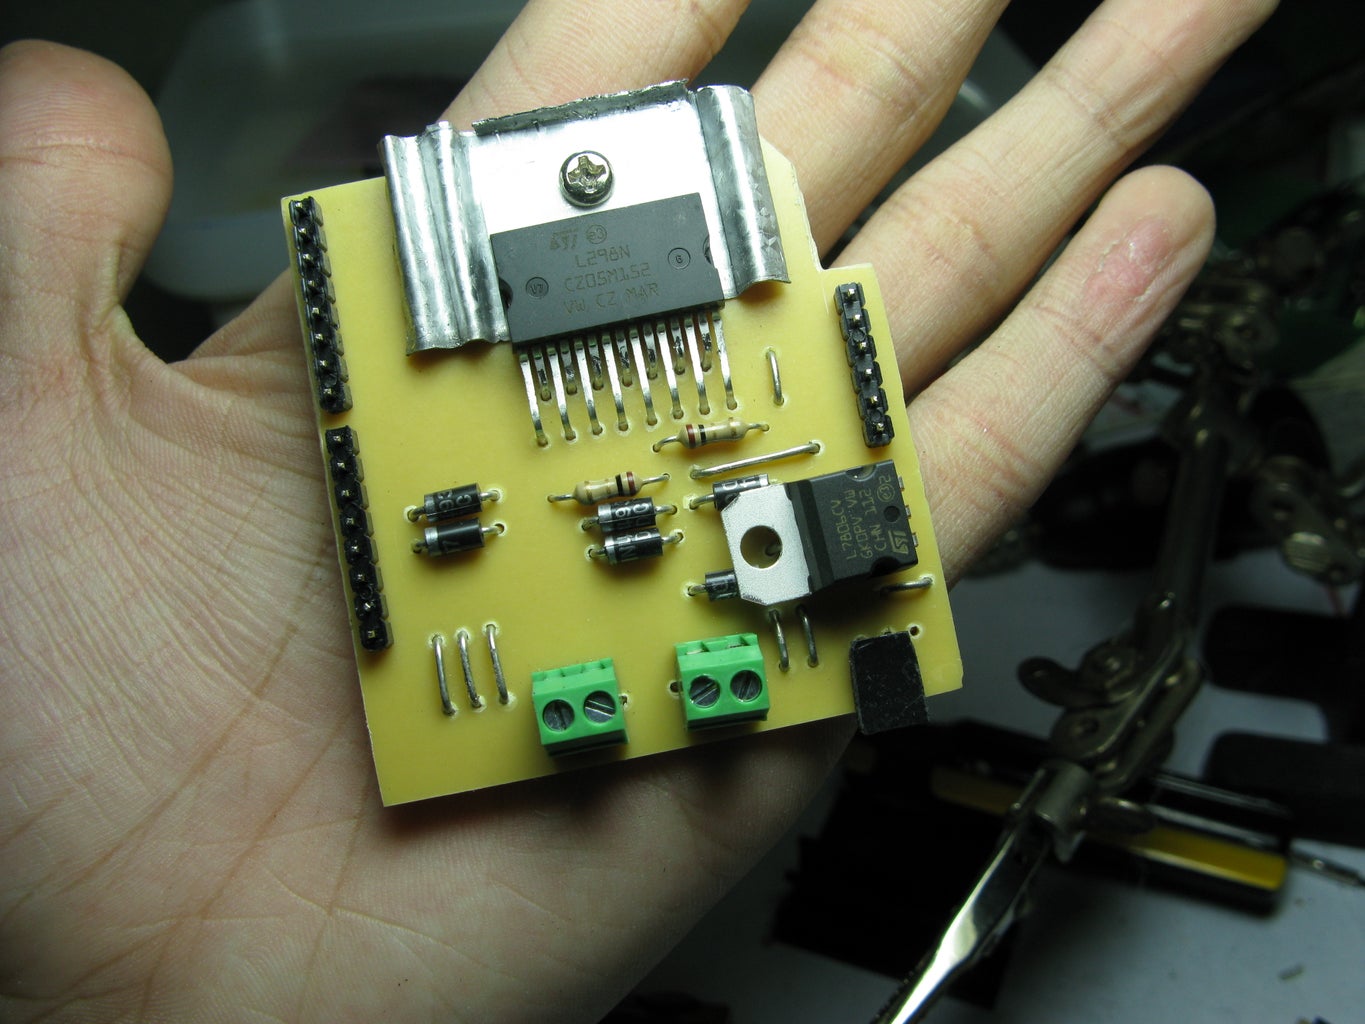


THIS STEP IS OPTIONAL, YOU CAN SKIP IT RIGHT AWAY!
Since most hobbyist prefer to be more practical, you can consider making one for only $8.00!
You can read my full instructable guide here: DIY Arduino Motor Shield [for only $8!] (L298N 2x4A)
The Bluetooth module is now 100% compatible with the DIY Motor Driver Shield. I've used it on my first ever 500g sumobot. Good to say it's completely reliable, considering the fact of achieving 7th place in the nationals (robotics competition).
__________________________________
Specs:
Voltage Range: 5- 50 volts
Current Range: 2-4 Amperes
Power: 25w @75°C
Working Temparature: -40°C to 150°C
Board Compatibility: Arduino Uno
Motor Outputs: 2 Motors (Left & Right)
Possible Robot Movements: Left, Right, Forward, Backward & etc..
PWM Pins: [12&11] [6&5]

Step 5: Mounting the Motors

Use your Dremel, or Jigsaw to cut a 19x16cm piece of acrylic (thickness 50mm), this will be used for your chassis. I found these cool L-shaped aluminum brackets from trash, I used it to fabricate my own "Gearbox Mounts". It's free! =D
You can ask for some L-shaped, aluminum brackets from nearby construction crew (aluminum scrap inventory).
Step 6: Gluing the Side Panels


It took me a lot of sweat to cut these side panels. I did it the hard way, by using a file and hacksaw. In my experience, using rotary tools on acrylic is a big no, since I shattered a lot of them before.
For the wheels, I needed an adapter/ hubs for the Tamiya RC wheels, so I fabricated mine using a lathe machine. If you want the ones, ready made, go to BaneBots.com, they sell a wheel+hub package.
Step 7: Sharpening the Scoop's Wedge

Sumobots need to have a sharp wedge to scoop out the competitor, in head to head combat, the one with the sharpest wedge usually prevails. The scoop's blade was designed for combat therefor it must be perfect. Again, rotary tools rotate too fast, therefore you don't have that much control over it. I used the trusty old file to do the job.
Step 8: Installing the Batteries


The battery's position plays a huge roll on balance. If placed on the back then there's a bigger chance of having a wheelee' effect, this increases traction, but if your batteries are located near the front, traction will decrease while the wheelee effect decreases too.
We all know that Lithium-Polymers bloat, and when they bloat they start to become useless (fear of exploding). I debloated them by carefully punching a hole, small enough for the hydrogen gasses to escape, then I patched them.
Warning: Debloating batteries is not advisable, do it at your own risk!
If you want to buy a new one, the best, quality brand I know is Turningy (4Cell, 1300mAh LiPo) they also feature a 1 year warranty.
Pic1: My Current Design (CALSONIC)
Pic2: My Previous Deisgn (FAC3PALM)
Pic3: My Previous Deisgn (FAC3PALM)
Step 9: Installing the Arduino Shields & Sensors


As we all know, it's easy to assemble the shields. Just snap in the "Motor Driver" above the Arduino UNO. Then wire up your sensors to your board. The Bluetooth connection will be shown in the next step.
I found this cool looking PC videocard fan. I installed it since it makes your bot look more intimidating.
For the scoop, I hacksawed 4 identical pillars then glued them with super glue and reinforced by clear epoxy.
The sensors are optional, I installed them since the robot is intended to fight in the autonomous division.
Step 10: Installing & Knowing Your Bluetooth Module


You can buy your Bluetooth Module from DX.com, for $8, don't worry about the shipping because it's free. There's a graphic diagram below. Now let's get started, first your package should come with a wire (extender), connect your +5v to your duino, then your ground wire. Second the TX from your Bluetooth should go to your Arduino's RX and the RX of your bluetooth to your Arduino's TX.
REMEMBER: Before programming, disconnect your Bluetooth's TX & RX from your Arduino to avoid errors.
How it works: So far, I know that the APP sends letters to your Arduino board via bluetooth. Your Arduino, then decodes these by using statements and condition, which will be discussed on the next page.
Step 11: The Arduino Codes (C++) [UPDATED! 9/4/13]
![The Arduino Codes (C++) [UPDATED! 9/4/13]](https://content.instructables.com/FDG/MF3W/HKVKX3P7/FDGMF3WHKVKX3P7.png?auto=webp&fit=bounds&frame=1auto=webp&frame=1&height=300)
I reconstructed the codes since they were intended for a different motor shield. I also changed the executions and added more math, divisional processes, thus making the movements more fluid and dynamic. The toggle switches are disabled, you can enable them by removing the "// (comment sign)".
Updates:
8/31/13 - Pololu Dual VNH5019 (codes) [Status: now compatible!]
9/04/13 - DIY Arduino Motor Driver (codes) [Status: now compatible!]
soon.... - Arduino R3 Motor Shield (codes) [Status: Beta stage (Unstable)]
soon.... - DX Dual VNH5019 Clone (codes) [Status: queued experimentation]
soon.... - DX R3 Motor Clone Shield (codes) [Status: queued experimentation]
Attention: Choose your motor driver codes below!
- Pololu Dual VNH5019 -------- [Download: Arduino Bluetooth (for Pololu Dual VNH5019).rar]
- DIY Arduino Motor Shield ---[ Download: Arduino Bluetooth (for DIY Motor Shield).rar]
- The original codes ------------[Download: Bluetooth RC Codes]
_________________________________________________________________________________________
// Reconstructed By: Angelo Casimiro (ASCAS)
#include "DualVNH5019MotorShield.h"
DualVNH5019MotorShield md;
char dataIn='S';char determinant;char det;int vel = 0; //Bluetooth Stuff
//int power = 4; // Remove This To Enable Tollge Switch #2
int overdrive = 13; //Press Toggle Switch #1, the pin13 LED will light up
void setup(){
Serial.begin(9600);md.init();
/*pinMode(power , OUTPUT);*/ //toggle switch function
pinMode(overdrive, OUTPUT);
}
void loop(){ det = check(); // You'l need to reconstruct this if your not using the Pololu Dual VNH5019
while (det == 'F') // F, move forward
{md.setSpeeds(vel,vel);det = check();}
while (det == 'B') // B, move back
{md.setSpeeds(-vel,-vel);det = check();}
while (det == 'L') // L, move wheels left
{md.setSpeeds(vel/4,vel);det = check();}
while (det == 'R') // R, move wheels right
{md.setSpeeds(vel,vel/4);det = check();}
while (det == 'I') // I, turn right forward
{md.setSpeeds(vel,vel/2);det = check();}
while (det == 'J') // J, turn right back
{md.setSpeeds(-vel,-vel/2);det = check();}
while (det == 'G') // G, turn left forward
{md.setSpeeds(vel/2,vel);det = check();}
while (det == 'H') // H, turn left back
{md.setSpeeds(-vel/2,-vel);det = check();}
while (det == 'S') // S, stop
{md.setSpeeds(0,0);det = check();}
//---------------------Toggle switch code------------------//
/* while (det == 'U')
{digitalWrite(power, HIGH);det = check();}
while (det == 'u')
{digitalWrite(power, LOW);det = check();}*/
//---------------------Mains Power------------------//
while (det == 'W')
{digitalWrite(overdrive, HIGH);det = check();}
while (det == 'w')
{digitalWrite(overdrive, LOW);det = check();}
}
int check()
{if (Serial.available() > 0) {dataIn = Serial.read();
if (dataIn == 'F'){determinant = 'F';}
else if (dataIn == 'B'){determinant = 'B';}else if (dataIn == 'L'){determinant = 'L';}
else if (dataIn == 'R'){determinant = 'R';}else if (dataIn == 'I'){determinant = 'I';}
else if (dataIn == 'J'){determinant = 'J';}else if (dataIn == 'G'){determinant = 'G';}
else if (dataIn == 'H'){determinant = 'H';}else if (dataIn == 'S'){determinant = 'S';}
else if (dataIn == '0'){vel = 400;}else if (dataIn == '1'){vel = 380;}
else if (dataIn == '2'){vel = 340;}else if (dataIn == '3'){vel = 320;}
else if (dataIn == '4'){vel = 280;}else if (dataIn == '5'){vel = 240;}
else if (dataIn == '6'){vel = 200;}else if (dataIn == '7'){vel = 160;}
else if (dataIn == '8'){vel = 120;}else if (dataIn == '9'){vel = 80;}
else if (dataIn == 'q'){vel = 40;}else if (dataIn == 'U'){determinant = 'U';}
else if (dataIn == 'u'){determinant = 'u';}else if (dataIn == 'W'){determinant = 'W';}
else if (dataIn == 'w'){determinant = 'w';}}return determinant;}
Step 12: Installing the Hood (Takes a Lot of Thinking)

It took me a lot of time to design my hood. Since this robot was intended for combat (@National Competition), it is essential to have a highly accessible hood, in case problems start to show up during the competition. My first hood version used a sheet of 1/8 illustration board. The second one used a bent metal sheet, I used the sliding folder's clip as the mount.
Step 13: The Android APP Interface

APP Download: Arduino Bluetooth RC Car (Android Devices Only)
Steps:
1st.) Download App in google play
2nd.) Turn your bluetooth on, and open the app
3rd.) Establish a bluetooth connection betweeen your phone
Go to Settings> Press Connect> Press LINVOR (Your BT Device)
4th.) Wait for the red light to turn green. And Your'e Done!
Troubleshooting: If robot doesn't respond, move the speed slider (Left to Right), this bug shows up sometimes.
Step 14: Your'e Done! Enjoy Your, Heavy Combat Sumobot!

Your'e done! Cheers! You've finished your Android Controlled Sumobot. Cheers! =D
Don't forget to vote and leave a comment. =D
Step 15: All My Sumobot Videos (RC & Autonomous)

CALSONIC 1KG Hybrid (Mrk.14 Bluetooth Mode)
FAC3PALM 400g Mini Sumobot (Mrk.13 Autonomous Mode)
National Competition (Philippines)
FAC3PALM 500g Mini Sumobot (Mrk.3 Autonomous Mode)
Monster 500g Mini Sumobot (Mrk.2 Autonomous Mode)
Step 16: Printable PDF File

Step 17: Update: (11/1/2013)

Black Edition. Painted the chassis off with a mat black finish :DD

Second Prize in the
Remote Control Contest

Participated in the
Arduino Contest

Participated in the
Microcontroller Contest


