

Introduction: Arduino Tri-Toed Biped


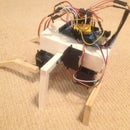

This instructable will teach you how to make an awesome three toed biped. This robot is powered by the Arduino micro-controller. You may be asking why a three toed biped? Well this foot allows the robot to rest on the outer toe when its opposite leg is lifted, stabilizing the robot. This instructable will go step by step and teach you how to make it.
Step 1: Attaching the Arduino

This step usually comes at the end but I think its better to start with it. Lets dive in!
Materials:
Arduino Uno
1/2 an inch thick balsa wood
small nails
glue
tape (optional)
Steps:
1. Take the piece of balsa wood and cut it to the shape of an Arduino Uno.
2. Cover the back of the Arduino with masking tape.
3. Cover the piece of balsa wood with glue and attach the Arduino to it.
4. Hammer the small nails into the mounting holes of the Arduino.
Step 2: Creating the Hip

The hip of any walking organism or robot is a vital part in balance. Most robotic bipeds have a small hip and big feet. This creates an unbalance shuffling movement. This robot has wide hips and small feet, like humans. This allows a more natural stride along with better balance.
Materials:
1. 3 inch by 1 1/2 inch balsa wood (the size changes depending on the servos)
2. Two servos
3. Glue
4. Tape (optional)
Steps:
1. Cover the piece of balsa wood with glue.
2. Carefully place the two servos with their horns acing outward on the glued side of the wood.
3. Cover the backside of the wood with the Arduino placed on it with glue. Place this on top of the servos so they are positioned like a sandwich.
Step 3: Making the Feet and Legs

As I described earlier, the feet are the most unique part in this robot. They have three toed and are positioned so that the third two is facing inward. When the robot lifts one of its foot to walk, the other foots third tow is being rested on to prevent the biped from falling.
Materials:
2x 4 1/2 inch long wooden rod
a slab of balsa wood
glue
servo horn
Steps:
1. Cut the slab of balsa wood into 2 star shape except with only 3 points.
2. Glue this to one of the 4 1/2 inch long wooden rods.
3. Cover the top of the wooden rod with glue.
4. Attach this to one of the servo horns and repeat this step again
5. Finally attach the servo horn to the servo and add a bit of extra glue to the servo horn if needed.
Step 4: Coding

This step is extremely simple. All you have to do is program the robot to move each leg up and down to make it move. You can even add a motion sensor so the robot will follow a moving object.

Participated in the
Coded Creations

Participated in the
Automation Contest

Participated in the
Explore Science Contest


![Tim's Mechanical Spider Leg [LU9685-20CU]](https://content.instructables.com/FFB/5R4I/LVKZ6G6R/FFB5R4ILVKZ6G6R.png?auto=webp&crop=1.2%3A1&frame=1&width=306)


