

Introduction: Bacon Powered Windmill


Of course you have. But wonder no more, because I have come up with the highly entertaining Bacon Powered Windmill for hours of power outage fun.
We all know how nice it is to sit and stare at fire; well with this contraption you not only get fire, but a whirling, turning, spinning, rotating wheel as well.
I would like to thank Charlie at Goulburn Water Systems for the inspiration for this one.
Step 1: Assemble Your Materials


Most importantly you will need a Bacon Powered Lamp as described in my earlier Instructable. This lamp is proving highly useful.
In addition to the lamp you will need the top (or bottom) of a large tin. I used the bit left over from making my Bacon Powered Bacon Stove, a length of stiff wire (high tensile wire or a bike spoke - that kind of thing) about 150mm long, and apart from some basic tools that's about it.
Step 2: Create Your Windmill Components


Take the bottom or top out of a largish tin can and cut the rim off it with some heavy duty scissors or snips.
Try to locate the centre of the disc and punch a small dent right there, without punching right through.
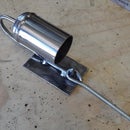
Make yourshaft from straight length of high tensile wire, or a bike spoke. Sharpen one end with a grinder or file.
Try to balance the disc on top of the shaft by placing the centre dent over the point of the shaft. If it doesn't sit level snip a tiny bit off the disc at the heavy (low) side to try to make it balance. Do this again and again until the disc sits level on the sharpened wire.
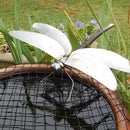
Cut the vanes of the windmill into the disc with scissors. Just make simple cuts at even intervals right around the disc. My cuts were all about 35mm long and 10mm apart at the outside. All the cuts should point to the centre of the disc.
With pliers, carefully twist the vanes so they are all at about the same angle. I guess about 30 degrees from the plane.
Step 3: Assemble Your Windmill

Carefully insert the shaft of your windmill into your Bacon Powered lamp, just inside the edge of the tin. Push it through the fat and sand, right to the bottom. Make sure it is as vertical as you can make it.
Gently place the fan part of the windmill onto the shaft so it balances level.
To make the wheel spin even more smoothly you can lubricate the point of the shaft with some bacon fat.
Step 4: Fire It Up and Enjoy


Simply light the lamp and watch the excitement grow as the windmill starts to turn. Faster and faster. Turning. Rotating. Spinning. Twirling.
You will probably want to share this fun with friends and neighbors. Perhaps you could get them to bring around some beers. And some food, because you will be hungry with all that delicious bacon aroma filling your nostrils.
I hoped you liked this bacony Instructable.

Finalist in the
Unusual Uses: Kitchen Challenge

Participated in the
Bacon Challenge


