

Introduction: Banker’s Station for Monopoly


People often fall into one of two camps with Monopoly: Love it or hate it. (If you hate it, check the very end of the video for tips on play that might help the games not take as long. Biggest hint, re-read the rules!)
I happen to be in the category that enjoys playing the game.It has special meaning for my family since my mother grew up on Ventnor Ave outside of Atlantic City, one of the yellow properties in the game. She wasn't too far from Marvin Gardens, and we often took walks on the boardwalk while visiting my grandparents.
My oldest son went through a phase where he wanted to play Monopoly a lot, and our vintage style edition of the game didn't have anything to hold the money or properties. This meant keeping the bank organized during play was a losing battle. To solve the problem, I built us a banker station using walnut and maple. Later, I made another version out of red oak and maple so I could document the process. That is what is shown in this video and this Instructable.
Step 1: Measure the Money


There seems to be some variance in the size of bills from one edition of Monopoly to the next. In my case, the bills were 1 3/4" by 3 3/4". In some sets, the bills are 2" x 4". So start by measuring the bills, as the money base measurements depend on it.
Add some extra space to the width and length (In my case I added 1/8" to the width, and 1/4" to the length) to figure out the size of money section.
Next, use this formula to figure out the dimensions:
- Total Width = ( (W + D) x 6 ) + W
- W = the desired width of the money section
- D = the divider thickness
- Total Length = L + 3/4
- L = the desired length of the money section
So, in my case (Using decimal notation to make this easier), w = 1.875, d = 0.25 the formula becomes ( ( 1.875 + .25 ) x 6 ) + 1.875 = 14.625, or 14 5/8".
My total width of the money base was 14 5/8" and my total length was 4 3/4"
You can take a look at a 3D render of the finished model to get a feel for how the money dimensions influence the other dimensions. The opening between the frame divider and right side of the frame is 3" wide.
Step 2: Cut Out the Parts


Here are the dimensions of the parts needed for this build. Cut the front and back rails longer than finished dimension to allow it to be trimmed to length. And remember, if your bills were a different size than mine, these dimensions will need to be adjusted.
Hard Maple (Or a light colored wood)
- 1/4" × 7/8" × 4" (6x) Money Dividers
- 1/4" × 4 3/4" × 14 5/8" Money Holder Base*
- 1/4" × 3 1/2" × 5 1/4" Tray Bottom*
- 3/4" × 14 5/8" × 2" Card Holder **
* These parts could also be made out of plywood as only the top is visible.
** I used a piece thicker than 3/4 to build mine. See step 12 to understand how this impacts the build.
Walnut or Red Oak (Or a contrasting wood)
- 3/4" × 3/4" × 20" (2x) Front and Back Frame Rails
- 3/4" × 1 1/2" × 6 1/4" (3x) Frame Ends and Frame Divider
Tip: Use a cross cut sled on a tablesaw with stop blocks for the repeated cuts
Step 3: Notch the Ends and Divider


The ends of the frame and frame divider overlap the front and back rails. I used a cross cut sled with a dado stack to notch them out, but you could cut this using just a hand saw or even a normal table saw blade (just with more passes).
If you are using a similar setup as I used, then set the height of the blade using the front or back rail, and make a test cut in some scrap to dial in the correct height.
Once that is set, you can set up the stop block for the width of the cut using this method:
- Align a piece of wood with the kerf in the sled, clamp it into place (This was the right side of the sled from my vantage point)
- Position the front or back rail against the clamped block, over the kerf in the sled
- Slide another stop block up against the front or back rail, and clamp that into place (Use a taller block than mine – it almost was too short!)
Now you can take multiple passes, sliding the part closer to the stop block with each pass. This way the cut will never go deeper than needed for a good fit.
Step 4: Make the Card Holder


You first need to make three cuts at different depths with a thin kerf blade, with the goal being to evenly space the cuts. Take the deeper cuts in multiple passes to limit burning, and make the cuts safer.
These don't have to be exact, but you want the difference between then to at least be the height of the color bar at the top of the property cards.
My cut depths were (Rounded to the closest 1/16"):
- 1 11/16" deepest cut
- 1 1/8" middle cut
- 9/16" shallow cut
Once the slots are made to the different depths, you can set the saw to a shallow angle, and begin to trim the different sections of the holder.
Start by cutting the tallest section first, then work your way down. The last cut will be the least supported on the saw, so use a push stick that can keep a good amount of pressure on the supported part of the cut. You want to leave about 1/2" of a lip in front of each kerf.
Step 5: Prepare the Money Holder


Trim the front of the money holder base to a 5º angle.
Next, set up a dado stack to fit your dividers’ thickness. It took me three tries to dial it in, but when it is correct you should be able to push the divider into the dado easily, and then you should be able to pick up the test piece by holding just the divider. If it stays in place, you have a good fit!
Remember, you only need one setup to cut two slots if you use stop blocks. Start at the outside, and work your way in. Cut one dado, then flip the piece around and cut the mirror dado on the other side. With this approach you should only need 3 setups to cut all 6 dadoes. Remember your dimensions from earlier, because the first stop block will be setup W away from the blade (1 7/8"). The next will be setup W + D + W away (4"), and finally W + D + W + D + W (6 1/8").
Step 6: Round Overs


The dividers as well as the frame ends and frame divider get matching round overs. To form these, I started with a sacrificial piece, and then clamped all the parts together before making multiple passes through a round over bit. (The sacrificial piece is the last to hit the router bit, and it prevents tear out of the other pieces)
The dividers only need the round over on the front. So after that was formed, I removed the dividers from the clamps, and then setup to cut the round over on the other side of the frame sides and frame divider.
Step 7: Rabbet for Tray Bottom


At this point, you can dry assemble the parts you have so far, and mark on the front and back rails where the side tray compartment will end up. The tray bottom will sit into a rabbet formed in the frame divider, right frame side, and front and back rails.
I cut the rabbet on the frame divider and right side over at the router table. I did the same for the front and back rail, using lines on top of the rails to figure out where to start and stop my cuts on the router table. Stop blocks could also be used for a little more precision.
I cleaned up the rounded cut using a chisel.
Step 8: Sanding


I cleaned up the parts on the disc and belt sanders. To remove some burn marks from the card holder, I found I could protect the front of the holder using a metal ruler, and use a multi-tool sander to clean up the different levels. Be sure to ease the sharp edges on the frame and dividers. You don't want anyone getting cut trying to get money out of the bank!
Step 9: Tray Bottom and Rails


At this point, take a final measurement to get the dimensions for the tray bottom, and cut that over at the table saw.
You should be able to cut the front and back rails much closer to length at this point. If they are still long, you can sand them flush after glue up.
Step 10: Glue Up


Take this in stages to make it easier. First glue in the dividers (holding the money holder in place to make sure they are aligned). Next, glue the card holder in place, clamping to the dividers.
When you glue the frame together, drop the money base in place to make sure everything is tight – but remove before any squeeze out would attach it before we are ready.
Once the glue dries, you can trim and sand the front and back rails flush.
Step 11: Finger Holds


This step is truly optional, but it adds a nice finish to the piece. I used a round router bit to add finger grips to the sides of the banker station. I just eyeballed start and stop points based on my fence setup and the width of the front and back rails – but you can utilize stop blocks or marks on the fence to get a consistent length.
Step 12: Fit the Money Holder Tray


My money holder was thicker than the 3/4" I call for in my design. Because of that, I had to remove some material from the back to allow the holder to overlap the back rail. This is optional, but if you have trouble getting the 3/4" money holder cuts to work, you could use a thicker piece and include this step in the build.
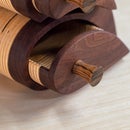
Ugly Joinery Warning: Of all the parts in the build, I really wish I had a better suggestion here for gluing the base in place. You could just apply wood glue to the edges of the tray, and push it into place (but be careful or glue will smear all down the insides of the walnut side and divider.
The way I built it, I got the money holder seated into place, then used CA glue to glue three small 1/4" thick offcuts into place (also cut at a 5º angle). I then ran CA glue along the left and right seams. I used CA activator to quickly set the glue.
Step 13: Apply Finish

Nothing much to add here except use your favorite finish! I used shellac, but a danish oil or other oil finish could look quite nice.
Step 14: Fill It Up!


To use this setup, I position all the properties by color into the different sections. I fan the properties out a little, and work from front to back, left to right. This means the fourth group is back in the front again. I personally fill them using their placement on the board, so purple, then light blue, then pink, etc.
This design doesn't make every property fully visible, but in practice it makes it really easy to see what is still for sale and retrieve the properties when purchased.
It lacks any storage for Community Chest and Chance cards though, so you can just stack them over two money areas when not playing the game. Obviously, they are on the board while a game is going.

Participated in the
Game Life Contest


