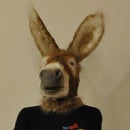
Introduction: Donkey Mask With Working Mouth (face Puppet)
- Promote the Democratic Party
- Play a practically-themed joke on a farmer
- Scare your dog
- Make an ass of yourself
- Portray Nick Bottom in A Midsummer Night's Dream
- Rob a bank
- Reduce your entrance fee at a Furry convention
Step 1: Aquire:
- 24"x48"x1" medium density fiberboard
- Modeling clay
- 2 sheets of 28"x28"x.06" PETG plastic
- 2 sheets of 28"x28"x.06" polystyrene
- 1.5 yards of artificial white fur
- 1.5 yards of muslin
- Silicone rubber (OOMOO 25, 9 lb. unit)
- Expanding polyurethane (FlexFoam-iT! III, 2.8 lb. unit)
- Thread
- Harness from a welding helmet
- 2 post screws
- Various nuts and bolts
- Several double-capped rivets
- Elastic
- Airbrush paint
Tools used in this project include:
- 3D Scanner
- ShopBot CNC router
- Vacuum former
- Cordless drill
- Hammer
- Basic sewing tools
- Razor blade
- Airbrush
- Hairbrush
- Bandsaw
- Electric trimmer
*all available at TechShop
Step 2: Sculpt
This donkey began as a 3” clay sculpture. The addition of fur has a surprisingly fluffing effect and adds a lot of volume, so make sure you start with a properly thin shape to achieve the right look when fur is added. With access to the equipment at TechShop, I was able to create a full-sized form of the donkey head by taking a 3D scan of the clay sculpture and milling an idealized reproduction using a CNC router. One of the finest advantages this process offered was the ability to create a perfectly symmetrical shape using Autodesk 3DS Max.
Step 3: Vacuum Forming
The two mirror parts were machined separately in MDF then sanded and coated with gesso. The nostrils and corners of the eyes were drilled-through to prevent air pockets from forming during the vacuum pull. The parts were vacuum formed in PETG plastic for its clarity and strength, as I wanted the eyes to be clear and saved weight and money by making them a molded feature of the superstructure. PETG costs more than ABS or styrene, but the cost difference is outweighed by the extra cost of adding clear eyes after the fact. PETG picks-up extremely fine detail, so make sure your working with a perfectly smooth surface. Slight imperfections can be smoothed-out with a head gun or a cigarette lighter.
Step 4: The Two Halves Become One
To join the edges of the two vacuum formed halves, I cut polystyrene mending plates and attached them with double-capped rivets, usually used for leather work. Although they can't be removed without destroying them, they are are cheaper than nuts and bolts and, more importantly, they provide a very low profile, allowing the form to sit close and comfortably on the head. They can be easily drilled-out for removal.
Step 5: Snout
I wanted the snout to be soft and responsive to touch, so it was cast in soft urethane foam from the same original, the process is covered here.
The muzzle shape is bolted into the top of the nose bridge and the front of the chin but not the sides. This will allow for movement when the jaw is opened and closed.
To give a natural transition from the dense fur to the hairless snout, some strands will be hand-punched into the foam.
Step 6: The Bridal
I am using a harness from a welding helmet to hold the mask tight on the head. The pivot point for the jaw is about 2” behind the eye. A post screw is used for its low profile and ease of installation and removal. The tricky part here is getting the human’s jaw to just contact the donkey jaw so they will move together.
Step 7: The Fur
To create the skin, I first created a test pattern in muslin over one of the MDF forms. Fur is too thick to create a tight pattern with inside out. This is where the directionality of the fur's grain is decided. The final pattern consists of two pieces, one for each side of the head with fur growing out and down from the middle. There are also short seams above the eyes to make the fabric fit the cranium. I also left extra fabric around the jaw to allow for the mouth to open. This is recommended even if you are using stretchable fur. Always cut fur from the backside with a razor blade. This will ensure you only cut the backing and not the fur itself, which will give an unnatural barber-cut look.
The completed pelt is attached to the plastic form by stitching through many small holes drilled through the plastic. Contact cement is an option but does not allow for easy removal of the fur (mistakes happen). The most important place to attach the fur is around the corners of the eyes and the edges of the plastic form. I also stitched it at a few other points to bring-out the shape of the brow and the jowls.
Step 8: Trimming Your Donkey
One of the keys to a realistic coat of fur is the natural variance of length and density across different parts of the animal. I used a $20 electric trimmer for most of the head, and the scissors on my Swiss Army Knife for the fine work around the corners of the eyes and mouth. I kept the fur long on features I wanted to accentuate, like the brow and the jaw.
Step 9: Painting Your Donkey
I have found the best paint for artificial fur is the Wicked line of Createx airbrush paint. Be careful not to add too much reducer, you want just enough paint to change the color of the fur, any more will affect the texture and behavior. Start by fluffing the fur with a hair brush to allow the paint to penetrate to the backing. After a complete coat, you can leave the fur to dry or brush it again to separate and arrange the hairs. If you don't have access to a proper airbrush, you can use a pump sprayer, though this will require more vigorous brushing to give a properly even coat.
Createx paint also sticks to the urethane of the snout.
Step 10: Ears
You're probably wondering why I haven't added the ears yet.
For the structure of the ears, I am using basic plastic boning, available at the fabric store. It is a strip of springy plastic inside a fabric sleeve. Once again, using the cap rivets, I joined two lengths of boning to control the curve and add rigidity. I then riveted it to the plastic shell. Now the donkey has antennae.
The pattern for the ears is 12" tall and 7" wide, to allow the fur to be wrapped around in the shape of the donkey's Spanish derrivative word (burrito=small donkey, because it's shaped like a donkey's ear). When sewing fur inside out, try to keep the fur inside so it doesn't get stitched. This will probably happen anyway, so be ready to pull out the caught hairs with a needle or seam-ripper. Once right side out, I sew a few stitches across the length of the ears to join the two layers and keep the ears realistically flat. Sewing directly over the fur means there will be a lot of fur to pull out of the stitches, but this step is worth it.
Step 11: Helicopter Bunny
At this point, the ears are bulky and heavy, making the donkey look like helicopter bunny. The final shape and position of the ears will be a result of how the fur is stitched to the head. I opted not to use a stiffer wire to hold up the ears so as to keep them responsive to touch. They can flex and pop back up again.
All they need now is a quick shave and a coat of paint.


