

Introduction: Conductive Fabric Pressure Sensor


These step-by-step instructions will show you how to make your own fabric pressure sensor. It mentions two different variations, depending on if you use stretchy or non-stretchy fabric.
The materials used for the sensor are basically cheap and off-the-shelf. There are other places that sell conductive fabrics and Velostat, but LessEMF is a convenient option for both, especially for shipping within North America.
Velostat is the brand name for the plastic bags in which sensitive electronic components are packaged in. Also called anti-static, ex-static, carbon based plastic... (So you can also cut up one of these black plastic bags if you have one at hand. But caution! Not all of them work!)
To make the sensor fully fabric one can use EeonTex(TM) conductive textile (www.eeonyx.com) instead of the plastic Velostat, but at the moment EeonTex(TM) conductive textile is only available in a minimum of 100yds.
This is an improvement on the Flexible Fabric Touchpad Instructable, using "iron-on" and plastic ex-static instead of the fabric which is less stable in maintaining resistance between the two conductive layers.
To see what we use this technology for visit:
www.massage-me.at
www.plusea.at
www.kobakant.at
VIDEO
Step 1: Materials and Tools


MATERIALS:
Stretchy version:
- Cotton jersey
- Stretch conductive fabric from http://www.lessemf.com
also see http://cnmat.berkeley.edu/resource/stretch_conductive_fabric
- Fusible interfacing from local fabric store
Non-Stretchy version:
- Cotton
- Shieldit conductive fabric from http://www.lessemf.com
also see http://cnmat.berkeley.edu/resource/shieldit_super
it already comes with heat glue fused to one side
Both versions:
- Velostat by 3M from http://www.lessemf.com
also see http://cnmat.berkeley.edu/resource/velostat_resistive_plastic
- Thread
- Machine poppers/snaps
TOOLS:
- Pen and paper
- Ruler
(- Compass)
- Scissors
- Iron
- Sewing needle
- Popper/snap machine (hand held or hammer and simple version)
Step 2: Stencils


Decide on a shape for your pressure sensor. Consider that you will need to create two separate tabs for the two layers of conductive fabric and that these should not touch each other (see pictures).
Fabric: sketch the shape for your sensor onto some paper or cardboard, including both tabs.
Velostat: create a 5mm smaller version of this shape, not including the tabs.
Conductive fabric: create a 10mm smaller version of the fabric shape that only includes one of the tabs. If your shape is not symmetrical you might have to create two stencils for this part.
Thrace these stencils to the fabrics and cut out the correct number of times:
2x Fabric, 2x Velostat, 2x Conductive fabric
If you are working with stretchy fabric and thus stretch conductive fabric or any other kind of conductive fabric that does not already come with fusible attached, you will want to fuse (iron-on) some interfacing to it before you trace ad cut out your shapes.
Step 3: Ironing-on (Fusing)


Now that you have all of the shapes cut our of the fabrics you ill need. You can fuse (iron-on) the conductive fabric to your fabric pieces (see pictures).
Also, if you are working with stretchy fabric you will want to cut two small pieces of non-stretch or thicker fabric the size of your tabs and fuse these to your tabs so that when you punch the poppers through, the stretchy fabric does not damage when stretched.
Step 4: Sewing


Sandwich your piece of Velostat between your two pieces of fabric fused with conductive fabric, so that the conductive fabric faces inwards, towards each other, separated only by the Velostat.
Thread a needle with regular thread and stitch around the edges. Or if you have a sewing machine, you can also use this.
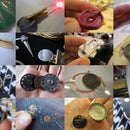
Step 5: Poppers


Read the instructions on how to use your popper machine. Attach a female popper to one side and a male popper to the other, preferable facing the same side.
Step 6: LEDs and Vibration Motors


If you happen to be working a lot with poppers and circuits you might like to modify a set of crocodile clips to have poppers on one end. Otherwise you can just clip on to the poppers.
To visualize with a multimeter, create the following setup (see pictures and video):
Set multimeter to measure resistance (in Ohm), should be between 2 K Ohm - 10 Ohm for stretch conductive fabric and X - 200 Ohm for Shieldit conductive fabric. Of course this depends on the size of your conductive surfaces and how tight the initial pressure from your stitching around the edge is.
Attach the multimeter plus to one side of fabric pressure sensor (doesn't matter which side) and multimeter minus to other side of fabric pressure sensor. Apply pressure and watch the resistance value change. You might have to adjust the range if you don't see anything. If you have a constant connection then either you forgot to put the Velostat in between or somewhere your two pieces of conductive fabric are touching.
To visualize with LED or vibration motor, create the following setup (see pictures and video):
Connect the plus of a 9V battery to one side of the fabric pressure sensor (doesn't matter which side) and connect the other side of the pressure sensor to the plus of an LED or either side of the vibration motor (switching plus minus only affects the direction of the vibration motor, whereas an LED only works in one direction). Connect the minus of the LED or the other other side of the vibration motor to the minus of the 9V battery.
Apply pressure to the fabric pressure sensor and control the brightness of the LED or the strength of the vibration.
To visualize with microcontroller and computer:
For Arduino microcontroller code and Processing visualization code please look here >> http://www.kobakant.at/DIY/?cat=347
Videos
ENJOY!
Participated in the
The Instructables Book Contest


