

Introduction: Laser-powered Light Saber


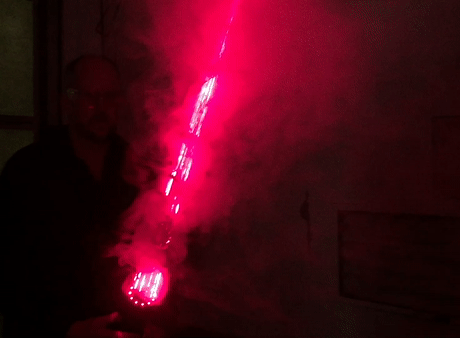
Ever since I saw Star Wars as a small boy I wanted to build a light saber. Decades later, I've crossed it off my bucket list. This instructable will show you how to make your very own laser sword/light saber using a laser array, an electronic cigarette, a couple of fans, a switch, and a 3D printed enclosure. It's mostly harmless and looks amazing, especially at night. Unlike the usual bright-lights-in-a-tube light saber, this one can be plunged into things, blazes dynamically and has the weightless blade you expect from a real light saber.
Step 1: Concept


The idea is a simple one, and was born when I cycled home one frosty night. While waiting for the lights I exhaled right down the axis of my 2000 lumen LED bike light, and a brilliant white beam lanced across the road. By the time I'd got home I'd hatched a plan to make a laser sword. The principal idea was that if I focused some laser beams as a plume of vapor dispersed, the light output would be roughly stable up to the focal point, beyond which both the beams and the smoke would BOTH be dispersing rapidly and therefore vanish, giving the beam a realistically finite length. I was an Artist in Residence at Autodesk's amazing Pier 9 workshop in the Fall of 2016, so what better chance to realize a childhood dream?
The trickiest thing I soon found was going to be focusing the lasers and producing fog reliably. My first prototype used dry ice and laser pointers (first photo), and while it proved the concept to be sound, the beams were all over the place (second photo) and the dry ice was awkward and short-lived. Soon after I arrived at Pier 9 I prototyped a 3D printed laser array (3rd photo) and hooked it up to a mains-powered fog machine (the kind you have at parties) and this looked pretty cool, even outside and without it being dark (animation above).
After a ton of online shopping research into small, battery-powered commercial fog machines ($800! Are you kidding me! And not even that small) I gave up and designed my own using a small fan, a 3D printed enclosure and an electronic cigarette. That problem being solved, I then designed a 3D printed array of 12 lasers that could be focused on a single point using set screws. It took a ton of testing and more prototypes than I have ever made for anything (except perhaps my 3D periodic table).
Step 2: Caution!

This device focuses 12 laser beams and produces fog using a powerful electronic cigarette. It is NOT a child's toy. If you make one, use with caution and consideration: do not point the plume of fog or the lasers at someone's face. I don't recommend making one using more powerful lasers than the ones I employed. They're plenty bright enough. I deliberately did not focus the lasers very finely - you get basically the same effect without having all 12 converging at a particular point in space.
Step 3: Materials

You will need to purchase the following parts. If you want to use different versions, you will probably have to redesign the 3D printed parts (see next step) to suit.
- 12 red laser modules
- 2 40 mm square 5V fans
- lipstick-sized battery charger
- electronic cigarette
- fog fluid
- switch
- 24 set-screws
Step 4: 3D Parts


I used Fusion360 to do all the 3D design. I'm a novice to solid modelling: Fusion360 is the only program I've ever used, but it made everything I wanted to do pretty easy (take jon-a-tron's 3D printing class if you want to learn more). Especially useful was the Create > Pattern > Circular Pattern tool, because it made duplicating the laser mounts trivial. The rest of it was a lot of careful measuring with calipers. The final design was the result of many iterations: prototypes had various problems, mostly with airflow, layout, hand feel and allowing room for wiring. Doubtless there is still room for improvement - if you'd like to tinker with the file yourself, it is publicly available. All I ask is that you share your tweaks back here again. If you're interested in the design process, play the screencast below to see how the design evolved (skip to 15 seconds for the start; my editing didn't seem to take).
3D print both attached parts using whatever color and material you like. I used a Stratasys Fortus to print in black ASA and in white polycarbonate. The prints are very strong, rigid and durable. The Fortus prints model and support in different materials, which means I had the luxury of not having to worry about supports because I knew they would be trivial to remove afterwards. Consider tweaking the design if you're not so lucky. E6000 bonds 3D prints together very strongly (another jon-a-tron tip), so slicing the print up into more parts (I use MeshMixer for this sort of task) then gluing them back together may be better than trying to print and removing the supports later.


Step 5: Mount Lasers


This part requires patience and some soldering skills. This probably shouldn't be your first electronics project - start with something simpler first, like the instructables Electronics Class.
1. strengthen the connections with heat-shrink tubing.
2. screw in all 24 set screws into the holes.
3. place laser module in housing and tighten the screws to the point they are JUST touching the laser module. Repeat 12 times.
4. Wire all the red wires together. I did this by soldering together 4 groups of 3 wires in each quadrant, then joined two of these together, then paired them all up. Protect all connections with heat-shrink tubing.
5. Wire all the blue wires together, as for the red wires above.
Step 6: Switch


Attach three wires to the switch according to the wiring diagram (note it says 12 V, but it works fine with 5 V). I chose to have the LED on only when the laser sword is on. Thread the wires through the three holes in the side of the casing, and press fit the switch in place.
Step 7: Power


I used a small rechargeable battery designed for recharging phones. This device puts out 5 V at up to 2 A, so has plenty of capacity for this application. Strip a USB plug and solder two wires to it. Plug the USB in and thread the wires through the gap at the end of the battery insert; press-fit the battery into place. It can be recharged while attached to the lasword, so hot glue it in place if you like.
Note that the rechargeable battery has a flashlight on the end. I didn't notice this when I bought it, but I retained its functionality by making a cut-out for the lens. It can be operated by pressing the on switch twice. Handy for when you need to refill the fog machine and it's dark!
Step 8: Fans


Thread the wires for the fans through the appropriate holes. Glue (or screw) the fans into their enclosures, taking care to get them the right way around (the cage is on the side that the air gets blown out of).
Step 9: Glue

I used E6000 and left the two parts to stick together overnight, held together with rubber bands.
Step 10: Final Wiring


Connect the red battery wire to the green switch wire. Connect all the remaining red wires together, and connect to the red switch wire (I did this by sequentially adding wires together, two or three at a time, and reinforcing each wire with thin copper scavenged from scrap wire. I used a chisel tip on the soldering iron to get the whole thing hot). Connect all the black and blue wires together (blue from lasers and switch, black from fans). Reinforce all joints with heat-shrink tubing.
Test as you go along. Once everything is working as it should, tape all the wires down securely. I used electrical tape then some black gaffer tape.
Step 11: Align Lasers


This step requires some patience. You're trying to get all 12 lasers to point at the same spot, about 3' (1 m) away from the laser array. Use a 0.05" Allen key and a thin-bladed screwdriver. Don't overdo the tightening! The laser pivots on a triangular wedge of plastic, and the laser and the wedge can both be crushed. Use the screwdriver to ensure the laser is straight, then align along the diameter using the set screws.
Step 12: Fog Machine


The heart of the laser sword is a portable battery powered fog machine. I made a proof-of-principle prototype of this before forging ahead with the final version. Basically, all you need is a small fan to blow (or suck) air through an electronic cigarette mounted in a 3D printed enclosure. However, for the laser sword, I didn't need a fine stream - I wanted a wide column - so I put the fan on top of the mouthpiece and guided the fog through 12 holes, one for each laser. I also wanted a more forceful stream, so I used two fans: one to blow into the electronic cigarette, one to draw the fog out. The electronic cigarette just press-fits into the enclosure. It is controlled with its own mechanism: you switch it on (by pressing five times in quick succession), then hold down the button for up to 10 seconds to generate a plume of fog. Set the power to higher wattage for more voluminous fog. I generally set mine to about 25-30 W (out of a maximum of 80 W).
Step 13: Fire It Up
The laser sword requires a particular sequence to operate, and so is child-safe.
1. Press the battery button once. The blue light will come on.
2. Press the large silver button once. The red LED will light up and the fans and lasers will switch on.
3. Rapidly press the electronic cigarette button five times.
You're ready to go! When you want the beams to become visible (the 12 laser dots will always be visible if you're pointing them at anything other than the sky, of course), press the big button on the electronic cigarette. Predictably, it is most effective in the dark and when it is relatively still (especially inside), but even when windy the "blazing dagger" effect is cool. Below is the laser sword ignited in a strong breeze.

For more video of it in action, see Donald Bell's Maker Project Lab footage, and this instagram video from Dat Phan. Both were taken at the final Artist in Residence showcase at Pier 9 in December 2016.
Acknowledgements: Many thanks to Taylor for Fusion 360 expertise, Jon for 3D printing tips, Scott for electronics advice, and Blue for photography help.


