

Introduction: NODEMCU LUA ESP8266 Connect to MySQL Database


This instructable is not for the faint hearted as it uses XAMPP (Apache, MySQL & PHP), HTML and of course LUA. If you are confident at tackling these, read on!
I use XAMPP as it can be set up on a pen drive or your hard drive and it is configured to run right away. There are other WAMP (for Windows) and LAMP (for Linux) servers out there that will work just as well and if you are really brave, you can set up a server from scratch!
You can get XAMPP here : https://www.apachefriends.org/index.html
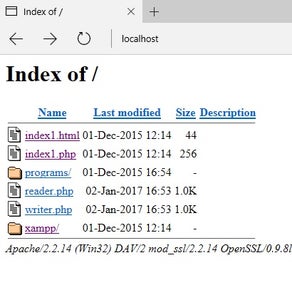
TIP: Rename index.php and index.html to something like index1.php and index1.html so that you get a list of the programs in the browser, rather than it jumping to the XAMPP start up screen.
Step 1: Installing and Running XAMPP

Once you have downloaded XAMPP, follow instructions on setting up and when you are finished you should get start screens like those above. You need to start Apache and MySql for the LUA program to work.
L:\xampp\xampp-control.exe
Change the drive letter (L:) to wherever you have installed XAMPP.
Step 2: MySQL
When you have Apache & MySQL running start the cmd.exe and then type
L: and the RETURN key - or wherever you have installed XAMPP (L is the drive letter assigned to my pen drive yours will probably be different)
then
CD xampp\mysql\bin and the RETURN key.
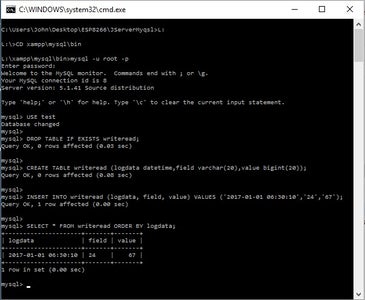
Start up MySql by typing this at the DOS prompt (as above).
mysql -u root -p
then press RETURN when asked for a password.
Then you can use the scripts below and you should see something like above.
USE test

DROP TABLE IF EXISTS writeread;

CREATE TABLE writeread (logdata datetime,field varchar(20),value bigint(20));

INSERT INTO writeread (logdata, field, value) VALUES ('2017-01-01 06:30:10','24','67');

SELECT * FROM writeread;
I have used the root directory without a password and the test database to create my table. This is a standard set up for MySQL with no security features enabled.
Step 3: The PHP Files


There are 2 files included, 1 to write the data to the database table and 1 to read it back and display it in the browser.
For security reasons, PHP files are not allowed to be uploaded to this site, so when you download reader.txt and writer.txt, rename them to reader.php and writer.php, and load them into the htdocs folder of XAMPP.
You can test if writer.php is working by typing
localhost/writer.php?field=7&value=3
or
127.0.0.1/writer.php?field=7&value=3
into a browser and if everything is working you should get an extra entry in the database table.
The reader.php program lists out all the rows of the table into your browser. Run this program by double clicking it in the browser or by typing
localhost/reader.php
or
127.0.0.1/reader.php
into the address bar of the browser.
Attachments

Step 4: The LUA File


The file jlwriter.lua is to be on the ESP8266. I used it on a WeMos version, but there is no reason why it should not work on any ESP8266.
If you are still with me and everything has worked, you should see a screen as above.
TIP: When using MySQL pressing F3 saves you typing in the whole script again.
In the LUA program change (line 29) to the IP address of whatever your PC uses to connect to your router or modem.
conn:connect(80,'192.168.0.10')
Type ipconfig into the Command prompt (cmd.exe) to find your IP address.
Attachments
Step 5: Editing Code

I find a good code editor is Notepad++ which can be downloaded here
https://notepad-plus-plus.org/
It can be used with many different programming languages or scripts and it's free.
I have included setup.txt to set up your MySQL table if you want to use PHP to do it instead of the method above.
Again you will need to change the file name to setup.php, then copy it into the htdocs folder.
Beware that running this file will wipe out any previous table and data.
Step 6: Conclusion
This has been a rather complicated instructable, but I did eventually get it to work. On the web, there are a few programs that are similar to this, but they are written for a DHT22 sensor. After trying these programs with limited success, I decided to gather everything I could find about MySQL written in LUA and start from scratch. After a lot of trial and error, I came up with this. I have used Apache, MySQL, PHP and HTML in the past, so had an understanding of how that side works.
These programs just scratch the surface of what you can do when connected to a MySQL database. It enables you to collect data and store it on your own PC rather than some unknown server. I hope there is enough here to give you a taste for what can be done with this powerful combination of programs.

![Tim's Mechanical Spider Leg [LU9685-20CU]](https://content.instructables.com/FFB/5R4I/LVKZ6G6R/FFB5R4ILVKZ6G6R.png?auto=webp&crop=1.2%3A1&frame=1&width=306)


