

Introduction: Runway on Fire


I designed this dress as part of a series.
I wanted this one to be a high fashion runway piece inspired
by the beauty of flames. I am so pleased with how it all came together.
I've made this "making of" so you can get an idea of how I put it together.
I hope it inspires you to make your own beautiful piece.
If you would like to see some more of my costumes you can visit my website:
http://littlewingsdesign.com/costume.html
or you can visit my etsy shop:
http://www.etsy.com/shop/fairystitchfactory/
Materials:
Fabric:
- 5 yards yellow Chiffon
- 5 yards Red Chiffon
- 5 yards orange chiffon
- 1 yard sparkly orange special occasion satin
- 1.5 yards red dupioni silk
- 1.5 yards fuze-able web
- 1.5 yards imported corset coutil.
- a mix of spiral steel boning and flatsteel boning.
- gold size 00 grommets
- a mix of various fire colored Swarovski crystals and crackle glass beads
- red and orange glass gems.
- brass metal decorations
Wings:
- clear cast epoxy resin (you need about 4 oz)
- galvanized steel wire
- black floral tape
- Orange and red basket wrap cellophane
- gold and red glitter
- a wood burning iron, incense sticks, or long matches your choice
- a hot glue gun
- a heat iron or regular iron
Step 1: Getting Started

I started with a corset pattern a friend of mine helped me to draft.
I always start by making a mock up. (Trust me this will save you
a lot of stress and wasted fabric later. It's worth the time I promise ^_~)
I use very heavy duck fabric to make them out of.
Look for something that is really stiff and can hold it's own shape.
You could use coutil, but it tends to run about $30 a yard so I
don't really find it worth it.
Once I got my fabric I started by cutting out my corset pattern.
Step 2: Mockup 1


After cutting out the pieces I pined them right sides together, and stitched the pieces together.
Step 3: Mockup 2


After the pieces are sewn together, I clipped the curves, and pressed the seams over pinning it in place.
This helps your curves to lay flat and prevents strange wrinkles and pulling.
Then stitch the seams down. This gives you a nice quick channel for your boning.
Step 4: Mockup 3


I make a lot of corset mockups so I have made lacing rails out of a strip of coutil and setting grommets in it.
This way I can just sew the rails on each mockup so I don't have to waste grommets on every mockup I make.
It also saves a ton of time, because it generally takes me a half an hour or so to set that many grommets with the die.
Once the rails are sewn on, I then slip the bones in the folded over seams.
Step 5: Mockup 4


At this point I laced up the corset mock up and try it on.
Then I looked over the mockup to see where I need to adjust it,
pull it apart, made the adjustments, sewed it back together and tried it on
again. I repeated this until it fits the way I want it to. (I'll save you the borring
parts of repeating the previous steps. This mock up took me 2 rounds of adjustments.)
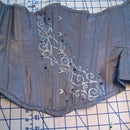
Step 6: Corset 1


and used it as a pattern.
What to cut:
- Cut 4 of each piece out of the red silk (2 for the lining and 2 for the outside)
- Cut 2 of each of the coutil
- and 2 of each piece out of fuse-able web
Step 7: Corset 2


Next I took 1 piece of the red silk, the corresponding piece of web, and coutil piece.
I placed the fuze-able web in between the coutil and the red silk.
I set my iron on steam and slowly ironed the piece.
This fuzes the coutil and silk into one piece.
This method makes a really smooth corset. It prevents a lot of wrinkles
from the fabric stretching more than the coutil.
Step 8: Corset 3


I like to serge the edges of all of my corset pieces to prevent fraying. This keeps them
from being a pain to work with, keeps them from shrinking due to loss of threads,
and just makes the overall corset stronger. I have a Brother 1034D but any over locking serger will do.
After I have serged all the pieces I pined the right sides together and sewed them all together.
Step 9: Corset 4


Then I pressed Seams down and stitched them over as on the mockup.
Step 10: Corset 5

Then I Inserted bones. The lengths of them will depend on your torso.
You want your bones to go right up to your seam allowance to really
keep your corset taught. I tend to use 1/4 inch spiral steel on the sides and bust
and 1/2 inch flat steel on the center front seam.
This gives you a nice flat shape in the front while giving you a little bend in the waist.
Step 11: Corset 6


I then painted a swirling gold fire design on the outside layer of the corset.
I used Lumiere gold fabric paint. You really just need a little creativity, some confidence, and a thin brush.
Don't worry, if you make a mistake, generally you can make it into something cool that looks intentional.
Step 12: Corset 7

I then added the beads and swarovski crystals to the corset.
I sewed them on with clear thread, passing through each bead at least 4 times before
knotting the back and cutting the thread. If you do the beads all on one thread, you run the risk
of loosing one bead and having it all unravel. This way if you break a thread and loose a bead,
you don't loose a whole bunch of them. It takes a little more time this way, but makes them much
more durable.
I also used epoxy glue to set the glass gems into the gold settings and sewed them onto the corset as well.
Step 13: Corset 8


Next I sewed together the pieces of the lining.
I also stitched some bias tape along the side of the bust
to insert a small bone to keep the sides of the bust of the corset
stiff enough to hold their shape. I used a spiral steel for this simply because
it was what I had lying around that was short enough. A flat steel might have been
a bit stiffer.
Step 14: Corset 9


I pinned the lining to the outer layer with the wrong sides together.
Then stitched slowly down the center of each seam on the right side.
This is often called "stitching in the ditch". It keeps the lining lined up with
your outer layer and prevents wrinkling.
Step 15: Corset 10


Then I cut some strips out of the silk for the binding.
I used 4 strips for this corset.
1 for the bottom binding, and 3 for the top.
(One piece for each side up to the point, and one on top of those in the center u)
I pined the binding along the top of the piece, stitched, turned it under, and then stitched it again.
Step 16: Corset 11


I marked the pacing of the grommets and set them with a grommet setter.
Marking helps me set them in a nice line, I have a tendency to make them uneven
if I don't do this. I tend to use a lacing bone as a guide, but you could just use a ruler.
Step 17: Skirt 1

I tend to use a stock pattern to establish a really basic shape
for my skirts and alter them from there. I used butterick 3843 in this case,
and the truly Victorian autumn overskirt as a loose base for the front.
Step 18: Skirt 2


I cut out the back of the skirt out of each color of chiffon, making each layer slightly shorter than the last.
I wanted a colorful layered fire effect.
Step 19: Skirt 3

I sewed the front sides to center front matching the right sides,
and repeated on the other 2 layers.
Step 20: Skirt 4


I then pinned yellow back piece on the dress form and pleated the back snug.
I did this with the other 2 layers, and then serged them all together at the top.
Step 21: Skirt 5


Next I pinned the from layers onto the dress form.
I then pinned in the pleats, arranging them until I liked how the front
was draping.
Step 22: Skirt 6


Next I laid the pleaded layers over the opaque orange fabric and used it as a base
to cut out the piece that would go under it. I then marked some darts on the piece
at the waist and sewed them.
Do not back stitch at the point. Instead leave the thread long
and tie a knot at the end. Then trim and press.This helps the
dart to lay flat.
Step 23: Skirt 7


Next I sewed the front to the back on one side.
I have designed this to be a wrap skirt so I serged the other side.
I pinned it to the dress form and pleated the back as I did on the chiffon layers.
Step 24: Skirt 8


Next I pinned the chiffon layers to the opaque layers.
I took some long fireplace matches and burned the bottom edges of all of the fabric.
This prevents fraying and gives a really cool tattered look.
I cut out strips of the chiffon, burned the edges and pinned them on in gathers on the left side
and the back. I don't tend to limit myself to a pattern. I tend to just pin things on and see how they look.
I pinned some tucks into the strips to make them wave like flame. I stitched them in place with some clear thread.
Just sort of have fun with it. Try things, you can always take them off if you don't like it.
Experimentation is the key to innovation.
Step 25: Skirt 9


I finished off the skirt by sewing on the waistband and skirt hooks.
I made it a wrap skirt so it's easy to get on, but the way it wraps it
looks like 2 skirts, and under skirt and an over skirt.
Step 26: Skirt Pin


I used epoxy glue to set the red gem in the brass setting, and then i used gorilla glue to
glue on the brass wings. After that set I glued a pin on the back.
Next I added chains and swarovski crystal drops.
I like to add little jewelry details on my dresses. It gives them a classy elegance,
and it's fun to make them.
Step 27: Shoulder Drape


I cut out a long strip of red chiffon and a shorter strip or orange chiffon.
I serged them with a rolled hem setting and then used clear thread to stitch
them onto the corset on one side. The rolled hem makes the fabric wave nicely.
They call this a "lettuce hem" I thought it was perfect for a fire dress.
Step 28: Beading

Lastly I added some beads to the skirt with clear thread.
I also made a necklace, but I didn't take pictures of the steps of that
because I was pressed for time alas.
Step 29: Earrings


I used epoxy glue to set the red gems in the setting.
I then glued the setting to another brass piece, and then added
earring hooks.
Step 30: Wings 1


I used Galvanized steel wire and black floral tape to make a wing frame.
Just cut the different veins of the wings and use the floral tape to wrap it all together in one piece.
Step 31: Wings 2


Then I traced the shape of the wings onto orange cellophane and cut out 2 of each wing.
This is just a basic shape at this point. It'll get refined in later steps.
Step 32: Wings 3


I cut out some red & orange accent shapes, sprayed basting spray on one layer of the orange cellophane,
and stuck them on. Then I stuck the wire frame down, and put the second layer of cellophane on top.
Step 33: Wings 4


I use a heat gun to shrink the cellophane to the frame.
(Be careful not to get it too close or you will burn large holes and tears into the cellophane.
This part take a little trial and error to get the hang of it.)
Then I take a hot glue gun, and fold the edges over the frame and glue them down.
I always burn myself at least once on this step, so do be careful.
Step 34: Wings 5


I trimmed the edges of the wings to the general shape I was looking for,
and then used a wood burning tool to burn the edges and add some holes for a more tattered
look.
Then I coat them in a layer of clear cast resin and add some glitter.
I used red glitter in this case to blend the accent pieces into the orange a bit more,
and soem gold glitter on the edges of the wings.
Then let them dry, the resin tends to take about 14 hours to dry per side.
Make sure they are laying flat or the resin will slowly slide off onto the tarp.
Also use a throw away brush, as you won't be using it again afterwards.
You need one brush per layer, and you need to let one side dry before flipping
the wings over and painting the other side with resin.
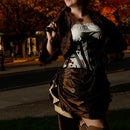
Step 35:

Photo by my husband Matt Norris
www.mgnorris.com
Hair and makeup done by me
To see more of my work visit my website
http://www.littlewingsdesign.com/costume.html
Step 36:

Photo by my husband Matt Norris
www.mgnorris.com
Hair and makeup done by me
To see more of my work visit my website
http://www.littlewingsdesign.com/costume.html
Step 37:

Photo by my husband Matt Norris
http://www.mgnorris.com
Hair and makeup done by me
To see more of my work visit my website
http://www.littlewingsdesign.com/costume.html
Step 38:

Photo by my husband Matt Norris
http://www.mgnorris.com
Hair and makeup done by me
To see more of my work visit my website
http://www.littlewingsdesign.com/costume.html
Step 39:

Photo by my husband Matt Norris
http://www.mgnorris.com
Hair and makeup done by me
To see more of my work visit my website
http://www.littlewingsdesign.com/costume.html
Step 40:

Photo by my husband Matt Norris
http://www.mgnorris.com
Hair and makeup done by me
To see more of my work visit my website
http://www.littlewingsdesign.com/costume.html
Step 41:

Photo by my husband Matt Norris
www.mgnorris.com
To see more of my work visit my website
http://www.littlewingsdesign.com/costume.html
Step 42:

Photo by my husband Matt Norris
http://www.mgnorris.com
To see more of my work visit my website
http://www.littlewingsdesign.com/costume.html
or to purchase from my shop visit
www.esty.com/shop/ibukij
Step 43:

Photo by my husband Matt Norris
http://www.mgnorris.com
To see more of my work visit my website
http://www.littlewingsdesign.com/costume.html
Step 44:


Finalist in the
Halloween Epic Costumes Challenge

Runner Up in the
BurdaStyle Fashion Challenge


