

Introduction: Small Parts Rack From Repurposed Chick-Fil-A Fruit Cups


When dining at my local Chick-Fil-A, I usually substitute a fruit cup for waffle fries (40 vs. 400 calories).
The fruit cup container looked useful, so instead of throwing them in the trash, I started taking them home and washing for future use.
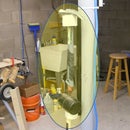
So to make a long story short, here's a small parts rack made from 5 fruit cup containers and some wood. I use it to store small electronic parts. A conduit clamp securely attaches the rack to my worktable. The original clear covers can be used to help protect stored items.
The basic design is a starting point that can be scaled up or revised as needed. Perhaps other food containers common to fast food restaurants and processed food can be repurposed like this.
Step 1: Materials and Tools


Materials:
5X Chick-Fil-A medium fruit cup containers
About 4 ft of 1 by 2 (actual dimensions are 3/4 by 1 1/2 inches) pine board
About 20 inches of 1/4 by 3/4 pine board (you can use any board less than 1/2 thk and 5 inches wide)
Wood Glue
1/4-20 hex head bolt 1/2 inch lg.
1/4-20 carriage bolt 2 1/2 lg
2X 1/4 inch flat washers
2X 2-1/2 lg wood screws
Conduit clamp matching the thickness of table where you plan to install rack. My table was 1/2" thick so I used this
Paper labels
The following material is used only as an assembly alignment aid (see Step 3)
3X 1" by 4" 1/4 hardboard
2X 3 1/2 " lg 2 by 2 board
Tools:
Wood Saw - I used a power miter saw, but any saw that can squarely cut boards is ok
Drill press or handheld drill with 1/4" and 5/32" bits
Router with 3/16" dia. straight bit
Tape measure and combination square
3X 12 inch bar clamps
Step 2: Fabricate Boards


Using 1 x 2 Pine board (actual dimensions 3/4 x 1 1/2) fabricate the follow parts:
a) Cut 2 pieces 16 inches long. Install 3/16 diameter straight bit in router and set cut depth to 3/8 inch. Cut five slots per DWG A: Slotted Uprights.
b) Cut 1 piece 5 inches long and drill 1/4 and 5/32 holes per DWG B: Top Cross-Member
c) Cut 1 piece 3 1/2 inches long. This is the bottom cross-member.
Using 1/4 thick by 3/4 wide wood strip (you can use any board less than 1/2 thk and 5 inches wide)
d) Cut 1 piece 16 3/4 inches long and drill two 1/4 holes per DWG C:Rear Upright.
e) Cut 1 piece 1 1/2 inches long. This is the bottom spacer.
Cut assembly alignment aids
f) Cut 3 pieces of 1/4 hardboard 1 inch wide and 4 inches long.
g) Cut 2 pieces of 2 x 2 boards 3 1/2 inches long
Step 3: Assemble Rack


a) Attach top and bottom cross-members to the slotted uprights - refer to illustration Rack Assembly part 1 of 3.
b) Attach rear upright and conduit clamp as shown - refer to illustration Rack Assembly part 2 of 3.
c) Glue bottom spacer between the rear upright and bottom cross-member as shown - refer to illustration Rack Assembly part 3 of 3.
Step 4: Installation


a) Locate the rack as desire on your table and tighten the conduit clamp. Note - the photo shows it clamped to the front rather than the rear of my table, but I just did this for better camera access.
b) Load parts into fruit cup containers and slide into rack slots. Optionally you can fit translucent cover to seal the top and/or add paper labels.
Enjoy !

Participated in the
Trash to Treasure Contest 2017


