Introduction: 3D Printed Berlin Uhr
Once in the year 1980 I was young and handsome. Now I'm only and. One a school trip to Berlin I saw a beautiful digital clock with a futuristic design. I decided right away to build this clock myself. This was the time before the introduction of the Commodore C64. Over the years that followed I have made this clock now for the third time. With evolving home equipment I have tried to make a better version every time. However the first on de Kuhrfurstendam has always been the best.
Step 1: The Clock
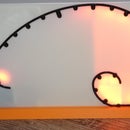
The dot on top blinks with the seconds. The lowest bar show 1 light per 1 minute. The second bar from the bottom shows a light every 5 minutes, the third bar show 1 hour per light and the last bar show a light every 5 hours.
So the clock in the title image show 10:31 (24H) because
1 minute + 6 times 5 minutes + zero hours + 2 times 5 hours.
How hard can it be.
On Wikipedia is a fine article on the clock, see the link below
Step 2: Electronics Hardware
The hardware of the electronics is quite simple. It contains 4 RGB LED strips of 11 LEDs and for the second a strip of 3 LEDs. The LEDs are connected together with wire. All +5 supply and GND can be connected in series. The first Din (minutes) is connected to D1 of the arduino. All the Dout are connected in serie to the next LED strip. See:
Monolithic-Clock - prepare led strip.
Step 3: 3D Printing
The clock contains may parts which are quite equal. I call the parts in front displays, the parts in the back, backs. The rest of the build is made of houses and dividers.
The upper part is the seconds colon which is made of an back_second, a house_second, a divider_second and a back_second printed in transparent color so you get a display_second. (3 files)
The upper row consists of a back_all, a house_end, a divider_end and a display_all
The second row has a different house and divider; i.e. house_mid and divider_mid. Plus the back_all and display_all
The third row has a divider with 11 parts; i.e. divider_5minutes. Plus the house_mid, back_all and display_all
The row below is the same a s the row on top but is rotated 180 degrees.
Just print:
1 x back_second
1 x back_second (transparent)
4 x back_all
2 x house_end
2 x house_mid
1 x divider_mid
1 x divider_5minutes
2 x divider_end
6 x connector
The shaft is made of three parts; shaft_top, shaft_connector and shaft_mid. You'll need at least these three prints. The shaft can be extended by printing more shaft_mid parts.
Attachments
Step 4: Software
The program is based on a number of examples which are combined. berlinUhr.ino is the mainprogram. ntp.h is made from an Arduino example for time keeping using Wifi and NTP time servers. wifi.h is used to connect to the wireless network. display.h is used to display time with neopixel led's. easterEggs.h and lightShow.h are cosmetical modules. Every hour the clock shows a light animation. easterEggs show on certain dates (eastern) a diffenrent color scheme.
Step 5: Famous Last Words
Trust me. I know what i'm doing.
If you like my project or have any questions, ideas or new plans for me feel free to place a comment.


