Introduction: 3D Printed Castle Planter (TinkerCAD)
My last Instructable focused on how to make a letter opener from wood. Following along with that theme, this Instructable will teach you how to make a nice desk paperweight using another commonly used 'making' technique - 3D printing!
If you don't happen to have the time to maintain a backyard garden or even the space to do so if you live in an apartment, you might not feel the need to try your hand at gardening. This castle planter was meant to be a low-maintenance planter that you can keep on your desk, on your windowsill, or really anywhere you need to add a bit of life.
Check out the completed design on Printables:
Step 1: Materials Needed
These are the materials / resources needed for this project:
1) A 3D Printer - Self explanatory. You might not necessarily need to own a 3D printer - maybe you have access to one at a friend's house, your local maker space, or even an online 3D printing service. I printed my castle planter on an Ultimaker 2+.
2) 3D Printing Filament - The filament is what is melted down to make your 3D printed object. It is fed through a nozzle and painstakingly arranged in countless rows of plastic until it eventually resembles an object. I used carbon fiber filament by Proto Pasta for this project.
3) A Decent Slicer - A slicer basically converts a 3D design into a format readable by a 3D printer. A free slicer you might have heard of before is Cura, which you can use on a Mac, Windows, or Linux.
4) Microgreens - This castle paperweight is meant to hold small, low maintenance plants. A good variety of plants that are small enough to fit inside of a paperweight are called microgreens. Not needed if you intend to use this project as a watercolor well.
5) A TinkerCAD Account - Essential if you plan on following my step-by-step instructions on how to replicate this project.
Step 2: Designs, Designs, Designs
As this is a 3D print project, you are going to need to either use my 3D model or make your own. If you would like to simply print mine, there are 3 ways you can access it:
1) TinkerCAD. Simply go this link to access this project on TinkerCAD, which is perfect for making edits of your own, downloading the file in a .stl or .obj format, and even sending it off to various 3D printing services to print and ship to your home.
2) Printables. You can find my castle planter on Printables here, where you can then download it for printing. Printables doesn't have editing features like TinkerCAD, but it makes up for it in other ways, such as allowing you to check out a huge variety of other people's prints.
However, if you would like to design and customize this castle planter for yourself, the next few steps will show you how to design it in TinkerCAD.
Step 3: Designing a Tower
First, we are going to make a tower to be used in our castle planter.
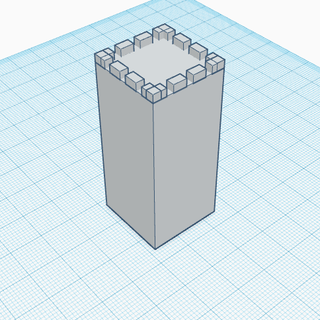
Start off by making a tall rectangular prism that is about twice as tall as it is long and wide. This will be the main structure of the tower.

Now, we need to add battlements. A battlement has two parts - the parapets, which are the low walls used for cover, and the gaps, for archers to shoot through. Add 4 rectangular prisms evenly spaced out along one side.

Duplicate these 4 rectangular prisms so that the battlements are on all 4 sides, for a total of 16 parapets.


Group the shapes together. This is the generic shape of the tower. Make a duplicate and set it to the side for later use as the center tower.

We are going to use TinkerCAD's "hole" feature to hollow out some portions of our tower.

First, make a large rectangular prism "hole" and center it in the tower to make a "pot" for plants.
Then, add 2 more rectangular prism "holes" on 2 adjoining sides of the tower, sticking slightly into the walls. These are for decorative purposes. Don't make them too deep, or the walls will be too thin. Note that you only need these decorations on 2 of the walls, the ones that will be facing outwards when we make the full castle.


Join the rectangular prism holes with the rest of the tower, and you will corresponding holes where they used to be. This is TinkerCAD's version of a "subtract" feature.

Step 4: Finishing the Castle
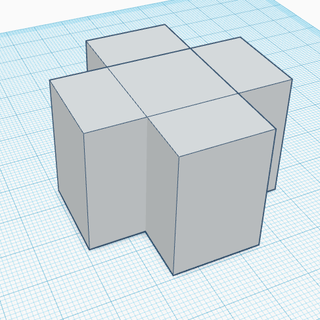
We now want to make the main portion of the castle. Make a "plus" by crossing two large rectangular prisms.

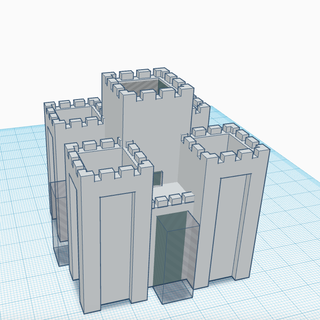
Then duplicate the tower from the last step and place them in the corners of the plus, with the decorations facing outward.

We are going to add some more battlements to the castle. Make 4 more sets of parapets (or duplicate the ones we used for the tower) and place them between each pair of towers.

Remember that extra tower from before? Make it taller than all of the other 4 towers and place it in the very center of the castle.

Now, make a rectangular prism "hole" and center it in the center tower.

This will be the largest of the pots used to hold plants.

We are going to "decorate" the castle the same way we did the towers. Get 4 rectangular prism "holes" and stick them slightly into the walls between towers. These are more decorations.

As a nice little added effect, make 4 rectangular prism holes to be doors. Place these on the main tower, facing towards the outer wall.

Group everything to hollow out the "holes" and merge all of the towers.


Step 5: Making a Hill
As any strategist could tell you, a castle is better off on a hill, where it can be easily defended from attackers. Even if our castle is just going to be used as a paperweight, it can't hurt to add a nice little touch to it.
To make the hill, I used one of Brandon Cole's community shape generators - the asteroid shape.

The asteroid shape generator was an easy way to make a more natural hill without having to add every little contour. First, set the coarseness to ~1 and size the hill so it is larger than the castle.

Then flatten it out (as no hill is a perfect orb).

Use a rectangular prism "hole" to cut off the bottom half of the asteroid, effectively turning it into a hill.


Move the castle on top of the hill and center it as best as you can. Raise the castle so as little as possible of the walls are inside the hill, and as much as possible is "on top".
Group the hill and the castle, and you have finished designing your castle!

Step 6: Printing Your Design
Now that you have finished designing your castle, it is time to turn it into a reality. If you are ordering it online through one of many 3D printing services, you don't need to worry about this step - just send in the file of the castle planter in whatever format the service you are using prefers.
Otherwise, it is time for you to open up a slicer software! A slicer software converts a 3D print into a file the 3D printer can understand. This is also the opportunity for you to decide what size and density you want your print.
As this project is meant to be a paperweight, I would suggest making it about 4-5 inches long/wide and 20-30% density (so it is heavy enough to weigh down papers). This planter is pretty sturdy, so I wouldn't worry about the number of shell layers too much - about 2-4 should be fine, as there aren't any delicate parts.
This print will definitely need supports. Make sure to enable them, or your print probably won't work.
Once you have make the last tweak, send the file to your 3D printer and print away!
Step 7: Maintenance and Use
There isn't really too much you need to do to maintain the health of your plants. Just make sure that they:
a) Get enough water - Seeing as this is an entry into a water contest, water is essential. Make sure that your plants get watered regularly (depending on how often they are supposed to be watered).

b) Get enough sunlight - Try keeping this paperweight somewhere that will get enough sunlight. Some simple solutions are keeping this castle near a window or even leaving it outside.

c) Get enough nutrients - Seeing as this is a small planter, make sure you use good quality soil so that your plants can get enough nutrients.


Step 8: Finish!
I hope you enjoyed the process of making this castle planter. All of the photos / screenshots used throughout this Instructable were taken by myself. If you have any questions on photography, or really anything in general, please feel free to mention them anytime.
I hope you liked this project. Above (and in the intro) are some glamour shots.
Have fun planting!
If you liked this design, feel free to check out my other models here:

Participated in the
Water Contest


