

Introduction: 3D Printed Christmas Decoration: Two Colours + Encapsulated Foil!


Well firstly I must thanks Penolopy Bulnick (https://www.instructables.com/member/Penolopy%20Bu...)
It was Penolopy's instructables and great innovative ideas that inspired me to make this experiment and instructable. . I did not realise that it was possible to print on various materials in order to get the most out of my printer and print something different!
As I mentioned, I am just sharing some experiments I made and hope that someone will find it useful and make something better!
Step 1: First Attempts


My first attempts were made by printing a thin layer directly onto the plastic foil. The plastic foil is the type used for wrapping chocolate Easter eggs in Italy for example. It is very thin (mine is 0.04mm!) but resistant. I had two sheets: one red and one gold. The red one seemed to shrink more than the gold one and the gold one seemed to stick better to the plastic. Hence, you may get different results depending on the foil. I also used a little alcohol to clean the foil, before using, in order to help the foil stick more. I also sprayed the foil with hair lacquer too.
The results were quite good but the foil could be peeled off and did not seem very permanent. However, the idea could be used to make rigid labels for example. In fact, I think it would be OK for labels that someone may want to fix to something with screws perhaps? ....just an idea.
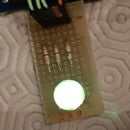
Step 2: Next Stage. Two Colurs and Foil Encapsulated Between Them!


For the next experiment, I cut a small disc of coloured foil, printed a disc in PLA aluminium, inserted the foil disc (having previously sprayed with plenty of lacquer!) and then printed over the top with transparent PLA.
The results were quite good but could be better with a thinner (transparent) layer in order to see the colours (of the foil) better. These could be used for earrings or for the discs that are sewn on oriental dancing clothes for example!
Step 3: Safety First

Well, my printer is a homemade printer made from an instructable: https://www.instructables.com/id/3D-Printer-2/
I know my printer very well. It is also not a very expensive printer. Hence:
- Follow this instructable at your own risk. I will not accept responsibility for damage or injury caused. Please follow the safety instructions for your printer and take care when using highly inflammable substances(alcohol, lacquer and plastic foil etc).
- If you do not know what you are doing or how to use your printer then do not follow this instructable.
- The printer must be well calibrated.
- Do not leave your printer unattended while making this.
Step 4: So Here Is How I Made It - First Draw a Suitable Part:


It won't please the sponsors, but I use FreedCad.
Download FreeCad: (https://www.freecadweb.org/wiki/Download/it) (It is open source so don't forget to support them with a donation!) and install it. Otherwise, use your favourite software for drawing in 3D: (inventor, Tinkercad etc). Penolopy's instructables show how to use TinkerCad for example.
I am not an expert at FreeCad and have only learnt from the internet. Perhaps there are better ways to do things but this is the way I know. If anyone has suggestions to improve then please feel free to comment!
1.Open FreeCad, select "part design" and create a new drawing,
2. Create a sketch and select the axis (X-Y for example).
3. Select circle (or other shape).
4. Position your pointer to a place on the grid and expand the shape. In my case I entered a radius of 45mm.
5. Close the sketch and select the "action" window and then "prisma".
6. enter the thickness and you should have a circle.
Step 5: Make a Protrusion


1. With the pointer, touch the surface of the disc.
2. Create another sketch
3. make a square on the outer diam. of the circle.
4. Close the sketch and make another "prisma". This time I had to select "inverted" so the "prisma" or extrusion goes the other way. (Otherwise it is above the surface of the circle).
Step 6: Make a Hole


1. Make another sketch
2. draw a circle in the middle of the square and enter a radius. In my case a radius of 1.0mm.
I positioned the circle approximately because it is not so important for this part. Otherwise, you can position with exact dimensions.
3. Close the sketch and make "Tasca" (pocket). You can give a dimension or select a "through
hole"
You should have a hole now.
Step 7: Prepare File for Printing


1. Save you drawing and then select OPEN SCAD mode.
2. Select the last action (our case "pocket")
3. Select "REFINE" see red arrow in image.(Cleans unnecessary lines)
4. Using "box select" select the "refined" part.
5. Choose "export" from the drop down menu and export as "object" (.obj).
6. You can close the file or leave it open but I "save as…" and give it a new name so that I always have the original.
6. navigate to the "object" file you created and open it. You need to (or at least I do) select "Alias Mesh mode" You will see the part is now a whole "smooth" part.
7. "Box" select it again and export as STL file.
8. You can save and close the file.
Step 8: Printer Settings


I use CURA so can only explain for this software:
1. Open the file you want to print.
2. Make the various changes to settings. You can see mine in the images. Please note that I lowered the temperatures later, in order to help prevent shrinkage of the film.
Set slow speed and resolution not less than 0.3mm.
In future, I will also make more attempts with perhaps less layers over the film.
3. Select "extensions" - "post processing" - "modify G code". then "add script" and "Pause at height".
4. The default values were already almost OK for me. The printer stopped and the print head moved to the rear right corner. Hence I could get at the print bed very easily.
5. Change number of layers / mm where you want the print to pause and enter a standby temp. (I put 170°C for PLA).
6. If you want to change material: add values for retraction of material and a value for extrusion. However, on my printer, it was easier to push some material through by hand.
ATTENTION: If you use the automatic extrusion, you have to be quick and clean the nozzle before the print head moves towards the part!! I used thin tweezers to remove the extruded filament.
In any case, you can see my settings in the image files.
When you save and exit, you should see a small square icon with a hammer and spanner next to the "save to SD" button.
Save the file to SD card and put in printer or send the file to your printer via USB cable..
Step 9: Printing the First Colour


1. Cut a disc from the plastic film. Clean with alcohol
and spray both sides with hair lacquer.
ATTENTION: Alcohol and Lacquer are very inflammable! You are working near heated parts!! Do so at your own risk!
2. Print the first colour.
3. When the printer makes the pause, spray the first material part with lacquer and place the plastic film disc on top. It is better to touch the plastic film (with hands) as little as possible. Use tweezers instead.
Smooth the film onto the part.
4. Change material and start the printer. (if you purge, remember to remove the material that is purged out!).
The printer will start to make the outer layer and this helps to keep the foil in place if you made it just slightly smaller than the outer diam. It is better. I did not cut the disc very well but the idea is to cut the film so as to leave a small space (1-2mm) between the outer diam. of the film and the outer diam. of the previously printed part.
Step 10: Printing the Second, Transparent Material.


As the printer covers the plastic film, you may need
to help keep it flat with a flat object. However, on smaller parts it is much easier and not necessary.
The first result with the red material was not so god because:
1. The transparent material is not very transparent!
2. there was quite a bit of shrinkage.
3. The printer missed a step because I think the print head caught on the red film.(you can see the film started to lift).
4. I would have been better to print a thinner part without infill!
Also I saw that the smaller, previous parts were a better finish and the colours more lively. Hence, I decided to make another attempt with the gold material.
Step 11: Final Print and Considerations


For this experiment, I just printed it all with
transparent PLA but made the pause so I could add the plastic gold foil.
I lowered the temperatures to 205°C. I found there was less shrinkage but not sure if it was due to the material or lower temperature though.
I also printed just one layer on top.
The end result looked better but was more delicate (with one layer). I need surely need to make a thinner part.
The small parts were better. They were only 1.5mm thick with no infill and I think this is why they had more lively colours. The larger parts are 90mm diam and 2mm thick.
The larger parts are perhaps not the best solution for Christmas decorations, but I think they could be improved with a bit of tweaking and patience!
Regarding the smaller parts, I think there is quite a bit of possibility as earrings, small decorations or labels, etc. Again, with a bit of imagination, tweaking and patience!
I will probably experiment some more and perhaps try different materials (even coloured, tissue paper) or print a frame around the edge of the plastic film rather than encapsulating in a solid disc or square.
In any case, I hope that someone finds this instructable useful or interesting and, better still, is able to create something more awesome and write an instructable!
Merry Christmas and a happy new year!
Step 12:
Here are the STL files and FreeCad files. The small disc is slightly dome shaped. It was a bit more complicated!
I may make an instructable later but there are plenty of videos on internet.


