Introduction: 3D Printed Earth Clock
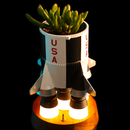
Few years ago, I invented and built a clock showing how the Earth is exposed to the sun in real time.
The Earth Clock: I was happy with the result, however I am now an engineering student and I wanted to put my mechanical knowledge into practice, especially about 3D printing by designing a new version.
This is an unusual clock, it doesn't indicate time as a normal clock would, instead, it shows where your location is, compared to the night. It's a little gadget to put on your desk.
It can be called a "Tellurion" but without the moon, indeed, at this scale the moon is a 13.6mm ball, 1.5 meters away from the Earth. The clock would be far too big! Because I didn't want to make something out of scale, I decided not to include the Moon.
In the following timelapse the the speed is incredibly high, but keep in mind that the Earth's rotation is so slow that the model appears to be motionless!
As the Earth is tilted by 23.4°, it turns on two different axes at different speed rates:
- a “vertical” axis doing one full rotation in 1 year, simulating the movement around the sun, causing seasons and changes in the days length.
- a “tilted” axis doing 1 rotation every day, causing days and nights.
Supplies
- 3D files
- 1x Arduino Nano
- 1x 28BYJ48 5V stepper motor
- 1x ULN2003 driver board
- 2x 5mm push buttons Aliexpress
- 2x 10k Ohms resistors
- 1x old USB cable
- wires
- 3x small screws
- sandpaper, primer, paint
- Soldering iron
- 3D printer
Step 1: 3D PRINTING
Here you can purchase the files on Cults3D
It has been designed with Fusion 360.
Try to avoid the elephant's foot problem, it happens when the first layer is squished against the build plate, it is annoying when printing pieces intended to be put together, particularly when printing gears… so, despite the fact that the bottom surface remains ugly, I used rafts to print the 6 [16]planetary_gear.
Elephant's foot can be reduced by lowering the build plate or its temperature, if it happens anyway, it can be fixed by scratching the surface with a blade.
Here is a table showing how I printed the pieces, no supports needed, nozzle = 0.4mm.
The piece [4]Night_globe has a sacrificial layer improving bed adhesion, it needs to be removed after printing.
| Name | Quantity | Material | layer height (mm) |
|---|---|---|---|
| [1]Internal_gear | 1 | Black PLA | 0.2 |
| [2]Bottom | 1 | Black PLA | 0.2 |
| [3]Carrier | 2 | Black PLA | 0.2 |
| [4]Night_globe | 1 | Black PLA | 0.12 |
| [5]Night_globe_support | 1 | Black PLA | 0.2 |
| [6]Carrier_plate | 1 | Black PLA | 0.2 |
| [7]Cable_stopper | 1 | Black PLA | 0.2 |
| [8]Sun_gear | 1 | Black PLA | 0.2 |
| [9]Motor_axis | 1 | Black PLA | 0.2 |
| [10]Bevel_gear1 | 1 | Black PLA | 0.2 |
| [11]Bevel_gear2 | 1 | Black PLA | 0.2 |
| [12]Spacer | 1 | Black PLA | 0.2 |
| [13]Northern_hemisphere | 1 | Dark Grey PLA | 0.12 |
| [14]southern_hemisphere | 1 | Dark Grey PLA | 0.12 |
| [15]Hemispheres_link | 1 | Dark Grey PLA | 0.2 |
| [16]Planetary_gear | 6 | Copper PLA | 0.2 |
| [17]Year_carrier | 1 | Copper PLA | 0.2 |
| [18]Foot | 2 | Copper PLA | 0.2 |
| [19]Earth_axis | 1 | Copper PLA | 0.2 |
Step 2: EARTH GLOBE
Once printed, sand down the flat surfaces of the two hemispheres to avoid any gap at the equator.

Put the piece [15] into the southern hemisphere [14] without turning it, align south Africa with north America and rotate the northern hemisphere by 1/3rd of turn. After that, continents should be aligned.

 _
_
Sand the globe with 120grit and 400grit sandpaper to remove the elephant's foot around the equator and to smooth out the surface, then spray 2 coats of primer and finally sand with super fine sandpaper (I used 800).
 _
_
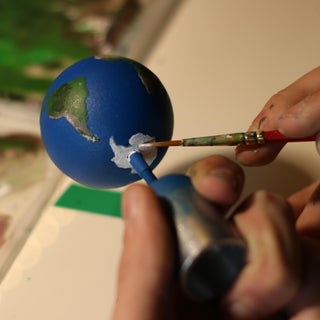
At this point, you can decide the color of your Earth: green and blue, black and white… or “realist” like mine.
To achieve a realistic look, spray blue paint over the entire globe, and paint the continents with acrylic paint according to the colors on google earth.
 _
_

Step 3: ELECTRONICS
You can see here what you will need for the following schematic (wires are ~5cm long).

I started by soldering the two resistors and the wires on the Arduino
 _
_
Then, I soldered these wires to the other components (buttons, ULN2003 board)

Finally, I soldered the USB cable to the ULN2003, but first, don’t forget to pass the cable through the 3D printed piece [2] !

Step 4: ARDUINO
You need to install a library: CheapStepper by Tyler Henry

Here is the code:
// Code by SimonRob and Wallgarden for the 3D Printed Earth Clock

const uint32_t DELAY = 20979137;  //20979.137 ms
#include <CheapStepper.h>

CheapStepper stepper(4, 5, 6, 7);

void setup() {
  pinMode(2, INPUT);
  pinMode(3, INPUT);
}

void loop() {
if (digitalRead(2) == HIGH){
  stepper.step(false);
  delayMicroseconds(50);
  }
if (digitalRead(3) == HIGH){
  stepper.step(true);
  delayMicroseconds(50);
  }
static uint32_t last_time;
if((digitalRead(2) == LOW)&&(digitalRead(3) == LOW)&&(micros() - last_time >= DELAY)){
  last_time += DELAY;
  stepper.step(false);
  }
}
After uploading it, you can already see if your circuit works, by pressing either buttons, the motor should spin one way or the other. If you are not doing anything, LEDs of the driver board should change every 21s.
Step 5: ASSEMBLY
First, the motor shaft must be shortened by 4mm.
 _
_
The assembly is detailed step by step in this video:
TIP: at 3:15, when you place the [17]year_carrier above the [1]Internal_gear, try to align the triangle of the internal gear with the beginning of the current month, it will be useful when setting the time.
Step 6: SET THE TIME
Now it should work 😊!
To set the time, you need to start at the beginning of the current month and place your country in the night, then press the button that turns the Earth counterclockwise and count the days until you reach the current day, finally go to this website and fine tune the position to match reality.
Step 7: CALCULATIONS
This step is here just if you are curious to know how I designed it and where the values are coming from (you don't need to understand this step to successfully make your own Earth Clock)
The real difficulty of the design was to find a gear combination linking the day rotation and the year rotation and to keep it compact.
Because the Earth’s axis is attached to the piece turning at 1rev/year and by knowing the ways of motions of the Earth, I had to achieve a 367.25:1 ratio.
To keep the gearbox small enough, I divided this ratio into three identical planetary gear sets with an aimed ratio of 7.1612:1 for each one. I found a gear combination giving 7.1666:1 which is:
Sun gear (Z1) =12 teeth
Planetary gears (Z2) =31 teeth
Internal Gear (Z3) =74 teeth
(Z1+Z3)/Z1 = (12+74)/12 = 7.1666…
With 3 of them in a row, the ratio is: ((12+74)/12) ^3 = 368.087963:1
In theory, 365.25 rotations of the Earth should induce one full rotation of the year carrier, but using this gear ratio, the year carrier will achieve 99.77% of this rotation (It has an error of around 20h/year which I find acceptable for a 3D printed model).
The gear ratio isn’t perfect, so I coded the Arduino according to the day’s rotation,
The speed rate of the motor must be calculated with the real gear ratio for the earth to achieve 360°/24h (solar day),
Motor speed rate: X°/24h
X = 360 / (1 - 2/368.087963) = 361.96674° (this formula results from the design itself)
Motor speed rate: 361.96674°/24h
360° => 4096 steps
361.96674° => ?? steps
361.96674 * 4096 / 360 = 4118.37713 steps/24h
24h = 86 400 000ms
86 400 000 / 4118.37713 = 20 979.1375 ms/step
Thank you for following my instructables! :D
And Thank you for the Grand prize in the Clocks speed challenge 2021!

Grand Prize in the
Clocks Speed Challenge


