Introduction: ALIENS! Making Your Circuit Boards Into Multiuse Protoboards!
I like to make wearable technology and I don't want to be limited by the shape, size, and pins made on a board if I want to use it. The DFRobot ESP32-C3 boards are a great size: SMALL, but I want them to be wearable ready too!
Using this technique of soldering super soft silicon wire to the pinholes in the board. from there you can get creative too and I've soldered these metal ring terminals to the ends of the wire. This means I can use croc clips, or sew with conductive thread to make my circuit! Simple and adds great functionality. You could add crock clip ends or whatever you want to your board.
This will make it great for prototyping many different circuits, then you just get a new board and pop it in your project after you've prototyped it. Keep this board as your prototyper! Let's check out how to do it.
Supplies
You'll need the following:
- soft silicone wire any color, I've used 28 awg gauge but I've done this with 24 and 22 as well so use the wire that suits your prototyping style
- metal ring terminals, 16 or as many as the pin number for your board. I've used: 0.5-1.5mm2-AWG22-16, screw dia 5.3 and 0.5-1.5mm2-AWG22-16, screw dia 3.2, for these protoboards before. You can get copper color ones, and different sizes so choose what works for your prototyping needs
- heat shrink is optional, it adds stability to the connection. I use a 50% shrink, clear for this type of circuit.
- DFRobot ESP32-C3 I've chosen this because it's a new style board so I wanted to have a prototyping one.
You will also need soldering items as this is a soldering project, this might include:
- solder iron, I use MiniWare TS80, there are some great low-cost Antex 25W ones
- solder (lead free!)
- tip tinner
- brass cleaner
- solder stand
- helping hands are useful
- flux
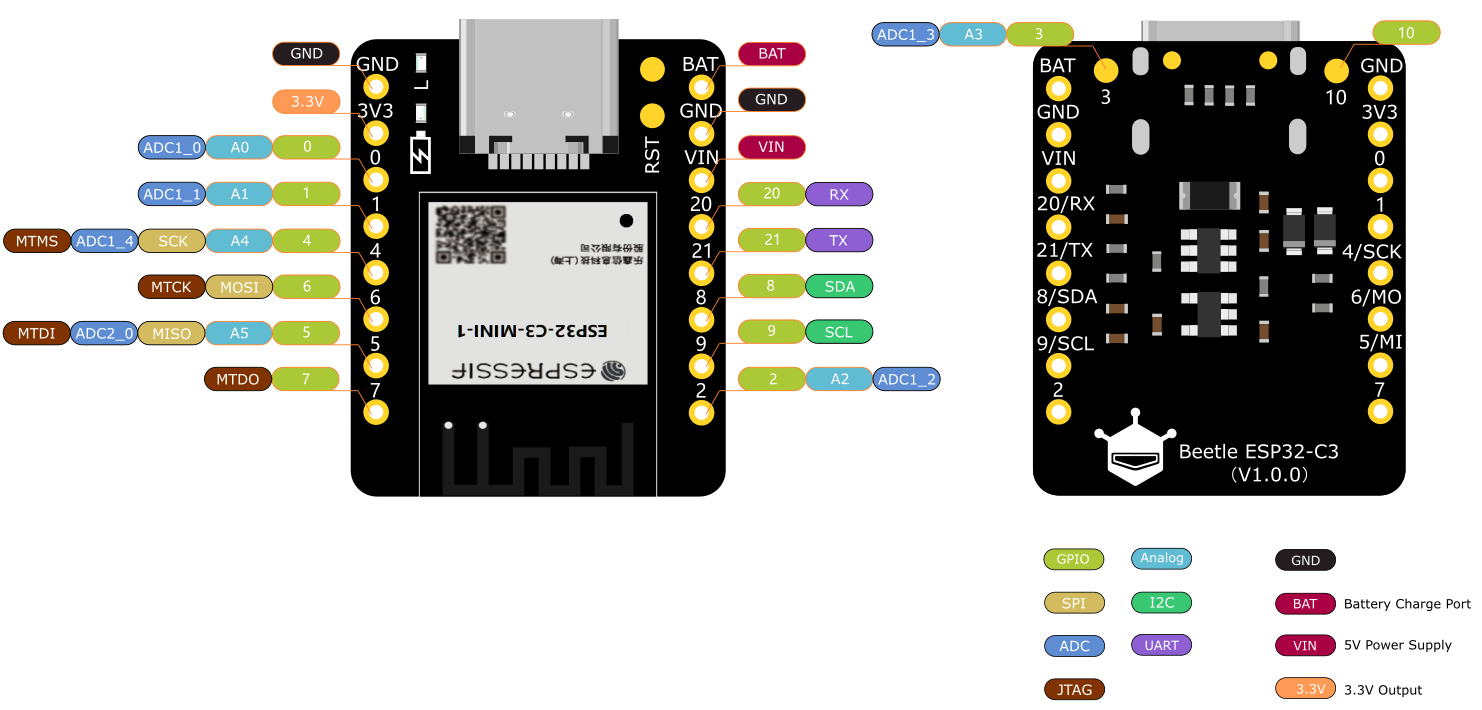
A little about this microcontroller board: I've chosen the DFRobot ESP32-C3 for this tutorial because it's a fully featured board - with ESP32 capabilities, and it is a small size which makes it great for a wearable design. Because it doesn't have sewtabs like a more traditional or wearable purpose board, such as the Circuit Playground series, or Flora, and Gemma M0, I decided I would make it into a wearable board for my projects. Here are the pins on this board for your projects:

Pin out diagram from DFRobot : https://www.dfrobot.com/product-2566.html
On the product page you can read about the board, but some details are:
- 25*20.5 mm
- 13 GPIOs
- li-ion battery charging management on board <- for me this is the stand-out feature from other boards. Especially for creating wearables, I usually have a battery pack, and then a charger board that needs to be secured and out of place - while being accessible. This solves all those problems!
- The ESP32-C3 chip supports WiFi and Bluetooth 5 (LE)
- Programmable with: Arduino IDE, ESP-IDF, MicroPython, C, and Python
It also came with an expansion board so you could add a screen or other components easily, this is an interesting feature.
Step 1: Prepare Your Wire
Preparing your wire all at once will make soldering a little quicker. This way you don't have to stop and then strip a wire, then solder then stop etc. Let's follow these steps:
- Cut your wire into the correct number of pieces for your board. I need 16 pieces.
- After you have cut them all the same, strip the ends off one side of the wire. You can use wire strippers or wire cutters. Silicone wire when it's thin, you can also typically just use your fingertips to remove the ends.
- Do this for all the wires.
Step 2: Solder to Your Microcontroller Board
Now that your wires are prepared. Mount your microcontroller board with a helping hands or similar device to hold it securely in place. This will make soldering a lot easier.
Twist the wire ends that you stripped earlier. To be able to push them through the small hole for the header pins, you'll need to twist stranded wires.
After they are twisted,
- push the wire through the hole of the pin you want to solder. I'll start on one side and work my way through all the pins.
- I'm going to push the wire through the top and solder on the bottom side.
Don't worry if the wire that you stripped is too long, we will trim this after we solder.
- solder the wires to the pins
After they have been soldered, cut or trim the ends of the wires. This is shown at the end of the video I included. Cut the ends where you soldered to trim them so they are neat and won't cause any bridges, or places where the wires might touch.
Step 3: Repeat!
Following the same steps as you've just completed, twist the ends of the wires, thread them through the microcontroller pin holes and solder to the board.
Trim these as well when you have completed it.
Step 4: Adding Alien Tentacles!
...sort of... now that we have the silicone wires on both sides of the microcontroller, let's add the tips to the wires.
Decide what 'tips' you want. There are copper, open-ended, crocodile, and more. I'm using
- metal ring terminals: 0.5-1.5mm2-AWG22-16 screw dia 3.2, for these protoboards
This size suits my projects and the wearable aspect very well. Let's follow a few steps to add them:
- Strip the ends of the wires. I will do this in 2 steps as we did previously. This helps to keep the wires in a better condition as they can sometimes break off if they are exposed for too long and we are moving it a lot. I'll strip one side first. Tip: Strip off a little longer than usual we will be folding it in half to push into the ring terminals so we need more wire.
- Twist the wire ends.
- Fold the twisted wire in half.
- I'm using heat shrink to make the connection even more stable. So I'll pull the heat shrink over the wire at this step.
- Once the heat shrink is on, push the folded wire through and only just slightly poking out of the edge of the ring terminal. We will solder this wire to the terminal.
- Solder the wire to the terminal.
I would suggest take your time. Enjoy this process. Soldering on these ends one by one takes time and effort, but it's rewarding and enjoyable. I find it relaxing!
Step 5: Repeat!
Now that you have finished adding the ends to one side of the wires and boardm=, do the same again - to the other side.
Don't forget you may want to add heat shrink to make this a more robust prototyping board.
Step 6: Woop! You're All Done!
The only thing left to do is use your new prototyping wearable microcontroller board. I attach crocodile clips to it to get rapid prototyping, but you might even want to swap out these new tips for crocodile clips themselves!
I hope you had fun and have made an Alien too. Try different colour wires, thicknesses, and other boards too. I'm making these for all the different boards I have!
To see more of my projects and wearables, visit http://christinefarion.com, follow me on Instagram, and Twitter is great if you have any questions or comments!
Wearable Electronics items purchased from Tinker Tailor.


