Introduction: Adjustable Woven Copper Bracelet


In this tutorial, We'll be creating a simple, adjustable, woven copper bracelet. I love this project because it's very versatile and provides a great introduction to several wire weaving techniques. The bracelet You create here will fit any wrist size, and can be easily lengthened or shortened for comfort or design modification (a little longer and it makes a really nice choker).
Let's get started!
Step 1: Materials

For this project, you'll need
- 26 Gauge Round Dead Soft Copper Wire
- Needle Nose Pliers
- Flush Cutters
- Ring Clamp (or other working clamp)
- A Mallet
- A Steel Bench Block (or anvil, something to hammer on)
- *optional* A File to smooth your edges
Step 2: Measure Your Wire


Measure the length of wire that you want to work with. For this project, I recommend 18 inches, especially if you are a first time wire weaver. It helps to have extra wire to work with, so you have a little breathing room. For later projects, you can use less or more once you have a feel for how weaving will affect the end length of your project.
Step 3: Cut Your Wire

Using Your flush cutters, cut Your wire at Your measured point.
Step 4: Cut Ten Wires of Equal Length

For this project, We'll need 10 wires of equal or near equal length. High precision isn't very necessary, as you'll be trimming the ends at the end anyway. However, you do want to make sure that you don't have one wire that's drastically shorter or longer than the others.
Step 5: Open Your Clamp (intro to Using a Ring Clamp)


For my weaving project, I used a ring clamp. It's a bit different from other clamps in it's operation, so I've included some pictures on how to open and close this clamp. I find it more convenient to use a ring clamp for weaving projects than other clamps because you can open and close it quickly, which can speed the process of switching rows. However, any clamp will work as long as it has a wide, flat, opening. This is how you'll be holding your wires still while you weave your rows.
Step 6: Insert Wires Into Clamp


Make sure your wires are in a neat row, with no overlaps or twists among the wire, and then insert your group into the clamp and close the clamp firmly so that your wires don't move. It is important to give yourself at least 1 inch of extra wire before your weave begins, and for this project I recommend 2. Your extra, unwoven wires at the ends will enable you to tie your project off neatly.
Step 7: Separate Your Wires Into Groups of Two

For this project, we'll be weaving a five-braid. This uses five groups of two wires each, hence the ten cut wires. In later projects, you can experiment with more or fewer groups or wires to see how it affects the final product, but I recommend that you start simple. I recommend that you don't start with a normal braid of three, as those are actually much more difficult to execute than they appear.
Step 8: Fold Your Groups Down in Alternating Directions


We'll be keeping track of our weave by keeping the groups always pointing in alternating directions. We will also number the groups to help with this process. The groups are from left to right, groups 1, 2, 3, 4, and 5. If Your project so far looks like the picture above, you're ready to start your weave!
Tip: If, while You're separating Your wires into groups, you are having trouble with wires popping out of the clamp or out of place, you might find it helpful to remove your wires from the clamp and take a bit of scotch or masking tape and tape the end of your wires together before reinserting it. Sometimes, for stubborn groups of wires this helps them to stay in place as you're working on the initial rows of your weave.
Step 9: Starting Your Weave: the Warp, Group 1


Fiber Woven Projects consist of two main parts: The Warp (the horizontal strands that hold everything together) and the Weft (the vertical strands that form the picture and the bulk of the fabric). Wire Weaving is no different. The first thing you need to begin your weave is a Warp Strand. This will be Group 1.
Separate Group one from the other groups, gently lifting it until it is vertical in reference to the clamp, as shown in picture 1. Then, gently bend Group 1 to the right, so that it sits just above the opening in your clamp, extending off to the right, as shown in picture 2. This is your first row's Warp Strand.
Step 10: The First Row: Group 2


Just as Group 1 is Your first row's Warp Strand, Groups 2, 3, 4, and 5 will be your Weft. To begin, lift Group 2 as shown in picture 1 until it is vertical in reference to the clamp. Then, gently pull Group 2 over Group 1, as shown in picture 2. Group 2 should overlap Group 1 and be oriented horizontally, pointing in the opposite direction from where it began. This is your first weft of your first row. Picture 3 provides a side view of this first Weft.
Step 11: The First Row: Group 3


Next, take Group 3 and lift it vertically as you did with Group 2, shown in picture 1. Gently bend Group 3 over Group 1, pulling it towards you until it is oriented horizontally facing in the opposite direction from Group 2, as shown in picture 2. Notice how the Weft strands are beginning to take the typical "over, under" pattern in relation to the Warp that characterizes traditional weaving.
Step 12: The First Row: Group 4


Next, gently lift and pull Group 4 over Group 1, as you did with Groups 2, and 3. Group 4 should be oriented in the same direction as Group 2.
Step 13: The First Row: Group 5


For your final Weft Strand, gently lift and pull Group 5 over Group 1, as you did with Groups 2, 3, and 4, pictured above. Group 5 should be oriented in the same direction as Group 3. Now, similar to when We began, We have 4 Groups of wires alternately facing opposite directions.
Step 14: Tighten Your Row


Pause Your weaving for a moment to tighten your row. Pushing your Weft groups closer together will improve the final look of your weave, making it appear tighter and more stable. This also decreases the already minimal chance of unraveling.
Step 15: Finished First Row


Congratulations! you've finished your first row of wire weaving. If you take your piece off the clamp now, it won't look like much just yet, but if You continue with this pattern after you set up Your next row, You'll have a beautiful piece in no time at all.
Step 16: Changing Rows


Changing rows is the most confusing part of wire weaving. In order to change rows, You first have to loosen your clamp. Then, push your wires down into the clamp until Your groups are sitting just above the mouth of your clamp, as they were just before You started weaving Your first row. Then, re tighten your clamp. A ring clamp, since it opens and closes very simply, decreases the time it takes to change rows, which is why I favor it. However, if you don't mind taking a little more time for this step, then any clamp will do.
Tip: in the early rows of weaving, completely opening and removing Your weave from the clamp can cause confusion and potentially, unraveling of your first few rows. Therefore, I recommend simply loosening the clamp and pushing the rows down, before re tightening the clamp, without removing them entirely.
Step 17: Resetting Your Groups


After you change rows, You'll notice that one of your groups, the Warp from the previous row, is still extending to the side. In order to reset Your groups so that You can begin the next row, lift this group and pull it away from You, so that it is oriented in the opposite direction from the group immediately to its left. Then, in order to keep track of Your groups, renumber them. Group 1 is now again the group to the far left, followed by Groups 2, 3, 4, and 5. This way, Group 1 is always the Warp strand, and Groups 2, 3, 4, and 5 are always the Weft.
Step 18: Adjust Groups, Ready to Go!


Before You begin Your next row, it is important that You adjust all of Your groups so that the wires aren't twisted or anything that will interfere with the way your final project looks. Complete this using Your needle nose pliers. After adjustment, You're ready to go. Repeat the steps in "Starting Your Weave", "The First Row", and make sure You change rows, reset, adjust your groups each time. You will notice Your wire woven creation begin to take shape.
Step 19: Weave After 13 Rows

After about 10-15 rows, go ahead and take Your piece out of the clamp and give it a look. At this point, Your project should look something like this. Your weave is beginning to take shape and tighten up, and Your wires are beginning to stiffen from You having bent them. Don't worry, this is what we want. It will help the finished project to be a little more durable. Don't worry about unraveling at this point, it's next to impossible for the wires to unravel themselves. They keep shape very well.
Step 20: Weave After 4 1/2 Inches: Ready for the Switch

For this project, I like to make the switch in directions for the weave after about 4 1/2 inches, or around 35-40 rows of weaving. You can increase or decrease this number, it won't affect the switch in directions at all. You can even skip the switch altogether in favor of a straight bracelet. In that case, continue weaving until Your desired length and then skip to the steps concerning tying off Your ends. If You are making the switch, it is important to note the direction that the weave is pointing out of the bottom of Your clamp. As pictured above, my weave was pointing downwards and to the left.
Step 21: Making the Switch Step 1: Turning Your Weave Around

The Switch sounds complicated, but is deceptively simple: You flip your weave around, so that the side facing You in the first section, is now facing away from You. It is important to note that in the first section My weave's tail was pointing downwards and to the left out of My clamp, and now that I have flipped it around it is pointing downwards and to the right. Now, all of Your groups that were pointing away from You should be pointing towards You, and similarly, the groups that were pointing towards You should now be pointing away from You. If You had three groups on the side facing You and two on the opposite side, You should now have two groups facing You and three on the opposite side.
Step 22: Making the Switch Step 2: Start Your Row


Now, you begin weaving again. To start your row, begin with Group 1 as a Warp strand as you did in "Starting Your Weave".
Step 23: Switch Row 1: Group 2


Next, bend Group 2 over Group 1 as You did in "The First Row". However, due to the change in direction, if You folded Group 2 away from You during section 1, You will now be pulling group 2 towards You.
Step 24: Switch Row 1: Group 3

Next, bend Group 3 over Group 1 as You did with Group 2 and in "The First Row". Again, everything is in the opposite direction.
Step 25: Switch Row 1: Groups 4 & 5


Do the same with Groups 4 & 5
Step 26: Switch Rows, Adjust Your Groups


Then, switch rows and adjust Your groups as you did during section 1, and continue. Your groups will be oriented differently, but the process for weaving is the same.
Step 27: Pause: Look at Your Groups

Make sure Your groups are alternately facing the opposite directions from one another, and that they are facing the opposite directions from their orientation before the switch, as pictured above. If they are, Great! Keep going! If they're not, pause, remove Your weave from the clamp, and look back to the switch to find where you went wrong. You can easily unravel to that point and reweave your wires. Since they will be bent anyway, no one will be able to pick out any kinks in the wire in your finished product.
Step 28: 4 Rows After the Switch


About 4 rows after the switch, Your project should look something like this. It might be a little loose to begin with, but that can easily be fixed in final cleanup.
Step 29: 15 Rows After the Switch

15 Rows after the switch it becomes much more obvious that Your weave completely changed directions.
Step 30: Taking Your Weave Off the Clamp, the Finished Weave


When You've reached about the same length after the switch as in section 1, for Me about 4 1/2 inches or 35-40 rows, then it's time to take Your weave off the clamp. Using Your needle nose pliers, adjust Your weft groups so that they're all pointing upwards away from the clamp and in the same direction, as they were before You began weaving. Leave your Warp group extending to the side. Once that's done, go ahead and undo the clamp and remove Your weave. It should look something like picture 2.
Step 31: Tying Off Your Ends: Fold Over Your Warp


To begin tying off Your ends, make sure that Your weft groups are all pointing in the same direction, and that Your warp group is extending to the side, as shown in picture 1. Then, gently pull Your warp group around Your weft groups, covering them completely. Wrap the warp group around the Wefts at least twice. You can wrap more, depending on what You want Your final ends to look like. However, I don't recommend less than two wraps, as one wrap tends to be a bit unstable.
Step 32: Tying Off Your Ends: Clip Your Excess Wire

After wrapping Your Warp group around your Wefts, clip any excess wire using Your flush cutters.
*Optional. If You think the wire ends will scratch You, go ahead and take the optional file from the materials list at the beginning and file the ends down a bit. This should smooth them out enough to where they aren't pointy.
Step 33: Tying Off Your Ends: Finishing the Wrap


Using Your needle nose pliers, tighten Your wrap just a bit, so that it stays in place. Your fully wrapped end should look something like picture 2.
Step 34: Tying Off Your Ends: Clipping Your Excess Wires


Once You've successfully tied off your ends, clip excess wire using Your flush cutters. You should have about 1/2 inch excess wire extending after the wrap. Don't worry if You're cutting an excess of 2 or more inches off of Your project, I built in a lot of breathing room for length adjustments when I measured the wires for this piece. This, We'll use to make finished, smooth ends.
Step 35: Tying Off Your Ends: Folding Over Your Extra Wires


To complete the ends, take Your needle nose pliers and fold over your extra wires. To do this, create a small circle or oval with the extra wires and gently press it into the end of Your weave. Ideally, these wires will cover the inside of Your end wrap, so that any sharp wire ends are tucked away nice and safe.
Step 36: Finished End


Your finished ends should look something like this.
Step 37: Finished Weave, Ends Tied Off

Congratulations! You're almost done! Your finished weave should look something like this, with equal lengths on either side of the switch and neatly tied off ends.
Step 38: Straightening Your Weave


It is inevitable that there will be parts of Your weave that look looser or tighter than others, or that appear to be woven at a different angle. Have no fear! This is easily remedied with a mallet. Place Your weave on a bench block or other hammering surface, sides up, and lightly tap along the length of the weave until it appears more uniform. It is important that You do not tap with a lot of force, as you can deform Your weave, and once deformed, it becomes very difficult to fix. Once You're happy with the uniformity of the weave, set it by lightly tapping on the face of your piece with the mallet. This sets the wires together so that inter-weave wire movement does not occur. Basically, it just makes sure that Your weave stays pretty over time.
Step 39: Shaping Your Bracelet

We used dead soft wire for this project, so even though it's been worked, Your bracelet should still be bendable. This is important, as that is how You can adjust its size and shape to fit any wrist. To shape the bracelet, grab each end and push them towards eachother, arcing the length of your weave. If You have a bracelet mandrel or a hammerable cylindrical object, You can choose to simply tap the bracelet into shape around that object with Your mallet. However, You really don't need to for this project, as the wire is malleable enough to be bent with Your hands.
Step 40: Adjusting Your Bracelet


In Picture 1, You see the shaped bracelet before adjustment. Now, all that's left is for You to adjust Your bracelet to fit Your wrist. My Wrist is very small, so I ended up tightening the bracelet quite a bit. But, since We made the bracelet with so much extra material, there is a lot of breathing room for loosening as well.
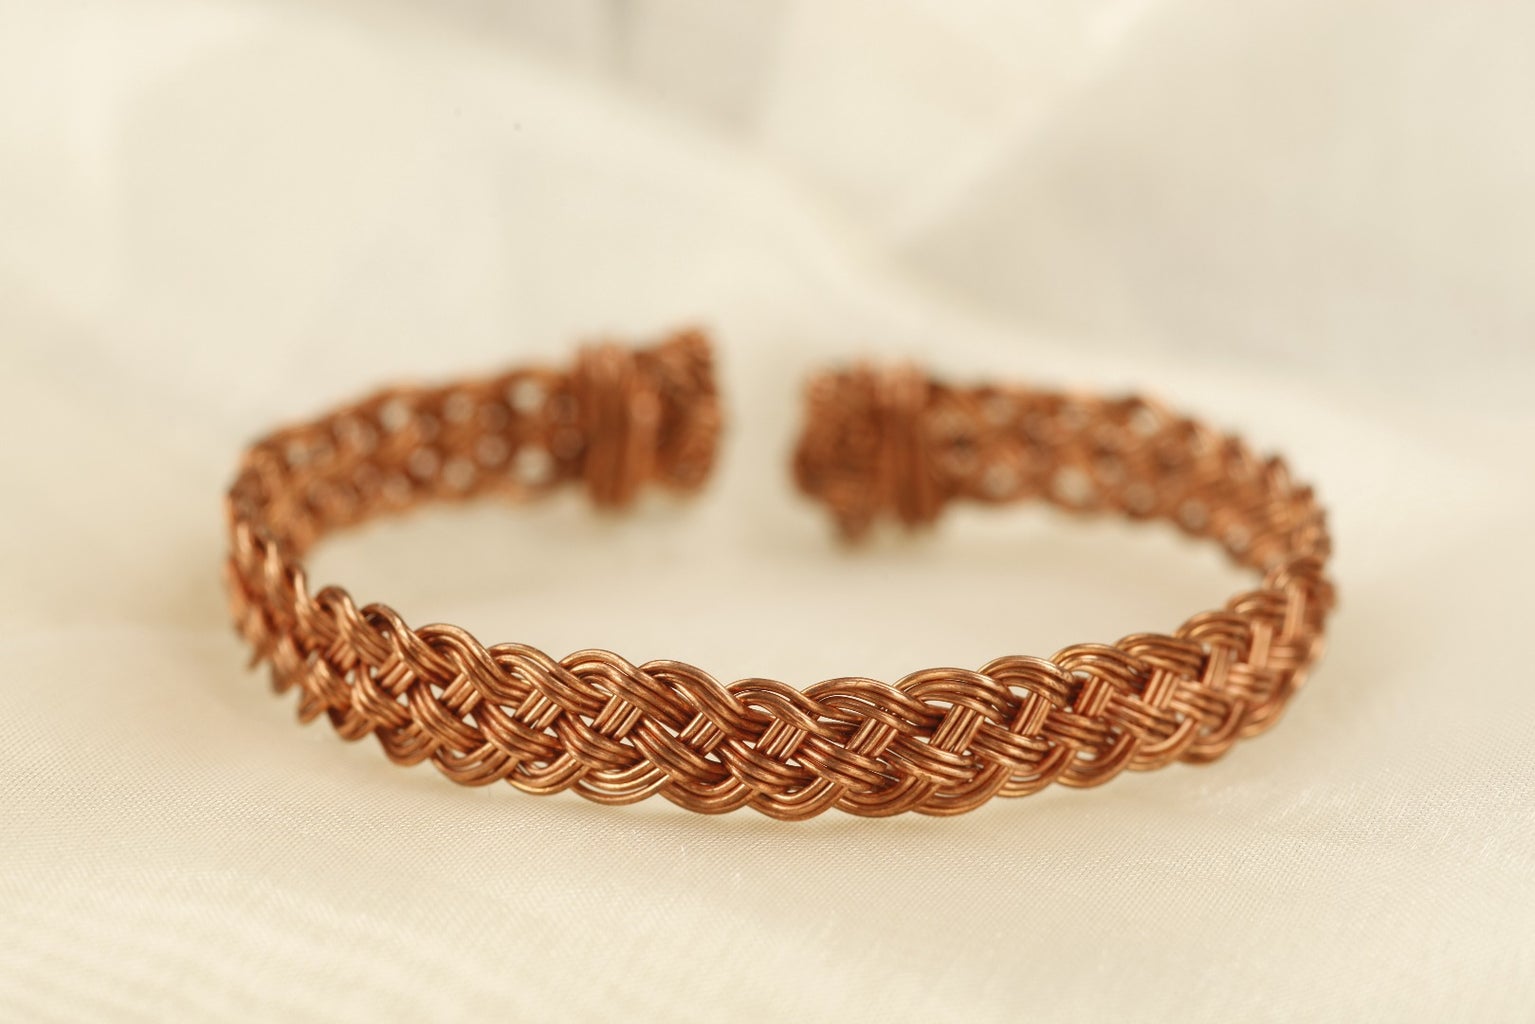
Step 41: Finished Bracelet

Ta Da! You have finished the bracelet! Congratulations on this first adventure in wire weaving!
Step 42: Next Steps...


There are tons of projects You can design Yourself using only the skills practiced in this tutorial! It is my hope that You can draw inspiration from this piece as You begin Your journey in wire weaving!
Good Luck!