Introduction: Aquaponics: EnvDAQ Upgrade With Water Temperature Sensor (Grow Bed DAQ)


The source code for the cloud application and Arduino sketch for this tutorial are available here.
You can also find this tutorial on our blog in a much more readable format (inline Figures).
The Environmental DAQ is an open-source Arduino shield that tracks air temperature, relative humidity and light in aquaponic and hydroponic grow beds. You can build your own using the parts list and attached Fritzing diagram or purchase one from Iowa Aquaponics.
1 x DHT22
1 x 4.7k ohm resistor
1 x 10k ohm resistor
1 x 1k ohm resistor
5 x 2-pin screw terminals
1 x 3-pin screw terminal
1 x Bi-color (Red/Green) 5mm LED
1 x 5mm Green LED
1 x Arduino Uno R3
1 x Arduino Ethernet R3
1 x Perf prototyping board or EnvDAQ Shield
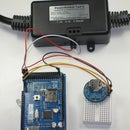
Another important parameter of plant health is root temperature, which can be easily tracked with the addition of DS18B20 fluid temperature sensor. This tutorial takes advantage of the prototyping area on the new Environmental DAQ Shields to add a the fluid temperature sensor using a three-pin screw terminal and resistor connected to digital pin five.
To get started, we will upgrade the DAQ shield and Arduino sketch after which we will upgrade the cloud application.
You can also find this tutorial on our blog in a much more readable format (inline Figures).
The Environmental DAQ is an open-source Arduino shield that tracks air temperature, relative humidity and light in aquaponic and hydroponic grow beds. You can build your own using the parts list and attached Fritzing diagram or purchase one from Iowa Aquaponics.
1 x DHT22
1 x 4.7k ohm resistor
1 x 10k ohm resistor
1 x 1k ohm resistor
5 x 2-pin screw terminals
1 x 3-pin screw terminal
1 x Bi-color (Red/Green) 5mm LED
1 x 5mm Green LED
1 x Arduino Uno R3
1 x Arduino Ethernet R3
1 x Perf prototyping board or EnvDAQ Shield
Another important parameter of plant health is root temperature, which can be easily tracked with the addition of DS18B20 fluid temperature sensor. This tutorial takes advantage of the prototyping area on the new Environmental DAQ Shields to add a the fluid temperature sensor using a three-pin screw terminal and resistor connected to digital pin five.
To get started, we will upgrade the DAQ shield and Arduino sketch after which we will upgrade the cloud application.
Step 1: Arduino: Diagram and Sketch


Figure 1. If you don't have the EnvDAQ, you can make one using the Fritzing Diagram.
Figure 2-4. The breadboard diagram for the DS18B20 without the rest of the EnvDAQ.
Figure 5. Add the new include statements and the one wire assignments. The link provided is a tutorial on finding your device address.
Figure 6. A temporary string to hold the water temperature.
Figure 7. In setup(), add the lines to begin the sensor and set the resolution.
Figure 8. In loop(), make a request to get the root temperature and assign in to the string, WaterTemp.
Figure 9. Add the WaterTemp string to the end of the request string to AppEngine.
Figure10. Finally, add the function for getting a temperature reading from the DS18B20 and create a string fit for the web request.
Step 2: Edit Settings


To make upgrading the web application as easy as possible, cut and paste the various temperature code and add a "w" or "W" in the places shown. This will dramatically decrease the chances of typo errors and the time this upgrade takes.
Figure 1. Open settings.py and edit the UserPrefs model. Add in the properties for water temperature minimum and water temperature maximum preferences. This is the first example of the suggestion above about copy and pasting the temperature property data; here, copy and paste and a "w" to the beginning.
Figure 2. Scroll down settings.py and add the form variables below the light properties.
Figure 3. The water temperature preferences are in a template (which we will create in a minute). First, add the code from Figure 3 to render the (yet-to-be-created) water temperature template and pass in the preferences.
Figure 4. The water temperature template is loaded into the /templates/settings/content.html template - the main settings template. Edit the template rendering code to pass in the water temperature template.
Figure 5. Next, edit /templates/settings/content.html by adding in the template variable for the water temperature template from Figure 4.
Figure 6. Create the water temperature template: /settings/water_temp.html. Again, this is easily done by copying and pasting the original /settings/temperature.html code and add the "w" in places.
Figure 7. Launch the web application in the sandbox and go to Settings to check the templates are loading correctly.
Figure 8. To save the preferences for water temperature, start by creating the onclick handler in javascript. Open settings.js, copy the original saveTempSettings() function and edit for water temperature.
Figure 9. The onclick handler makes an asynchronous request to the server, so we need a request handler to process the request. Open settings.py and add the code from Figure 9.
Figure 10. As with any request handler, the url needs to go at the bottom.
Finally, reload the settings page in the sandbox environment and save your water temperature preferences.
Step 3: Environment Model & Request Handler


Figure 11. In environment.py, amend the data model to include the water temperature property to the EnvData entity.
Figure 12. The request handler for the Arduino is in the familiar adacs.py. Start by getting the water temperature argument passed from the Arduino and assigning it to WTemp. Optionally, you can add a logging command to spit out the data that is passed.
Figure 13. Next, assign the WTemp argument to the WTemp property of the EnvData model created in Figure 11.
Figure 14. One of the major upgrades to the EnvDAQ cloud application is the use of memcache. Memcache stores data in system memory for a limited time and is specifically used here to hold the current parameters sent by the Arduino in order to reduce datastore read operations. The original ~17,000+ read operations have been cut by a third, reducing the system load (and the potential for the server to instantiate new instances) and speeds up response times from the browser to the server. Similarly, user preferences are stored in memcache. Append the EnvNow assignment to include WTemp, before it is put in memcache.
Test the Arduino request handler by typing in the following url in your browser
localhost:8080/adacs/arduino?Temp=84.1&Humidity=69.8&AmbientLDR=850&WaterTemp=75.0
If everything is working, the application will return Connected. To confirm the data was saved, open the Admin Console (localhost:8000/) and then open Datastore Viewer. Use the selector to view the EnvData kind and you will see the new entity.
Step 4: GetChartData: JavaScript and Environment Request Handler


Just as we have JavaScript files for temperature, relative humidity and light, we need one for water temperature. Create a new file: /static/scripts/water_temp.js and add the following:
// Shared Aspects
var WTData = [['Time', 'WaterTemp', 'Min', 'Max']]; // Data for all water temp visualizations
var wtempChartData;
// Main Table
var wtempTable;
// Chart
var wtempChart;
var wtempChartOptions;
// Gauge
var wtempGauge;
var wtempGaugeData;
var wtempGaugeOptions;
function drawWTempTable() {
// Chart data
wtempChartData = google.visualization.arrayToDataTable(WTData);
// Assign new visualization to DOM element
wtempTable = new google.visualization.Table(document.getElementById('wtempTable'));
// Draw Table
wtempTable.draw(wtempChartData);
}
function updateWTempTable(Time, TempValue, MinTemp, MaxTemp) {
// Get the last row number
var lastRow = wtempChartData.getNumberOfRows();
// Get the value of the last row
var timeStamp = wtempChartData.getValue(lastRow - 1, 0);
//alert(timeStamp + ' ' + TempValue);
if (timeStamp == 'Now') {
wtempChartData.removeRow(0);
}
wtempChartData.addRow([Time, TempValue, MinTemp, MaxTemp]);
wtempTable.draw(wtempChartData);
}
/////////////////////////////////////////////////////////////////////////////////////////////////
function drawWTempChart() {
wtempChart = new google.visualization.LineChart(document.getElementById('wtempChart'));
wtempChartOptions = {
animation: {duration: 1000, easing: 'out'},
backgroundColor: { fill: "none" }
};
wtempChart.draw(wtempChartData, wtempChartOptions);
}
function updateWTempChart() {
wtempChart.draw(wtempChartData, wtempChartOptions);
}
///////////////////////////////////////////////////////////////////////////////////////////////
/* Draws Water Temperature Gauge Using Water Temperature Chart Data */
function drawWTempGauge() {
var lastRow = wtempChartData.getNumberOfRows();
var lastTemp = wtempChartData.getValue(lastRow - 1, 1);
var minTemp = wtempChartData.getValue(lastRow - 1, 2);
var maxTemp = wtempChartData.getValue(lastRow - 1, 3);
//alert('MinTemp: ' + String(minTemp) + ' ' + 'MaxTemp: ' + String(maxTemp));
wtempGaugeData = google.visualization.arrayToDataTable([
['Water'],
[lastTemp]
]);
wtempGauge = new google.visualization.Gauge(document.getElementById('wtempGauge'));
wtempGaugeOptions = {
min: 0,
max: 100,
redFrom: 0, redTo: minTemp,
greenFrom: minTemp, greenTo: maxTemp,
yellowFrom: maxTemp, yellowTo: 100,
minorTicks: 5
};
wtempGauge.draw(wtempGaugeData, wtempGaugeOptions);
}
function updateWTempGauge(TempValue, Threshold) {
wtempGaugeData.setValue(0, 0, TempValue, Threshold);
wtempGauge.draw(wtempGaugeData, wtempGaugeOptions);
}
Figure 15. The new script needs to be loaded with the others. Open /templates/main/scripts.html and insert the new script below light. Do not put this script first - temp.js must be first.
Figure 16. The GCT section for water temperature needs to be added to /templates/main/content.html.
Figure 17. In /static/scripts/main.js, edit the getChartData() function to handle the new water temperature argument. There are two places it needs to be amended. The first place (Figure 17) is to push dummy data in the event data is not returned from the server.
Figure 18. If actual data is sent, push that data to the array.
Figure 19. At the end of drawCharts() add the calls to draw the water temperature charts.
Figure 20. The request handler for getting chart data is in environment.py. Edit GetChartData so that it returns the water temperature data and preferences.
Figure 21. At this point you should be able to reload the main page of the webapp and be presented with the new charts for water temperature.
Step 5: UpdateChartData: JavaScript and Environment.py


Just like Step 4 with GetChartData from JavaScript and request handler, we have to edit the UpdateChart.
Figure 22. There are four places we need to edit /static/scripts/main.js updateChart(). First, add the lines from Figure 22 to include the new water temperature data from the JSON object.
Figure 23. If you have your web application open at midnight when the new day begins, the charts are cleared/reset.
Figure 24. Add the data to the original data array should your browser window change size and automatically redraw the charts (the point of updateDisplay()).
Figure 25. Add the function call to update the water temperature charts with the new data.
Figure 26. In environment.py we need to edit updateChartData(). The request handler is a conditional that tries to get the EnvNow data (as Environment) from memcache. The first condition occurs if the memcache has expired.
Figure 27. Finally, the second condition returns evaluates the timestamp against the current data in memcache and returns the data only if the timestamps are different.


