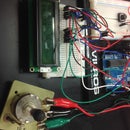
Introduction: Arduino Battery Testulator
This project shows you how to make a primitive battery tester with your Arduino. The battery level is shown with LEDs that light up according to the level. This maxes out at 1 volt.
Step 1: Wiring the Hardware
To wire your Arduino properly, copy the picture above.
Step 2: Typing Up the Software
Input the following code into the Arduino program:
int ledpin12 = 12;
int ledpin11 = 11; int ledpin10 = 10; void setup() { Serial.begin(9600); analogRead(A0); pinMode (ledpin12, OUTPUT); pinMode (ledpin11, OUTPUT); pinMode (ledpin10, OUTPUT);
}
void loop() { float sensorValue = analogRead(A0); // Convert the analog reading (which goes from 0 - 1023) to a voltage (0 - 5V): float voltage = sensorValue * (5.0 / 1023.0); // print out the value you read: Serial.println(voltage); if(voltage==0){ digitalWrite (ledpin12, LOW); digitalWrite (ledpin11, LOW); digitalWrite (ledpin10, LOW); } if (voltage>0){ digitalWrite (ledpin12, HIGH); } if (voltage>=.5){ digitalWrite (ledpin11, HIGH); } if ((voltage>=1)){ digitalWrite (ledpin10, HIGH); } }
Step 3: Power Up Your Arduino!
Connect your battery to the battery tester and power up your Arduino, then upload the code!


