Introduction: Arduino Calculator With LED Output
Hey guys! Want to learn how to use a serial monitor input and output. Well here you've got the perfect tutorial on how to do so! In this instructable, I will guide you through the simple steps needed to create a calculator using the Arduino serial monitor and show the result in LED blinks.
Step 1: Downloading the Arduino IDE
Download and Install the Arduino IDE (Interactive Development Environment) using the link below:
https://www.arduino.cc/en/Main/Software Choose and save the version that best suits your operating system and configuration.
Step 2: Hardware Materials
- 1 Arduino board
- 1 cable to connect Arduino board to your computer
- 1 LED
- Jumper Wires
Step 3: Building the Hardware
1) Connect Arduino to your computer
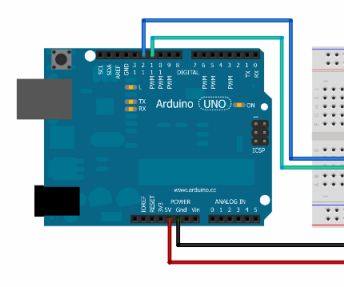
2) Connect LED to breadboard and the Arduino as shown in the picture.
Step 4: Downloading and Running the Program
Download the attached arduino program to your laptop. Connect the arduino to your laptop, and run the program.
In the arduino IDE, Open Tools->serial monitor. Type in a calculation to be made, for example, 3+2, and you will get the result as 5. You can also try subtraction, multiplication and division as follows:
4+2 (you will get Result = 6)
8-3 (you will get Result = 5)
5*3 (you will get Result = 15)
10/2 (you will get Result = 5)
You will see that the LED blinks as many number of times as the output.
Attachments
Step 5: Understanding the Program
First let's understand how serial port input and output works. A user can enter data in the input field in the serial monitor window to send values and data to the Arduino. Any serial program, or even a custom serial application can be used to send data to the Arduino instead of using the Serial Monitor window.Similarly the user can output data to serial monitor.
We are now going to use this for building our own calculator. First in setup() method: We initiatilize variables and the serial port. Serial.begin(9600); // begins serial communications Serial.println("Send me a calculation"); Serial.println("For example: 2+3"); Then in loop() method: while(Serial.available() > 0) { // while there is data being sent to arduino, number1 = Serial.parseInt(); operation = Serial.read(); // operation will be the first char after the first number number2 = Serial.parseInt(); // stores the second number in number2 Then we call calculate() and print the result of the calculation. calculate() is the custom function that performs the calculations. Lets understand how that works. If (operation == '+'), it adds the two numbers and stores the result in "result" variable. If (operation == '-'), it subtracts the two numbers and stores the result in "result" variable. If (operation == '*'), it multiplies the two numbers and stores the result in "result" variable. If (operation == '/'), it divides the two numbers and stores the result in "result" variable. Otherwise, it prints "Error"
The blink method has the code to blink the LED as many times as the result with a simple loop.


