Introduction: Arduino Controlled Mini Vending Machine
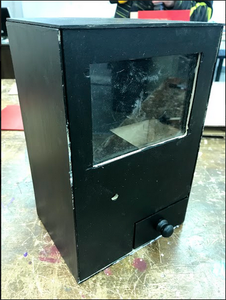
This is our vending machine, it vends three fun size snickers candy bars. The overall dimensions are about 12" x 6" x 8". This vending machine is controlled by an arduino, with breadboard and a servo motor.
Step 1: Materials

We used plywood that was 3/16" thick. This is our cut list.
-(2) 12" x 8"
-(2) 12" x 6"
-(2) 8" x 6"
-(2) 7 1/2" x 5 1/2"
-(1) 7" x 5 1/2"
-(1) 5 1/2" x 4"
-(2) 3 1/2" x 2"
-(1) 4" x 2"
-(1) 3 1/2" x 2 1/2"
Some trimming was necessary.
So, you would need minimum sized board of 12" x 36".
Step 2: Initial Set Up

We laid the pieces out to make sure they are correct. Then we made rabbit cuts on all four sides of the top and bottom pieces. We made rabbit cuts on the front and back of the side pieces. This makes a better and stronger joint between the pieces.
Step 3: Cutting Window and Door

We cut a window in the upper part of the front piece, leaving a 1" border around the edges. We cut a full door on the back piece also leaving a 1" border around the edges. We cut a new door, instead of using the piece we cut out. Then, attached it with two hinges, and added a knob.
Step 4: Interior Shelf

We glued the interior walls and shelves together. Using dado cuts for stronger joints. Some trimming was required to make it fit just right. We drilled two holes (both visible in the picture) for the wires. In the right side of the picture you can see that we had to cut out the shelf for the candy bars to drop through.
Step 5: Assemble Further

We glued the sides, bottom, and back together. Then we installed the interior walls and shelf.
Step 6: Drawer


We glued the drawer together, and added a knob to the front.
Step 7: Final Set Up


We made sure the front and top were the correct size. We did some minor trimming. We cut out the front piece for the drawer and made sure it slid nicely.
Step 8: Painting


We painted the exterior of the vending machine. Also, the interior where you see through the window.
Step 9: Arduino, Breadboard, and Servo Motor


After uploading the code into the arduino and wiring it up. We placed the servo motor with an arm sticking through a shelf to vend the fun size candy bars.


