Introduction: Azimuthal Projection 3D Map Decoration X Folk Music Puzzle Game - Arduino


INTRODUCTION
The following page will instruct you how to create an Arduino project, which has two main functions—plain decoration with lighting and folk music puzzle game, that incorporates the fields of geography, geometry, maps, United Nations, and music all together in one. Building upon the structure of hexagons, the device portrays the world map in the Azimuthal Equidistant Projection, which is the form of map projection utilized by the United Nations (and its symbol).
When activating the decoration mode, the continents of the map would glow in different colors determined by random combinations of RGB values through the use of RGB LEDs.
The game mode, on the other hand, requires users to recognize the origin of folk music songs (selected by randomly generating numbers from 1 to 20) and put his/her answer's continental board into its corresponding position on the main wooden board within a set time (pre-set for 1 minute).
____________________________________________
SUPPLIES
Actual Materials
- 5mm RGB LEDs *20
- Wires
- Resistors *9
- Arduino Board *1 (any type)
- Breadboards *3
- Buttons *7
- LCD Display Board I2C *1
- Cardboard Box (13*9*5.7 inch; 33*23*14.5 cm)
- Wooden Board (37.5*29*0.8 cm)
- Acrylic Boards (transparent * 2, semi-transparent *1)
- Portable Charger *1
Tools:
- Blade *1
- UV Cure Adhesives *1
- Double-sided Tape *1 roll
- Hot Glue Gun *1
Machines:
- Laser Cutting Machine
Software:
- Adobe Illustrator
- Adobe Photoshop
- Rhino 3D
Step 1: Design the Board

You can directly download the attached file or follow the steps below.
Outlining the Map
- Download a map outline from Google
- Google "united nations logo"
- Select "tools - size - large"
- Download your most favorite image (the one used by this project: link) *Try not to select the ones with complicated lines overlapping with the continental lands*
- Transfer the downloaded map into the printing version
- Color the undesirable regions into white by using the paintbrush function in Adobe Photoshop
- Export the file (JPEG)
- Import the file into Adobe Illustrator and use the "image trace" function to trace the map
- Export the file (dxf)
Adding the Hexagon Background
- Import the dxf file into Rhino
- Select the "polygon" function and key in "6" for the "NumSides" option
- Key in "3.5" for the radius value
- Draw 28 equal-sized hexagons
- Export the file in 3dm
Attachments

Step 2: Laser Cutting


- Import the previously completed file to xxx.
- Using the laser cutting machine, print out the main body on the wooden board and the continents on the acrylic boards (2 transparent & 1 semi-transparent) (videos are provided above)
Step 3: Build the Device


Boards After Laser Cutting
- Acrylic Continents
- Use the UV curable adhesives to glue each continent's three boards together (with the semi-transparent as the middle layer)
- Use the UV light to shine on the glued regions in order to allow the glues to solidify
- Wooden Board Foundation
- Manually remove the small land regions stuck on the main wooden board
- *If any part of the wooden board is broken, use the UV curable adhesives to glue them back*
Building the Base (Bottom Foundation of the Entire Device)
- Find an adequate-sized cardboard box, with dimensions as close as 13*9*5.7 inch (33*23*14.5 cm)
- Using the wooden board as the reference model, trace the continental parts onto the top surface of the box
- Trace the bottom part of the buttons onto the top surface of the box, with each button centered within each traced continental parts
- Use a blade to cut off the button parts by following the traces
- Within the traced continental parts, use a blade to cut off short segments surrounding the button
- Trace two more bottom parts of the button onto the right side of the box (try to align the traces with the same height)
- Trace the LCD display board onto the right side of the box (above the two buttons in the previous step)
- Use a blade to cut off the two button parts and the LCD part by following the traces in step 6 and 7
Step 4: Build the Circuits

Referring to the schematics above, build the circuit.
Note:
- The resistors for the RGB LEDs and the ones of the buttons are different, LOOK CLEARLY!
- Since the LCD Display Board above doesn't have the I2C model, it's not connected perfectly. (LCD Display Boards with I2C models only have to plug in four pins)
- Connect GNDs on the displayer and the Arduino board
- Connect the VCC on the displayer with the positive pins on the breadboard
- Connect the SDAs on the displayer and the Arduino board
- Connect the SCLs on the displayer and the Arduino board
Step 5: Upload the Code
The code for this project can be found here or below.
Every coding line has a side note explaining its purpose and function.
Note:
- All the specific D pins can be changed and adjusted based on your circuit's layout
- All the delayed seconds can be changed into different values, but DON'T DELETE them! (These delayed seconds allow the code to flow more logically. Without them, some parts of the code might not work!)
- On line 24 (the introduction of the "for loop"), you can designate the number of repetition you would like the loop to run for (the original value is 5)
- The RGB LEDs' color combination in each button's "if pressed" and "if not pressed" loops can be adjusted and customized. (Originally, the RGB LEDs would shine in green if pressed while they would shine in red if not pressed. You can change the values to have creative colors for answering RIGHT and WRONG)
#include <Wire.h>
#include <LiquidCrystal_I2C.h>
LiquidCrystal_I2C lcd_I2C_27(0x27, 16, 2); // set the LCD address for a 16 chars and 2 line display
int _R ; //introduce variable R, which stands for the Red value of the RGB LEDs
int _G ; //introduce variable G, which stands for the Green value of the RGB LEDs
int _B ; //introduce variable B, which stands for the Blue value of the RGB LEDs
int _SongNumber ; //introduce variable SongNumber
void setup() {
pinMode( 10, INPUT); // sets D10 as input for the map-decoration button
pinMode( 9, INPUT); // sets D9 as input for the puzzle-game button
pinMode( 8, INPUT); // sets D8 as input for the Eurasia button
pinMode( 4, INPUT); // sets D4 as input for the North America button
pinMode( 3, INPUT); // sets D3 as input for the South America button
pinMode( 2, INPUT); // sets D2 as input for the Africa button
pinMode( 1, INPUT); // sets D1 as input for the Oceania button
lcd_I2C_27.init (); // initialize the LCD display board
lcd_I2C_27.backlight(); //turn on the backlight of the LCD display board
}
void loop() {
if (digitalRead( 10 )) { //if the map-decoration button is pressed
for (int i = 0 ; i < 5 ; ++i ) { //run the following loop for 5 times
_R = random( 0, 1023 ) ; //give variable R a random value from 0 to 1023
_G = random( 0, 1023 ) ; //give variable G a random value from 0 to 1023
_B = random( 0, 1023 ) ; //give variable B a random value from 0 to 1023
analogWrite(13, ( _R / 4 )); //the R value of the RGB LEDs for the first group substitutes and writes the variable value from 0 to 255
analogWrite(12, ( _G / 4 )); //the G value of the RGB LEDs for the first group substitutes and writes the variable value from 0 to 255
analogWrite(11, ( _B / 4 )); //the B value of the RGB LEDs for the first group substitutes and writes the variable value from 0 to 255
analogWrite(7, ( _R / 4 )); //the R value of the RGB LEDs for the second group substitutes and writes the variable value from 0 to 255
analogWrite(6, ( _G / 4 )); //the G value of the RGB LEDs for the second group substitutes and writes the variable value from 0 to 255
analogWrite(5, ( _B / 4 )); //the B value of the RGB LEDs for the second group substitutes and writes the variable value from 0 to 255
delay( 3000 ); // wait for 3000 milliseconds (3 seconds)
} //since the values of variable R, G, B are determined in the loop, there would be five different color combinations per loop
}
if (digitalRead( 9 )) { //if the puzzle-game button is pressed
_SongNumber = random( 1, 20 ) ; //give variable SongNumber a random value from 1 to 20
lcd_I2C_27.setCursor(0, 0) ; // set the cursor, counting begins with 0
lcd_I2C_27.print( _SongNumber ); // print the value of SongNumber to the LCD display board
analogWrite(13, 0); //reset and write the value of D13 as 0
analogWrite(12, 0); //reset and write the value of D12 as 0
analogWrite(11, 0); //reset and write the value of D11 as 0
analogWrite(7, 0); //reset and write the value of D7 as 0
analogWrite(6, 0); //reset and write the value of D6 as 0
analogWrite(5, 0); //reset and write the value of D5 as 0
if ( _SongNumber >= 1 && _SongNumber <= 3 ) { //if the value of variable SongNumber is from 1 to 3
delay( 60000 ); // wait for 60000 milliseconds for players to listen to the folk music (60 seconds; 1 min)
if (digitalRead( 8 )) { //if the Eurasia button is pressed
analogWrite(13, 0); //analogWrite the value of D13 as 0
analogWrite(12, 255); //analogWrite the value of D12 as 255
analogWrite(11, 0); //analogWrite the value of D11 as 0
analogWrite(7, 0); //analogWrite the value of D7 as 0
analogWrite(6, 255); //analogWrite the value of D6 255
analogWrite(5, 0); //analogWrite the value of D5 as 0
} //all the RGB LEDs would shine in green color
else { //if the Eurasia button is not pressed
analogWrite(13, 255); //analogWrite the value of D13 as 255
analogWrite(12, 0); //analogWrite the value of D12 as 0
analogWrite(11, 0); //analogWrite the value of D11 as 0
analogWrite(7, 255); //analogWrite the value of D7 as 255
analogWrite(6, 0); //analogWrite the value of D6 as 0
analogWrite(5, 0); //analogWrite the value of D5 as 0
} //all the RGB LEDs would shine in red color
} //since the correct answers for SongNumber 1 to 3 are all Eurasia, this "if loop" accesses whether the player's answer is correct or not
if ( _SongNumber >= 4 && _SongNumber <= 6 ) { //if the value of variable SongNumber is from 4 to 6
delay( 60000 ); // wait for 60000 milliseconds for players to listen to the folk music (60 seconds; 1 min)
if (digitalRead( 4 )) { //if the North America button is pressed
analogWrite(13, 0); //analogWrite the value of D13 as 0
analogWrite(12, 255); //analogWrite the value of D12 as 255
analogWrite(11, 0); //analogWrite the value of D11 as 0
analogWrite(7, 0); //analogWrite the value of D7 as 0
analogWrite(6, 255); //analogWrite the value of D6 255
analogWrite(5, 0); //analogWrite the value of D5 as 0
} //all the RGB LEDs would shine in green color
else { //if the North America button is not pressed
analogWrite(13, 255); //analogWrite the value of D13 as 255
analogWrite(12, 0); //analogWrite the value of D12 as 0
analogWrite(11, 0); //analogWrite the value of D11 as 0
analogWrite(7, 255); //analogWrite the value of D7 as 255
analogWrite(6, 0); //analogWrite the value of D6 as 0
analogWrite(5, 0); //analogWrite the value of D5 as 0
} //all the RGB LEDs would shine in red color
} //since the correct answers for SongNumber 4 to 6 are all North America, this "if loop" accesses whether the player's answer is correct or not
if ( _SongNumber >= 7 && _SongNumber <= 10 ) { //if the value of variable SongNumber is from 7 to 10
delay( 60000 ); // wait for 60000 milliseconds for players to listen to the folk music (60 seconds; 1 min)
if (digitalRead( 3 )) { //if the South America button is pressed
analogWrite(13, 0); //analogWrite the value of D13 as 0
analogWrite(12, 255); //analogWrite the value of D12 as 255
analogWrite(11, 0); //analogWrite the value of D11 as 0
analogWrite(7, 0); //analogWrite the value of D7 as 0
analogWrite(6, 255); //analogWrite the value of D6 255
analogWrite(5, 0); //analogWrite the value of D5 as 0
} //all the RGB LEDs would shine in green color
else { //if the South America button is not pressed
analogWrite(13, 255); //analogWrite the value of D13 as 255
analogWrite(12, 0); //analogWrite the value of D12 as 0
analogWrite(11, 0); //analogWrite the value of D11 as 0
analogWrite(7, 255); //analogWrite the value of D7 as 255
analogWrite(6, 0); //analogWrite the value of D6 as 0
analogWrite(5, 0); //analogWrite the value of D5 as 0
} //all the RGB LEDs would shine in red color
} //since the correct answers for SongNumber 7 to 10 are all South America, this "if loop" accesses whether the player's answer is correct or not
if ( _SongNumber >= 11 && _SongNumber <= 14 ) { //if the value of variable SongNumber is from 11 to 14
delay( 60000 ); // wait for 60000 milliseconds for players to listen to the folk music (60 seconds; 1 min)
if (digitalRead( 8 )) { //if the Eurasia button is pressed
analogWrite(13, 0); //analogWrite the value of D13 as 0
analogWrite(12, 255); //analogWrite the value of D12 as 255
analogWrite(11, 0); //analogWrite the value of D11 as 0
analogWrite(7, 0); //analogWrite the value of D7 as 0
analogWrite(6, 255); //analogWrite the value of D6 255
analogWrite(5, 0); //analogWrite the value of D5 as 0
} //all the RGB LEDs would shine in green color
else { //if the Eurasia button is not pressed
analogWrite(13, 255); //analogWrite the value of D13 as 255
analogWrite(12, 0); //analogWrite the value of D12 as 0
analogWrite(11, 0); //analogWrite the value of D11 as 0
analogWrite(7, 255); //analogWrite the value of D7 as 255
analogWrite(6, 0); //analogWrite the value of D6 as 0
analogWrite(5, 0); //analogWrite the value of D5 as 0
} //all the RGB LEDs would shine in red color
} //since the correct answers for SongNumber 11 to 14 are all Eurasia, this "if loop" accesses whether the player's answer is correct or not
if ( _SongNumber >= 15 && _SongNumber <= 17 ) { //if the value of variable SongNumber is from 15 to 17
delay( 60000 ); // wait for 60000 milliseconds for players to listen to the folk music (60 seconds; 1 min)
if (digitalRead( 2 )) { //if the Africa button is pressed
analogWrite(13, 0); //analogWrite the value of D13 as 0
analogWrite(12, 255); //analogWrite the value of D12 as 255
analogWrite(11, 0); //analogWrite the value of D11 as 0
analogWrite(7, 0); //analogWrite the value of D7 as 0
analogWrite(6, 255); //analogWrite the value of D6 255
analogWrite(5, 0); //analogWrite the value of D5 as 0
} //all the RGB LEDs would shine in green color
else { //if the Africa button is not pressed
analogWrite(13, 255); //analogWrite the value of D13 as 255
analogWrite(12, 0); //analogWrite the value of D12 as 0
analogWrite(11, 0); //analogWrite the value of D11 as 0
analogWrite(7, 255); //analogWrite the value of D7 as 255
analogWrite(6, 0); //analogWrite the value of D6 as 0
analogWrite(5, 0); //analogWrite the value of D5 as 0
} //all the RGB LEDs would shine in red color
} //since the correct answers for SongNumber 15 to 17 are all Africa, this "if loop" accesses whether the player's answer is correct or not
if ( _SongNumber >= 18 && _SongNumber <= 20 ) { //if the value of variable SongNumber is from 18 to 20
delay( 60000 ); // wait for 60000 milliseconds for players to listen to the folk music (60 seconds; 1 min)
if (digitalRead( 1 )) { //if the Oceania button is pressed
analogWrite(13, 0); //analogWrite the value of D13 as 0
analogWrite(12, 255); //analogWrite the value of D12 as 255
analogWrite(11, 0); //analogWrite the value of D11 as 0
analogWrite(7, 0); //analogWrite the value of D7 as 0
analogWrite(6, 255); //analogWrite the value of D6 255
analogWrite(5, 0); //analogWrite the value of D5 as 0
} //all the RGB LEDs would shine in green color
else { //if the Oceania button is not pressed
analogWrite(13, 255); //analogWrite the value of D13 as 255
analogWrite(12, 0); //analogWrite the value of D12 as 0
analogWrite(11, 0); //analogWrite the value of D11 as 0
analogWrite(7, 255); //analogWrite the value of D7 as 255
analogWrite(6, 0); //analogWrite the value of D6 as 0
analogWrite(5, 0); //analogWrite the value of D5 as 0
} //all the RGB LEDs would shine in red color
} //since the correct answers for SongNumber 18 to 20 are all Oceania, this "if loop" accesses whether the player's answer is correct or not
lcd_I2C_27.clear(); //clear the LCD display board
delay( 1000 ); // wait for 1000 milliseconds (1 second)
}
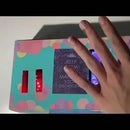
}Step 6: Finishing the Device
- Open the cardboard box and put in the previously constructed circuits (including all elements, ex: three breadboards, the Arduino board, the portable charger)
- Referring to the code and the traced continental parts on the top of the box, stuff the buttons into each of their corresponding positions
- *You may refer to the side notes behind the codes in order to ensure which pin's button is for which continent*
- Stuff the two "function buttons" (map-deco of D10 and puzzle-game of D9) into each of the cut-parts on the right side of the box
- Install the LCD display board into its cut part on the right side of the box
- Open the box and ensure all the wires are connected properly to the boards
- Stick the wooden board foundation to the top part of the box by using double-sided tape (make sure to align properly so the buttons can fit right into the cut-part of the wooden boards)
- Use hot glue gun to fill in the small region parts (not the main continents)
Step 7: DONE!!!!!!
For the puzzle game, go to the link for the testing playlist!


