

Introduction: Base De Gatito - Cat Base (español/english)


Hola que tal! me llamo valeria ramirez ponce y soy estudiante de la carrera de arquitectura, a continuacion les mostrare el armado de una caja que elabore en un curso llamado fabdig, para todos aquellos interesados en el corte laser y demas, pueden experimentar con distintos diseños y mas, ¡Esto es un mundo infinito!
--------------------------------------------------------------------------------------------------------------------------------------------------
Hi
there, I’m Valeria Ramirez Ponce and i’m an architecture student, let me show you the box armed that made myself in a course called fabdig, for everyone that interest on the laser cut, can experiment with any desings and more, That’s is an infinite world!
Supplies
1. Autodesk fusion 360
2. Megaláser
Step 1: CREACION DE CARAS - SIDES CREATION


En nuestro primer paso vamos a ver las siguientes imagen que estan adjuntas
(Cara A, Cara B, Cara C) Las cuales tenemos que fabricar en nuestro programa llamado AUTODESK FUSION 360
1.-las crearemos con la herramienta linea (o machucando la letra L)
2.- cuado tengamos el trabajo hecho daremos "''ENTER":
3.-podremos dar en terminar boceto:
4.-proseguir con las demas caras
----------------------------------------------------------------------------------------------------------------------------------------
For the first step we’ll see the next images.
(Side A, Side B, Side C) We need to do that on our program AUTODESK FUSION 360
1. Create the sides with the tool line (or pressing the key L)
2. When we’ve the work done we will press enter
3. And press finish sketch.
4. Keep continue in all sides.
Step 2: GROSOR DE LAS CARAS-SIDES THICKNESS


Luego de tener las caras hechas, procederemos a obtener el grosor de cada una de ellas
1.-le daremos click al icono de añadir grosor:
2.-escribiremos 3 mm en la ventana emergente:
3.-continuaremos haciendo esto con las otras 2 caras.
----------------------------------------------------------------------------------------------------------------------------------------
After to have all sides done, we’ll continue to get the thickness of
each one.
1. Click icon to add thickness.
2. Write 3 mm at next window.
3. Keep doing the same on each side.
Step 3: COLOREAR LAS CARAS-SIDES DESIGN


Una vez hecha cada una de nuestras caras, les asignaremos nombre para una mejor organizacion
al momento de crear nuestro armado de caja.
Ahora es el momento de ponerle color a nuestras distintas caras y que acabe como muestra la imagen del paso número 3.
1.-le daremos clic en "diseño", a continuacion le daremos en "renderizar":
2- nos vamos a dirigir a esta paleta de colores:
3.-nos aparecera una pestaña abajo a la derecha:
4- bajaremos hasta encontrar "madera":
5.- luego podremos escojer diversos tipos de madera, yo escojere roble:
6.-Arrastramos el bloque de madera que queramos a nuestra cara A:
7.- hacer lo mismo con las demas caras.
----------------------------------------------------------------------------------------------------------------------------------------
Once all sides are done, we’ll give it a name for a better organization
at moment to make our box armed.
Now it’s the moment to put it color in all sides like the image.
1. Click on “design”, and after give that a “render”.
2. Go to color palette.
3. And a window will appear at the bottom right.
4. We’ll search “wood”.
5. And select one of all wood options, I’ll select oak.
6. Craw the wood block that you want to our A side.
7. Replicate for all sides.
Step 4: CREACION DEL ESCENARIO-SCENARIO CREATION

A continuacion teniendo hecho ya el coloreado y el grosor adecuado, nos dedicaemos a hacer el fondo para nuestro armable
1.-Debemos estar en la pestaña de "renderizar"
1.-Daremos click a escena que se encuentra al costado
2.-Nos abriran una pestaña emergente en la parte inferior derecho
2.-iremos a una biblioteca de entornos
3.-escojeremos el que nos guste (yo escojere el de campo)
4.-arrastrar y voala!
----------------------------------------------------------------------------------------------------------------------------------------
Having the coloring and the thickness done, we’ll gone to make the environment
for our armed box
1. Go to option “render”.
2. Click to scene that are next to right.
3. It that show us a window on the right bottom.
4. Go to scenes library
5. Select that you like (I chose the Field).
6. Craw it and WAALA!
Step 5: ARMADO DE NUESTRA CAJITA-BOX ARMED

A continuacion crearemos un nuevo archivo la cual nombraremos "armado"
1.-En este lugar insertaremos nuestra cara A (haga clic en derecho e insertar en el diseño actual)
2- Hacer lo mismo con la cara B y luego mediante una heramienta llamada (union) podremos unir los extremos
2-Una vez la cara puestadaremos clickearemos en la mitad de la cara y uniremos correspondientemente con nuestra otra cara, inmediatamente podremos ver como ambas se unen
3.-Haremos lo mismo con la cara C y podremos terminar el armado de caras correspondiente y que quede como la imagen
4.-Que no se te olvide guardar!
----------------------------------------------------------------------------------------------------------------------------------------
Right now we’ll create a new file named “armed”.
1. In this place we’ll insert our A side (Right Click and insert on actual design).
2. Do the same with the B side and after with a tool (union) we can join the ends.
3. Once the side is placed in our new tab, we’ll click from the middle of the side of the face to the other half of the side that we want to join, you will quickly see the animation of the union of both sides.
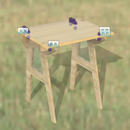
4. Do the same with the C side and we’ll see the box armed and check that it is the same as the image.
5. Don’t forget you to save the file.
Step 6: GRABADO DE GATITO-ENGRAVED OF KITTY


Luego haber tenido tu cajita armada podremos hacer el correspondiente grabado de la imagen dxf que ati te guste, por si te gusto mi imagen, te pondre la pondre en la portada de este paso
1.-Iremos a boceto dandole click derecho a nuestra cara A
2- Ahora tenemos que poner nuestra imagen dxf en el plano de la cara A, asi que iremos directamente a "insertar-lienzo-importar desde mi ordenador"
3.-Buscamos nuestra imagen, seleccionaremos nuestra cara, podremos mover y ajustar a nuestro gusto
4.-Luego procedermos a dirigirnos a linea-crear-spline-punto de ajuste de spline
5.-Con nuestra herramienta podremos dibujar todo el contorno y lineas internas de nuestro dibujo
6.-Una vez terminada, cerraremos los extremos de la linea
7.-Listo! en el siguiente paso te mostrare como escribir el texto en nuestra cara A!
----------------------------------------------------------------------------------------------------------------------------------------
After to have your box, we can make the engraved dxf image that you
like, if you like my image, I’ll put it on this step.
1. Go to sketch pressing right click to A side.
2. Now we can put our image dxf in the A side, so we go to “insert-sketch-import from my computer”.
3. Search our image, select our side, we can move it and adjust it to like.
4. After, we need go to line-create-spline-adjust spline point.
5. With our tool we can draw all contour and internal lines of our draw.
6. Once finished, we’ll close the ends of the line.
Nice! On the next step I’ll show you how write text on our A side.
Step 7: TEXTO EN CARA A-TEXT ON "A" SIDE

Ahora aprenderemos a como ponerle texto a una de nuestras caras!
1- justo al costado de nuestra imagen de gatito tendremos un espacio para poner nuestro texto
2- iremos a el lugar donde sacamos spline y veremos que 2 casillas abajo estara una herramienta con el nombre "TEXTO" tiene un icono de la letra A mayuscula
3.- seleccionaremos el campo donde queremos escribir y luego le daremos click
4.-Nos aparecera una ventana emergente en donde podremos escribir nuestro nombre o cualquier texto que queramos
5.-le daremos guardar y cerrar
6.-por ultimo le daremos "terminar boceto"
----------------------------------------------------------------------------------------------------------------------------------------
Now I gonna show you how put the text on our sides!
1. Just next to our kitty image we have space for put our text.
2. We’ll go to the place where we get spline and we’ll see that two boxes below there will be a tool called “text” has an icon A.
3. We’ll select the place where we want write and press click.
4. Will Appears a window where we gonna write our name or whatever text we want.
5. Save and Close.
6. And click “Finish sketch”.
Step 8: ACTUALIZAR EN NUESTRA BASE-UPDATE ON OUR BASE

Para que nuestra cara A salga en nuestra base ya hecha, tendremos que darle a actualizar para poder visualizarla
1.-arriba en nuestra barra de guardado te aparecera un icono de advertencia de que los complementos no estan actualizados
2.-luego de ahi clickearemos y nos estara cargando la imagen y nuestro texto en las caras predestinadas
3 podras visualizar igual que la imagen adjunta!
----------------------------------------------------------------------------------------------------------------------------------------
For visualize our A side in our base done, we need to update it.
1. In our save bar will appears you a warning icon that the complements aren’t updated.
2. Click there and will load image and text on all sides.
3. You will see the same that the image!
Step 9: Corte Laser Con Las Caras Prediseñadas-LASER CUT WITH THE PREDESIGN SIDES


Ahora usaremos el programa laser a continuacion los siguientes pasos:
1.-Vamos a guardar cada una de nuestras caras como imagen dxf, luego podremos abrir nuestro programa de manejo laser y abriremos nuestra cara A
2.-nos apareceran unos colores en nuestra pequeña barra de abajo
3.-escojeremos distintos colores para guiarnos
guia:
rojo- (corte)
azul- (grabado-escaner)
4.-vamos a seleccionar con nuestro cursor todo el marco y le asignaremos el color rojo para corte
5.-seleccionamos azul a la imagen ya las letras para que quede el grabado laser
6- luego le daremos a la pantallita superior que se encuentra en medio de nuestra barra principal para que nos de la simulacion del trabajo laser a realizar
7.- ¡listo! solo faltaria conectar tu maquina laser para poder manipularla desde tu computadora con la opcion de "comienzo"
IMPORTANTE:
recuerda que para corte laser
50 +
recuerda para grabado laser
50-
----------------------------------------------------------------------------------------------------------------------------------------
And now we gonna use the laser program, the steps to make it:
1. We gonna save each sides as a dfx image, later we’ll can open our laser program and open our A side.
2. A color will appear on our little bottom bar.
3. We’ll select many colors to guide us.
Red- Cut
Blue- engraving-scanner
4. We’ll a select with our cursor all frame and assign the red color for cutting
5. We’ll select the blue to the image and the little letters for the laser engraving
6. Later we’ll click to window that is in our principal bar for see the simulation of laser work to do.
7. Nice! Just connect your laser impresser for use from your computer with the option of “start”.
Important:
Remember for laser cut:
50+
Remember for laser engraving:
50-


