Introduction: Big Stainless Steel Sculpture: Part 1


I'm building a sculpture for new building in San Mateo, CA. When completed, the piece will stand at 17 feet and weigh about 2,000 pounds. The sculpture isn't complete yet, but this is what I've done so far.
Step 1: Design

The commission called for a vertically oriented sculpture with a relatively small footprint. My work often begins with primitive forms and lately has consisted of spherical elements. Not the best shape for vertical work. But, an ellipse is elemental too: it can be drawn using a simple formula, can be fabricated without too much trouble and is also the path that celestial bodies take as they hurtle around the sun. Here's an ellipse drawn in 3DS Max that is 119" x 42". Why 119" instead of an even 120"? At 119", this shape can be laser cut out of a 10 foot plate of stainless.
Step 2: Modifying


The ellipse needed some thickness, so I extruded it to 3 inches. At nearly 10 feet tall, the ellipse still maintains a "planar" feel which I like. But a thick ellipse is boring so I applied a bend modifier (angle=20 for Max users) to make it interesting. I've found that simple changes like this can make basic geometry look organic, especially if combined with other forms to create a compelling composition.
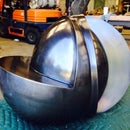
Step 3: Sculpting


Repeated forms are often integral to my work. I started by standing the first form on end, added additional forms and after a lot of work, arrived at a composition that I liked. The piece measures 4 feet wide, 18 feet tall, and 4 feet deep. After consulting with the mechanical engineers at AJ Miller and Associates in Oakland, we determined that the sculpture could be mounted on a 3 foot diameter x 1 inch thick stainless steel plate to be anchored in a concrete footing.
Step 4: Making Patterns


This sculpture was going to be fabricated out of 3/16" (7 ga.) 304 stainless plate to create hollow forms. I performed boolean operations on the piece to generate patterns that could later be flattened, transferred to the stainless plate and cut to create accurate intersecting lines. Turns out 3DS Max isn't the best tool for this so the piece was imported into Rhino and "unrolled" without too much trouble.
Step 5: Rendering

Here's a fast and dirty rendering. On to fabricating.


