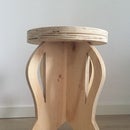
Introduction: Bowl/Lamp
Let's start!
Step 1:
I created this object this the software:
-Fusion 360
-Slicer for Fusion 360
-Adobe Illustrator
-2 sheets of plywood (600x400x3 mm)
-laser cutter
Step 2: Create the Shape on Fusion 360 Autodesk
The first step is to create the form. I did it in Rhino and then, once saved in .step, I imported fusion 360
Step 3: Slicer
Once in Fusion 360, press "Create" and "Slice" and the module will be imported into the other software. In this other software, you can decide how to "cut" the shape.
An important step in this software is to put the thickness of the cardboard you intend to use. Once you've decided how to break it down, save a PDF and import it into Illustrator.
REMEMBER A THING: software is not a genius! It can make mistakes so check if it is possible to build the shape.
Step 4: Illustrator
Once in Illustrator put the information that your laser cutter require.
in our case was
- for cutting: RED RGB(R=255 G=0 B=0) 0.01mm the thickness
- for engraving: BLUE RGB(R=0 G=0 B=255) 0.01mm the thickness
Step 5: Laser Cutter
Bring in the laser cutter.
Cardboard is cheaper so for the first try it's better to use cardboard.


