Introduction: Cheap and Simple Bluetooth Speaker


Hi Everyone......
This is my first ever instructable.
This is an extremely cheap and easy to make Bluetooth Speaker. This was not an intentional project, just a bonus during the making of another project (which i will share after it is complete). And i am glad i made this, the sound is so wonderful, much more than i expected. I urge everyone to try this, as it is quite straight forward and cheap.
I know it falls short on the aesthetics area, that will be sorted soon (waiting for some carbon fiber vinyl sheets)....
Step 1: Parts


1. 36MM 4Ohm 3W Full Range Mini Speakers
2. Bass Passive Radiator
3. PAM8403 5V Power Audio Amplifier
4. BK8000L Wireless Bluetooth Stereo Audio Module
5. Micro USB 5V 1A 18650 TP4056 Lithium Battery Charger Module
6. 1S 18650 Lipo Battery Level Indicator
7. Ground Loop Suppressor
8. Switch
9. 18650 LiPo Battery - 2Nos
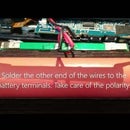
Step 2: Connections

Connecting the boards are quite straight forward.
Refer above wiring.
Step 3: Enclosure


Enclosure is made with 3mm wooden board.
Dimension: 19cms X10.5cms X6cms.
The enclosure could have been made much smaller, but this was actually designed for another project which had larger boards and more components. The sound reproduction with this dimension is amazing. Not sure if it will change with different dimensions. I was little skeptical about the thickness of the board, but it seems like it actually helps to radiate the lower frequencies along with the passive radiator.
As the thickness of the board is very less, you can use a normal utility knife to cut out the holes for the speakers and the passive radiator. The uneven edges were polished down with sandpaper. Used a drill to make holes for the switch, volume control, wires.
Step 4: Assembly
A general statement: All fixing has been done with hot glue. Be generous with the hot glue as the enclosure has to be air tight to get better low frequency effect.
1. The speakers and the passive radiator were fixed onto the front panel.
2. Fixed the front panel to the base panel.
3. The PAM8403 amplifier board and the switch were fixed on to the top panel through the drilled holes.
4. The wires for the charger board and the battery capacity indicator were pulled inside through the top panel.
5. Batteries and the rest of the circuit boards were glued to the inside of the base panel.
6. Fixed the side and back panels one by one.
7. Make sure all the holes and gaps are air tight. Used excess glue on the edges and once hardened, cut away the excess with a utility knife.
8. Thats it !
Step 5: Learning Point

A very important knowledge acquired during the making of this bluetooth speaker is "GROUND LOOP"
Basically if you power two different circuit boards with the same power supply, ground loops are created which make humming noise in your audio output. You do not want this in your audio circuits.
More Info here: https://en.wikipedia.org/wiki/Ground_loop_(electricity)
The easiest way to avoid noise generated by ground loop is to connect a ground loop suppressor prior to your amplifier.
Step 6: Further Improvement
Even though the looks of the speaker isn't very appealing, the performance is awesome. I have ordered a sheet of carbon fiber vinyl sheet. Will cover the entire box with this. This should give a nice look.
Photos will be uploaded once it is done.
Thanks everyone.......


