Introduction: Class to Manage the Configuration in the ESP32 EEPROM

Hi, I want to share with you all the class that I have developed and it simplifies the task of adding configuration information on ESP32 devices.
The class the following objectives:
- Facilitate the creation of a configuration system on ESP32 devices.
- It has a configuration menu.
- Verification of whether the device is has no configuration, in which case it enters configuration mode.
- Set a pin to activate the entry to the configuration menu. Connecting that pin to ground when the device starts appears the possibility of entering the configuration menu.
- Protect the setup menu by password.
Step 1: Source Code
These files contain the source code of the "Configuracion" class, to be able to use it follow the following steps:
- In the folder where arduino is installed, open the libraries folder.
- Create a folder with the name "Configuracion".
- Copy the three files to the "Configuracion" folder.

Step 2: Methods of the "Configuracion" Class
The methods that the class has are the following:
static void declararPropiedad(String name, String initialValue);
Description
Declare the properties and their initial value.
Parameters
- name: Name of the property, this literal will be displayed in the configuration menus.
- initialValue: Value that will be assigned by default on the first power on the device.
static void iniciar(int size, int PIN);
Description
Read the values of the configuration properties from the EEPROM. If it is not started, it starts the initialization process. Before calling this method you have to define the names of the properties using the method declararPropiedad.
Parameters
- size: Maximum number of bytes to be used in the EEPROM.
- PIN: PIN of the ESP32 board which, when connected to GND, allows to enter the configuration menu.
static String leerPropiedad(String name);
Description
Get the value stored in the property.
Parameters
- name: Name of the property from which you want to obtain its value.
static String leerPropiedad(int position);
Description
Get the value stored in the property.
Parameters
- position: Number of the position of the property from which you want to obtain its value. The first property has position 1, the second 2, ...
Step 3: How to Use the "Configuracion" Class
In this example we want to store the SSID and password of the router we want our ESP32 to connect to.
At the beginning of the setup block we initialize the two properties that we want to store in the WIFI_SSID and WIFI_PASSWORD configuration.
Then we call the method iniciar with the values 1024 and CONFIGURACION_PIN (which has the value 13). With these 3 lines the class allows you to manage the values of the two properties, we can modify them at any time.
Create a new project in the Arduino IDE and enter the following source code.
#include "Configuracion.h"

#define CONFIGURACION_PIN 13 /* PIN of the ESP32 board which, when connected to GND, gives us the possibility to enter the configuration menu. */

void setup() {
  Serial.begin(115200);
  /*
   * Configuration, the values entered are treated as default values.
   * The default values only take effect when you first start the device.
   */
  Configuracion::declararPropiedad("WIFI_SSID","");
  Configuracion::declararPropiedad("WIFI_PASSWORD","123456");
  Configuracion::iniciar(1024, CONFIGURACION_PIN);

  /* TODO */
  Serial.println("WIFI_SSID value is " + Configuracion::leerPropiedad("WIFI_SSID"));
}

void loop() {
  // put your main code here, to run repeatedly:
}
Step 4: Run the Example for the First Time


In the screenshots that are in this step show what the class does.
In the first check that the device is not initialized and asks for the password, we put QWERTY and send.
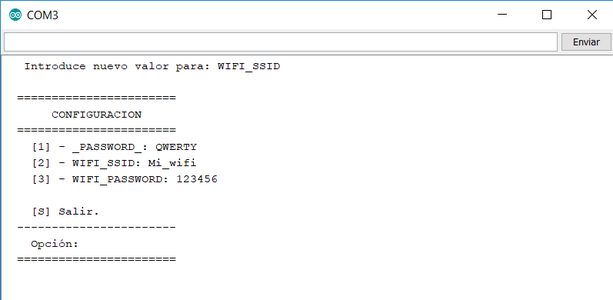
The second image shows the parameters and their values, as we can see the only parameter that has an initial value is WIFI_PASSWORD.
We will enter a value for WIFI_SSID, enter 2 and press send.
It asks us to enter a value for WIFI_SSID, type Mi_wifi and press send, the result is in the third image.
We enter S and send to exit, it shows us the phrase "SETTING OUT" and shows us the value of the WIFI_SSID parameter as we have programmed in the example. The last image shows the result.
Step 5: Enter the Configuration the Next Time

To enter the configuration it is necessary to connect PIN 13 to GND, when starting the board it shows us a progress bar for a few seconds, press send and ask for the password.
Enter QWERTY and press send.
Now it shows us the main configuration menu as the image shows.
This menu allows us to:
Option 1, show the values of the parameters.
Option 2, edit property values, as seen in the previous step.
Option 3, delete all the configuration, when starting the device would do what we have seen in the previous step.
Option S, exit.


