Introduction: Couch Potato
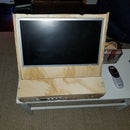
This project was created so that you can have a laptop experience in bed, but with the power of a desktop. It is essentially a lap desk with a cut out hold for the keyboard, a built in mouse pad, built in speakers, and of course RGB under glow. In order to complete this project, you will need access to a circular saw or table saw, a jig saw, a nail gun, wood glue, staples, double sided sticky tape, and a hot glue gun. For materials you will need a small sheet of ply wood, a yoga mat (or any kind of thin foam), a mouse pad, a monitor, speakers, USB hub with a decent length cable, USB powered light strip, key board, a mouse, and a computer (preferably a desktop but a laptop will work also).
Step 1: Measurements and Cuts
I started with a large piece of wood and measured and cut it down to my needs using a table saw. To fit my key board, mouse pad, and monitor the dimensions were 28.5" x 19.25". I then used extra wood from the previous cuts and made 11.5" legs to fit on either 19.25" end. For the base I traced my key board and used a jig saw to cut the dimensions. I then cut a little square at the top so the cable could run under the lap desk.
Step 2: Putting It Together
I put the desk together using brad nails and some wood glue. This is the quickest and easiest way to do it for a strong bond. I then used a yoga mat I found and cut the foam pad to the size of the top piece for some cushion when typing. The surface also has lots of grip so you can set down drinks or game controllers without having to worry about them slipping off. I next measured out 1" to the right of the key board so I could place the mouse pad down. This is just held in place with some hot glue on top of the foam mat.
Step 3: Adding Features
After sliding in the keyboard and placing a mouse down, I then determined to center the monitor with the keyboard. I cut out a hole in the foam by tracing the monitor stand and placing it down, using hot glue to hold it in place. I chose to do this in case I ever need to remove the monitor stand, you can use a more permanent solution if desired. I then added a USB hub with 4 ports to the side attaching it with double sided sticky tape. The cord foe this is about 4-5 feet so it will reach the desktop no problem. I next added RGB lighting to the bottom using an inexpensive, USB powered strip I found. It is attached with double sided sticky tape and hot glue. Then I added the speakers which took up the final port in the USB hub.
Step 4: Enjoy!
Set coach potato up in bed or on a coach for the ultimate gaming experience. I ended up using it on the futon in my dorm room and it makes gaming so much more relaxing. To make your experience even better, I would recommend a wireless keyboard and mouse to reduce cords. If you want to go even further, wireless speakers/headphones and a wireless display would reduce the cords to only one (the display power cord). To make this set up even more extreme, you may also increase the length of the ply wood to add another monitor.


