Introduction: Comfortable Enduro Bike Seat

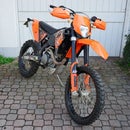
I like to use my Enduro Bike, KTM 450 EXC-R, for trips through the mountains. For one thing, it is very light and powerful and for another, it can be used on and off the road.
The first 2 trips were no fun, as after about 2 hours my lower back was hurting and burning. The seat is only 4 inches wide and quite hard, thus only a part of my rear could rest on it.
So a fix was needed. Here I describe how I fixed this problem.
Now I can ride the bike for hours without any problems to my lower back.
The first thing was to get another seat for the modification as I did not want to use mine. This was quite easy as many used seats are offered online, just make sure you do not get a cracked one which is quite common for these seats, given the area of use or abuse.
The next thing was the new seat cushion or foam. There were also many offers online, just the detailed information about the density of the foam was not so easy to come by.
As the available height was low this called for a high density foam.
The one I used has 140kg/m³ or 29lbs/ft³ and is especially for motorcycle seats.
The size I used was 26x13x1,6 in.
This foam has the advantage that it is easy to form with a knife and a sanding block.
The new seat cover was also selected from materials available for motorcycles.
Supplies
Foam block
Seat cover
Staples
Contact cement
Step 1: Prepare the Tools


Tools needed:
- Screwdriver
- Needle-nose Pliers
- Contact Cement
- Big Knife
- Snap-off Knife
- Rough File
- Nail Staple Gun
- Scrap Pieces of wood
- Lashing Straps
- Magnetic Bowl
- Sanding Block
Step 2: So Let Us Start


The next step is to prepare the bought seat by removing the cover (keep the cover, as it will be needed later).
This is a tedious task as there were about 100 nails which held the old seat cover.
It was also glued to the plastic frame!
Here you need the screwdriver, the needle-nose pliers and the magnetic bowl so that all the staple nails are securely collected.
Be sure to remove all the broken pieces of the staple nails from the plastic body of the seat or you will have bloody fingers.
Now you can remove the seat cover.
Step 3: Prepare the Seat to Fit the New Foam


The next step is to make a cutout in the old foam bed of the seat where the new foam is placed.
Here is the most important part to increase the comfort on this seat.
As the base is quite narrow the foam block provides additional width. So make sure to have enough overhang on the sides to give you a nice and wide new seat base.
The foam block is then glued to the seat frame with the contact cement.
Then it is time to form the foam. The first rough cuts are done with the big knife. The finer adjustments are done with the small knife, the file and the sanding block.
The overhanging pieces of the foam need to be glued to the base before the final adjustments.
For this you need the scrap pieces of wood and the straps.
Apply the contact cement to the foam and the side of the seat frame and after the drying period press the foam with the wood pieces and the straps tightly together.
Now use the leftover pieces of the foam and fill the gaps to make a nice smooth foam body.
Step 4: Finishing the Seat


Now comes the more requiring part, the cover.
I have done a few seats in the past and I have developed a way that works for me.
Cut the cover roughly to shape, using the old seat cover as a guideline leave at least 3 inches overhang so you have something to hang onto when stretching and tightening the cover.
To remove the residue of the old glue from the seat frame I use WD40 and patience.
Clean the seat body with brake cleaner and let it dry thoroughly.
Apply the contact cement to the areas of the seat body where the cover will be attached and stapled to and let it dry.
I start with the straightest area first, applying the contact cement to one long side of the cover.
Carefully bring the cover in contact with the seat body in this area. When the cover has no more creases in this area start applying pressure so that the glue can do its job. The amount of pressure is important, not the time so I sometimes use a small hammer.
Now use the staple gun and fix the cover in this area. Do not yet overdo it. One staple every ½ inch is enough.
Now repeat the previous steps with the other long side of the seat.
Now come the tricky parts, every seat has them - tight radius's
Here I pull the cover tight in the front and later in the rear and check the cover for creases in this area.
If they are OK I tackle it down with a few staples. Then you need to pull and push the cover to get it around corners in a way that it looks good at the end.
Here comes the point were you may need to remove some of the previously used staples to get the cover material around the corners with the least amount of creases.
The pictures show the bottom of the seat with most of the overhang already cut off.
Now you can shoot away with the staple gun. Afterwards, cut off the excess cover material.
Step 5: It Is Done

Turn the seat around and - be happy.
NOTES
There are some big creases in the rear section but there is only so much time I am willing to invest and they have no negative effect.
There are some aftermarket seats available but first they are quite expensive and second they are not readily available as the bike is not the latest model.