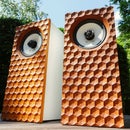
Introduction: Copper Tube and Wood HIFI Speakers Build With CNC
This project is a bit of an aesthetic experiment with a speaker project attached!
I wanted to use up some spare drivers I had lying around so I designed something interesting to house them and hopefully extend on my experimenting with Oak/Maple and Copper pipes.
I have done a few projects along this theme including a coffee table that came out very nice!
These were designed to be rustic and yet have good speaker performance, well, the best I could manage from these particular drivers.
If you enjoyed this project please vote for me on the Audio Contest!
Step 1: Design:
As always with these things, I started in Fusion 360 and after getting some rough dimensions from volume calculations based on the specs of the drivers.
I just did the main parts of the design as I didn't have time to produce a full assembly.
Step 2: Quick Cam
I decided to use my CNC to cut the chamfers using an adaptive machining strategy and then finishing by hand with a plane and sand paper. This ended up working very well!
For the rest I just did some basic profiles and rushed through the CAM quite quickly as it is a fairly boring step in the process.
Step 3: Gluing Up Scraps
Because the solid maple boards I had were reclaimed form old cabinet doors they were only 10mm thick. So I laminated them with scrap bits of 10mm plywood to get them up to the desired thickness of 20mm. I have done the same thing with MDF in previous builds.
Step 4: CNC
This bit is fairly self explanatory but I prefer to use my CNC router over traditional wood working tools. I ran the files I generated in Fusion to create the chamfers and cut the parts to size.
Step 5: Assembly of Box
First I cut a rabbit along one edge of each piece to accept the back panel. I used my diy router table for this but I could have done it before hand on the CNC router but I forgot. Next I laid out the pieces and attached them together with masking tape. Then glue was added and everything clamped up.
A tip for getting nice mitres is to run the shank of a screwdriver hard along the mitre edge to bend the wood fibers over so they meet perfectly.
Step 6: Front Panel
I attached the speaker driver to the front panel after cutting a mitre around the inside cutout.
Step 7: Copper Pipe Assembly
I gathered all the parts and cut the tube to the right lengths and then proceeded to solder everything together. I was going for quite a rough and rugged look so I left all the joints uncleaned after soldering.
After everything was assembled I coated it with some clear acrylic lacquer and then once that dried I went over it with the blow torch again to create a deep reddish tint to the finish which made the copper look very retro and interesting.
Step 8: Bass Port and More Assembly
I drilled a hole for the bass port in each speaker and then fitted the tube with a bit of sealant around the edges to get a nice seal. Then I sanded the whole box and mounted it on the frame.
Step 9: Back Panel
I machined a piece of mdf for the back which I painted matt black. The wires were then soldered to the binding posts and the panel was mounted to the speaker box itself.
Step 10: Finished!!
I apologies for this fairly brief instructable but I didn't have much time to record my build process properly. These speakers came out very nicely and they sound great.
If I were to do it all again I would set aside more time and pay more attention to the fine details of the build. There were some elements that didn't work quite right to do with the copper frame but I guess this was an experiment and I can learn from it for the next build!

Runner Up in the
Audio Contest 2017

Participated in the
Reclaimed Contest 2017


