Introduction: DIY IoT Time Clock for Smart Office
Do you know what is a time clock?
Time clocks were mainly used at the end of the 19th century and throughout the 20th century as a way to monitor precisely the attendance of employees in big companies and factories. Back then, it was often a paper card that the employee would slip into a machine that pinched the right time box or print it. Its concept has, of course, evolved a lot since then and most models now integrate RF or biometric technologies.
Those new machines are pretty expensive (at least $100) so we propose you to create your own fun time clock machine to monitor your employees (if you’re a CEO/HR) for less than $40 (again!) but which you can also adapt to any other use (monitor your pet's in and outs through its pet door for instance).
FEATURES
With this Instructables, you will be able to create a time clock that can:
- Detect motion when employee arrives
- Snap them
- Receive the snapshot via Slack
- Record the time of arrival
- Display how many employees have arrived
This project is fun and easy to make (no need for special skills) and will let you discover a bit more about home automation and even refresh your knowledge of Excel!
Step 1: REQUIRED MATERIAL
- Raspberry Pi 2, 3 ($20~$35) // for RPi 2, you will need a WiFi dongle
- 16Gb SD card ($9)
- 1 PIR module ($2) link + wires
- An old webcam
- A Google Drive account
TOTAL: less than $40!
The entire installation should take about an 1 hour.
Step 2: SET UP YOUR PROTA PI
You first need to build the smart hub that will control the automation of your ring bell and connect all devices together. Prota OS for Raspberry Pi is our free smart hub OS which is very easy to install. In no time you will turn your Raspberry Pi into a smart home automation hub!

You can download Prota OS here. Then burn it on the SD card.
We made an easy guide you can follow to set up your Prota Pi.
Step 3: SET UP YOUR WEBCAM AND PIR MODULE

- Plug-in the camera’s USB cable to your Raspberry Pi
- Download the Webcam app on your Prota Pi (in App Libraries)
- Open the app to check that the camera is now working (it should start to automatically take screenshots in case of any motion)
Now let’s connect your PIR sensor to your Raspberry Pi.

As you can see, next to your sensor’s pins are small indications on what each pin is made for:
- D is for Data
- + is for the current connection
- - is for the ground connection
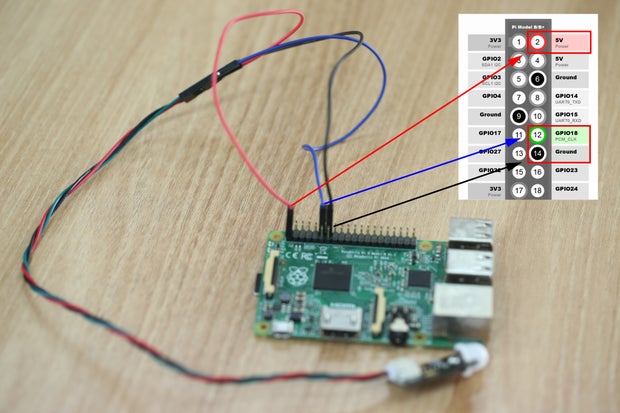
Simply connect as in the picture below to set properly.

For the quick explanation, the RED cable is connected to a 5V pin (PIN02), the BLACK cable is connected to a ground pin (PIN 14) and the BLUE cable is connected to GPIO18 (PIN 12).
You can look at the map below if you need any direction.

- Now let’s open Prota Space.
- If you haven’t done it yet, download the GPIO app in App Libraries.
- In GPIO app, click on GPIO18. Select “Interrupt” and “Pull down”. Click on “set”.

The sensor is now set up.
Move your hand around, you should see notifications of “rising interrupt” on the GPIO app page.
Step 4: SET YOUR EXCEL ATTENDANCE DOCUMENT
Let’s make a Google Drive spreadsheet that you can access at any time to see how many employees have arrived and at what time.

Download the template that we prepared (find below).
A quick explanation about this spreadsheet:
- 1st tab integrates all recordings by your PIR module that will be added here by an IFTTT applet
- 2nd tab will convert time information into day and hour in datevalue and timevalue
- We consider here an employee is defined as absent if he arrives after 11:45 AM (which is 0.4895833333 in timevalue)
- 3rd tab calculates how many entries were recorded for this day before 11:45 AM. Change the function in column B if you want to set a different timespan.
Save this document as Google Spreadsheet in a specific folder of your Drive.
We suggest this path My drive > IFTTT > Prota.
Attachments
Step 5: SET UP THE NECESSARY APPS
Let’s first set up your IFTTT account
- Download the IFTTT app from App Libraries (in Prota Space)
- From the same device you use Prota Space (smartphone or browser), access IFTTT.com and sign-in/sign-up
- Search for “Prota” and click on connect. Choose your Prota to connect it to your IFTTT account. Search for “Email” and connect your IFTTT account to your email.
- Search for “Slack” and connect your IFTTT account to your Slack account

Now let’s set up your Email app
- Go to App Libraries and download Email app
- Open it, click on + and setup your email address
You can follow this guide if you need further details.
Step 6: SET UP YOUR AUTOMATIONS (STORIES & IFTTT)
Now it’s time to automate everything!
First, let’s create the storyline
- Open Stories app in your Prota Space, click on + and then on “when”
- Click on “set sensor” and select GPIO. The event should be “detects a rising interrupt on pin GPIO18”. This means “when a movement is detected”.
- Now we will set the actions that follow this trigger. Select Webcam, the action event should be “webcam take a snapshot”.
NB: In our case, the snapshot was taken too quickly after the motion detected and the person hadn’t fully stepped inside. We added as “extra option” a delay of 5 seconds.
- Click on the “then” button on the top right corner. Select IFTTT for the next action, and choose “run the Prota applet”
- Click on the “and another actor story” button and add “email send to trigger@recipe.ifttt.com file - snapshot“

Now let’s create the 2 applets that we will need
- IF Prota - Execute storyline (select the one you created previously)
THEN Google Drive - Add a row to spreadsheet (Input your spreadsheet name and its folder path)
- IF Email - Send IFTTT any email
THEN Slack - Post to channel (Select for instance direct messages to yourself)

Step 7: YOUR TIME CLOCK IN ACTION!
It’s ready! Let’s install the time clock next to the door and see how it looks like in action!
This project aims mainly at showcasing a basic application that combines Raspberry Pi, sensors, Prota OS and webcams. It’s a great starting point for your personal project, so we encourage you to go further, as there are in IoT an unlimited number of possible applications.
Here are some ideas if you want to go further:
- Instead of a PIR sensor, try using a laser module. The setup is as easy and can be a little bit more accurate than the PIR sensor.
- Adapt the project to monitor your pet’s daily journeys outside of the house with a sensor aiming at its pet door.
- Improve the excel spreadsheet use by linking the employee count to a webhook that will automatically notify you by Telegram app
- Scan all your employees smartphone’s bluetooth with your Prota Pi’s Blue Tag app and set up storylines so that for each employee passing by it records their name with the arrival time.
If you try your own project based on this one, don’t hesitate to ping us, we’d love to know more about it!
That’s it for today! We hoped you’re excited to try it at your office or do your own version!
If you enjoyed reading and testing this project, don't forget to "favorite" it and to follow us on Instructables and on Twitter!
BETA PROGRAM
You like Prota OS and want to test our newest apps before their release?
Subscribe your email address here to enroll or get further information on our Beta program.
You like our projects? Make your own!
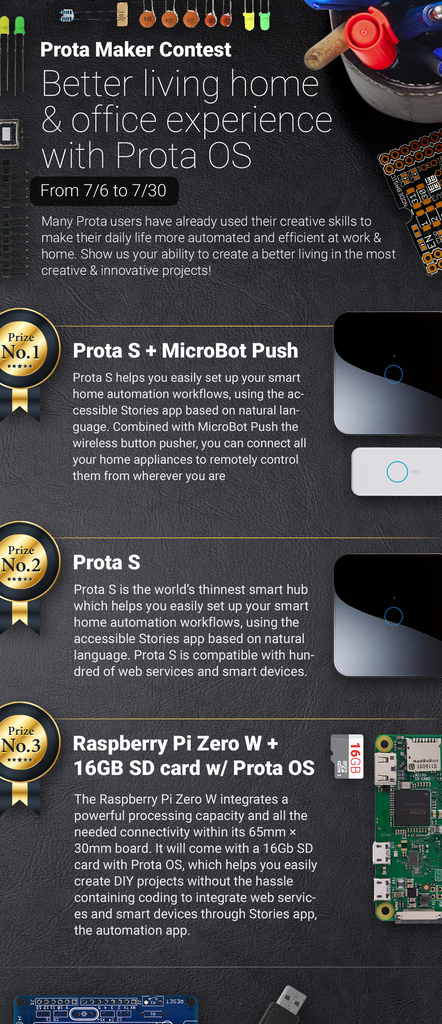
We are currently (and until July 30) running a maker contest. Show us the creative projects you can do with Prota OS and win awesome prizes!
More info here - https://support.prota.info/hc/en-us/community/top...


Participated in the
Sensors Contest 2017


