

Introduction: DIY Pocket Pong


Hi, I am Athul, studying 9th grade and about to enter 10 grade. I have always been a fan of retro gaming. Also, kids like me are now tired of boring mobile games. there is a trend of people being interested in 90s tech and old games. One of the most interesting games is Pong by Atari engineer Allan Alcorn, an easy-to-learn but harder-to-master game. I considered putting this game into my pocket with 3d printing and electronics. so in this project, we will build a small, battery-powered, fully 3d printed, and easy-to-build pocket-sized pong console. it has 2 controllers so you can play with your friends. also, it is fun to play solo on it, like you can control both sides it is kind of challenging
Supplies

Parts
Tools
- glue gun
- 3d printer
- wires
- soldering iron
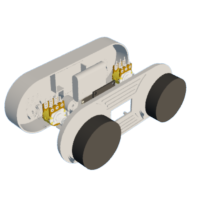
Step 1: Designing Everything in Fusion 360

I utilized Auto Desk Fusion 360 software to create the designs for all the 3D-printed parts needed for my project. Furthermore, I added design patterns to the front plane, giving it an amazing appearance. You can find the 3D printable files and .STEP files are below


Step 2: 3D Printing Parts
 I used a 3d printing service for printing my files. I selected PLA+ and 0.2MM layer height.
Step 3: Wiring Digram

Step 4: Assembly
Step 4:1


Insert the OLED module into the 3D-printed part using the four small tabs. Make sure the OLED display is oriented correctly. Use a soldering iron to melt the tabs and fix the display onto the 3D print.
Step 4:2

 Insert both 10k pots into their designated holes and tighten the nuts securely.
Step 4:3


Insert the buzzer and power switch into their designated slots and securely them with glue.
Step 4:4

Connect all the power and ground wires of all components. Also, solder some extra wires for SDA, SCL, POT 1, POT 2, and Buzzer. Follow the wiring diagram
Step 4:5

Glue the Xiao upside down into the main body and also glue the battery.
Step 4:6


Also, we need to install the power switch
Step 4:7

We need to solder the +ve wire of the battery to the switch and -ve to the BAT -Ve pin of Xiao, then connect the other end of the switch to the BAT +Ve of Xiao
Step 4:8

Connect all the wires to the Xiao as shown in the wiring diagram
Step 4:9

Close it off together. it will snap fit. if you need it mode securely use a little glue on the sides. also put the knob
Step 5: Flashing the Esp32

connect the xiao to your PC and flash the code through Arduino IDE
Here is the code for this project. Written by Michael Teeuw
#include <Wire.h>
#include <Adafruit_GFX.h>
#include <Adafruit_SSD1306.h>

//Define Pins
#define OLED_RESET -1
#define BEEPER A3
#define CONTROL_A A0
#define CONTROL_B A1
#define SCREEN_WIDTH 128 // OLED display width, in pixels
#define SCREEN_HEIGHT 64 // OLED display height, in pixels

// Declaration for an SSD1306 display connected to I2C (SDA, SCL pins)
Adafruit_SSD1306 display(SCREEN_WIDTH, SCREEN_HEIGHT, &Wire, -1);
//Define Visuals
#define FONT_SIZE 2
#define PADDLE_WIDTH 4
#define PADDLE_HEIGHT 10
#define PADDLE_PADDING 10
#define BALL_SIZE 3
#define SCORE_PADDING 10
#define EFFECT_SPEED 0.5
#define MIN_Y_SPEED 0.5
#define MAX_Y_SPEED 2
//Define Variables

int paddleLocationA = 0;
int paddleLocationB = 0;
float ballX = SCREEN_WIDTH/2;
float ballY = SCREEN_HEIGHT/2;
float ballSpeedX = 2;
float ballSpeedY = 1;
int lastPaddleLocationA = 0;
int lastPaddleLocationB = 0;
int scoreA = 0;
int scoreB = 0;
//Setup
void setup()
{
   Serial.begin(115200);
  if(!display.begin(SSD1306_SWITCHCAPVCC, 0x3C)) { // Address 0x3D for 128x64
    Serial.println(F("SSD1306 allocation failed"));
    for(;;);
  }
    splash();
  display.setTextColor(WHITE);
  display.setTextSize(FONT_SIZE);
  display.clearDisplay();
}
//Splash Screen
void splash()
{
  display.clearDisplay();
  display.setTextColor(WHITE);
  centerPrint("PONG",0,3);
  centerPrint("By Allan Alcorn",24,1);
  centerPrint("Ported by",33,1);
  centerPrint("MichaelTeeuw.nl",42,1);
  display.fillRect(0,SCREEN_HEIGHT-10,SCREEN_WIDTH,10,WHITE);
  display.setTextColor(BLACK);
  centerPrint("Move paddle to start!",SCREEN_HEIGHT-9,1);
  display.display();
  int controlA = analogRead(CONTROL_A);
  int controlB = analogRead(CONTROL_B);
  while (abs(controlA - analogRead(CONTROL_A) + controlB - analogRead(CONTROL_B)) < 10) {
    // show as long as the total absolute change of
    // both potmeters is smaler than 5
  }
  soundStart();
}
//Loop
void loop()
{
  calculateMovement();
  draw();
}
void calculateMovement()
{
  int controlA = analogRead(CONTROL_A);
  int controlB = analogRead(CONTROL_B);
  paddleLocationA = map(controlA, 0, 1023, 0, SCREEN_HEIGHT - PADDLE_HEIGHT);
  paddleLocationB = map(controlB, 0, 1023, 0, SCREEN_HEIGHT - PADDLE_HEIGHT);
  int paddleSpeedA = paddleLocationA - lastPaddleLocationA;
  int paddleSpeedB = paddleLocationB - lastPaddleLocationB;
  ballX += ballSpeedX;
  ballY += ballSpeedY;
  //bounce from top and bottom
  if (ballY >= SCREEN_HEIGHT - BALL_SIZE || ballY <= 0) {
    ballSpeedY *= -1;
    soundBounce();
  }
  //bounce from paddle A
  if (ballX >= PADDLE_PADDING && ballX <= PADDLE_PADDING+BALL_SIZE && ballSpeedX < 0) {
    if (ballY > paddleLocationA - BALL_SIZE && ballY < paddleLocationA + PADDLE_HEIGHT) {
      soundBounce();
      ballSpeedX *= -1;

      addEffect(paddleSpeedA);
    }
  }
  //bounce from paddle B
  if (ballX >= SCREEN_WIDTH-PADDLE_WIDTH-PADDLE_PADDING-BALL_SIZE && ballX <= SCREEN_WIDTH-PADDLE_PADDING-BALL_SIZE && ballSpeedX > 0) {
    if (ballY > paddleLocationB - BALL_SIZE && ballY < paddleLocationB + PADDLE_HEIGHT) {
      soundBounce();
      ballSpeedX *= -1;

      addEffect(paddleSpeedB);
    }
  }
  //score points if ball hits wall behind paddle
  if (ballX >= SCREEN_WIDTH - BALL_SIZE || ballX <= 0) {
    if (ballSpeedX > 0) {
      scoreA++;
      ballX = SCREEN_WIDTH / 4;
    }
    if (ballSpeedX < 0) {
      scoreB++;
      ballX = SCREEN_WIDTH / 4 * 3;
    }
    soundPoint();
  }
  //set last paddle locations
  lastPaddleLocationA = paddleLocationA;
  lastPaddleLocationB = paddleLocationB;
}
void draw()
{
  display.clearDisplay();
  //draw paddle A
  display.fillRect(PADDLE_PADDING,paddleLocationA,PADDLE_WIDTH,PADDLE_HEIGHT,WHITE);
  //draw paddle B
  display.fillRect(SCREEN_WIDTH-PADDLE_WIDTH-PADDLE_PADDING,paddleLocationB,PADDLE_WIDTH,PADDLE_HEIGHT,WHITE);
  //draw center line
  for (int i=0; i<SCREEN_HEIGHT; i+=4) {
    display.drawFastVLine(SCREEN_WIDTH/2, i, 2, WHITE);
  }
  //draw ball
  display.fillRect(ballX,ballY,BALL_SIZE,BALL_SIZE,WHITE);
  //print scores
  //backwards indent score A. This is dirty, but it works ... ;)
  int scoreAWidth = 5 * FONT_SIZE;
  if (scoreA > 9) scoreAWidth += 6 * FONT_SIZE;
  if (scoreA > 99) scoreAWidth += 6 * FONT_SIZE;
  if (scoreA > 999) scoreAWidth += 6 * FONT_SIZE;
  if (scoreA > 9999) scoreAWidth += 6 * FONT_SIZE;
  display.setCursor(SCREEN_WIDTH/2 - SCORE_PADDING - scoreAWidth,0);
  display.print(scoreA);
  display.setCursor(SCREEN_WIDTH/2 + SCORE_PADDING+1,0); //+1 because of dotted line.
  display.print(scoreB);
  display.display();
}
void addEffect(int paddleSpeed)
{
  float oldBallSpeedY = ballSpeedY;
  //add effect to ball when paddle is moving while bouncing.
  //for every pixel of paddle movement, add or substact EFFECT_SPEED to ballspeed.
  for (int effect = 0; effect < abs(paddleSpeed); effect++) {
    if (paddleSpeed > 0) {
      ballSpeedY += EFFECT_SPEED;
    } else {
      ballSpeedY -= EFFECT_SPEED;
    }
  }
  //limit to minimum speed
  if (ballSpeedY < MIN_Y_SPEED && ballSpeedY > -MIN_Y_SPEED) {
    if (ballSpeedY > 0) ballSpeedY = MIN_Y_SPEED;
    if (ballSpeedY < 0) ballSpeedY = -MIN_Y_SPEED;
    if (ballSpeedY == 0) ballSpeedY = oldBallSpeedY;
  }
  //limit to maximum speed
  if (ballSpeedY > MAX_Y_SPEED) ballSpeedY = MAX_Y_SPEED;
  if (ballSpeedY < -MAX_Y_SPEED) ballSpeedY = -MAX_Y_SPEED;
}
void soundStart()
{
  tone(BEEPER, 250);
  delay(100);
  tone(BEEPER, 500);
  delay(100);
  tone(BEEPER, 1000);
  delay(100);
  noTone(BEEPER);
}
void soundBounce()
{
  tone(BEEPER, 500, 50);
}
void soundPoint()
{
  tone(BEEPER, 150, 150);
}
void centerPrint(char *text, int y, int size)
{
  display.setTextSize(size);
  display.setCursor(SCREEN_WIDTH/2 - ((strlen(text))*6*size)/2,y);
  display.print(text);
}
Step 6: Let's Play the Game
Let's power it. you need to move one of the pots to start the game, also it is rechargeable through USB C. Don't forget to switch on the power switch before plugging in the charger. the device needs to be powered On in order to recharge the battery. Have fun !!!
First Prize in the
Arcade Student Design Challenge


