Introduction: DIY Smart Home Bedside Remote
Today we’re gonna try automating as many lights as possible in many different ways and make a DIY remote control that you can put on your bedside table to easily control all your smart lights.
FEATURES
- Set up your smart hub based on Raspberry Pi
- Make a remote control out of a GPIO breadboard
- Control your Hue Lights through physical buttons
- Connect your power sockets and physical lights switches
FOR WHOM
- Any beginner in automation, even with no knowledge, will be able to easily follow this project. So it’s a great way to start automating your smart home and see how easy and fun it can actually be!
- Owners of smart bulbs and/or smart sockets who want to go one step further and make it even easier to turn them on and off, especially if you have various brands (which implies different apps to open and use).
- Tech enthusiasts who like fun and cheap DIY projects to automate their homes.
- A person with limited mobility, because being able to switch on and off lights or other house appliances that are spread across the house with one single remote can be a significant help for the everyday life. Home automation can make a huge change for anyone with a disability, so don’t hesitate to spread your knowledge around you!
This project should only take about an hour to make and you won’t need any particular skills nor a big budget (you can connect 5 lights for less than $60 in total).
Step 1: REQUIRED COMPONENTS
- Raspberry Pi 2 or 3 ($20~$35) // for RPi 2, you will need Bluetooth & WiFi dongles
- 16Gb SD card ($9) GPIO breadboard + wires + buttons ($5~10)
- RF transceiver for RPi ($3) + antenna to solder OR RF transceiver module with antenna included ($15)
- RF switches (you can find 5 switches for $25 here) AND/OR MicroBot Push button pusher + velcro tape (also available on Amazon) AND/OR Philips Hue light bulbs ( link)
The components should vary depending on how you plan on automating your lights.
For the sake of the explanation, we will explain three different methods to connect your lights (with RF sockets, with MicroBot Push, with Philips Hue). Feel free to mix whatever way you want, depending on the setting of your house/room.
For RF Sockets: currently our OS supports 433, 477 and 315 MHZ sockets. We recommend you to use WattsClever, DX or Etekcity. The following brands are not working properly: Westfalia, Energenie, DiO, JTD.
Step 2: SET UP YOUR PROTA PI
You first need to build the smart hub that will control the automation of your ring bell and connect all devices together. Prota OS for Raspberry Pi is our free smart hub OS which is very easy to install. In no time you will turn your Raspberry Pi into a smart home automation hub!
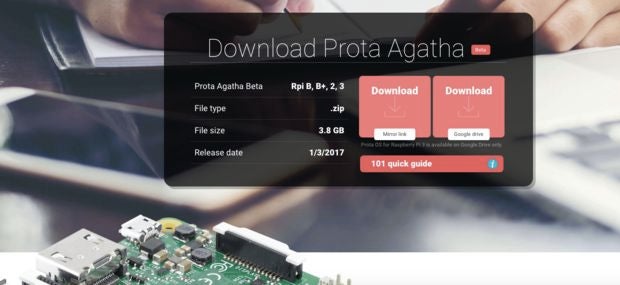
You can download Prota OS here . Then burn it on the SD card.
We made an easy guide you can follow to set up your Prota Pi.
Alternatively, you can check this Instructables .
Step 3: SET UP YOUR GPIO BREADBOARD, AND BUTTONS
Let’s now set up your GPIO breadboard which will be your remote control. Each button on it will trigger one light (it can also trigger several if you prefer) and we will set up for this project three buttons.

Our model of GPIO breadboard is a small one so it’s good for 3-5 buttons. If you want to put more of them, consider buying a bigger one.
Start by setting up your buttons like in the picture below

- Plug a hard wire next to each button, and connect it to the blue - line (ground).
- Plug a jumper wire at the top of this ground line (red one in the picture)
- Plug a jumper wire next to each button, which we will then plug to a GPIO pin (white, black and brown in our example).
Now let’s connect the breadboard to your Raspberry Pi.

- Plug the ground wire (red wire) to PIN 9.
- Plug the button wires (white/black/brown wires) to the PIN 11/13/15

Step 4: SET UP YOUR ANTENNA
This step is only needed if you want to connect a RF socket to your bedside remote.
If you have opted for a RF module and a DIY antenna, you need to solder them together.Make sure the soldering connects the antenna to the ANT port on the RF transceiver.

You can have more information on how to make an external antenna in this article.
Keep in mind that the required length of your antenna will depend on the frequency of your RF socket. Our OS supports 433, 477 and 315 MHZ.
Once soldering is done, plug three jumper wires to your RF transceiver (433/477/315 MHZ).
VDD = Electric current (5V)
GND = ground (select a ground PIN)
DATA = has to be connected to GPIO23


You can connect those three jumper wires as we did on PIN 2 (5V), PIN 6 (GND) and PIN 16 (GPIO 23).
Step 5: SET UP GPIO APP
It’s time to set up your Prota OS apps to configure the buttons.
First, let’s take care of the GPIO settings
- Go to App Libraries and download the GPIO app
- Open GPIO app
- Select GPIO17 and set it up on Interrupt // Pull Up.
- Click on “Set” to confirm.
- Do the same for GPIO27 and GPIO22

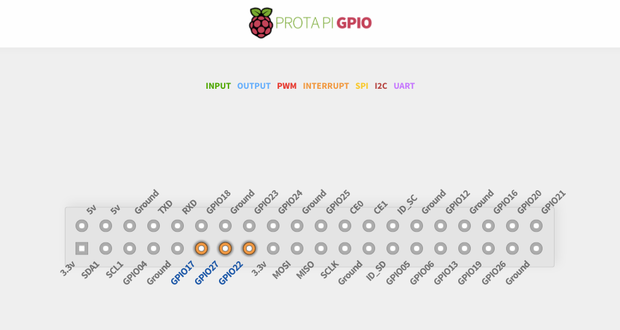
You can make a test by pressing on your buttons. It should react by a “falling” and “rising” interrupt.

Step 6: SET UP YOUR RF SWITCH, PHILIPS HUE AND MICROBOT PUSH
We will review three methods to automate your lights and link them with your remote control:
- Via a RF switch
- With Philips Hue bulbs
- With a MicroBot Push installed on a light switch
Let’s start by connecting your Prota Pi to your RF switch:
- Open App Libraries and download ON/OFF app
- Click on “Add socket”
- Type-in the details, select “On Board” and click on “Done”

- The app will start scanning the surrounding sockets. Press and hold on the socket’s button until the LED blinks
- When the LED stops blinking and stays on solid red, it means your Prota Pi has paired with your socket. You can then press on “Remember”

You can now try turning it on and off via the app interface.
Now let’s pair your Philips Hue bulb with your Prota hub:
- Go to App Libraries and download the Philips Hue app
- Open the Philips Hue app and follow the instructions to pair your Prota and your Hue hub. You can follow this guide.

Nothing more to do!
Finally, let’s set up your MicroBot Push and pair it to your Prota Pi.
First, let’s do the pairing.
- Turn on your MicroBot (the switch is on the back)
- Access your Prota Space and go to the homescreen
- Click on the “Pair now” button and follow the instructions to pair the MicroBot

Now let’s install it on your light switch. Put velcro tape on the tip of your MicroBot’s finger and on the spot where the finger will press the light switch. This can work with any type of switch (including toggle switches). Then place fixing tape on the MicroBot to attach it to the wall next to your light switch.
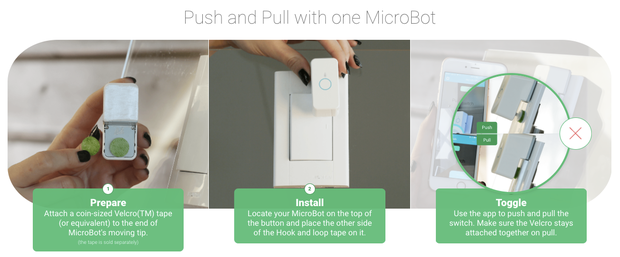
You now have three ways to turn on and off your lights!
Step 7: SET UP YOUR AUTOMATION STORIES
Let’s now write down the storylines that will link the buttons to your lights
- Go to your Stories app
- Press on “+” and click on “When” to start writing a new storyline
- Select GPIO as Sensor and select “When Gpio Pin detects a rising interrupt on GPIO17” (this is your 1st button)
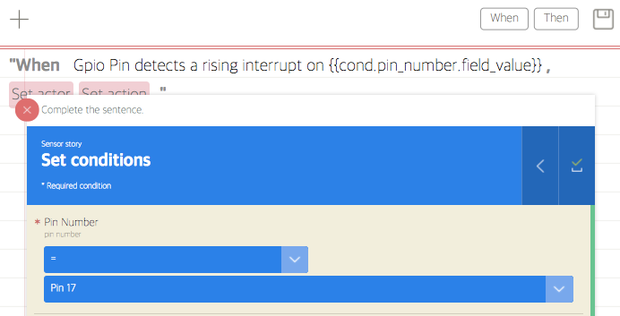
- Select ON/OFF as Actor and “socket turn off” as an action.

- Click on the save icon
Now you can create two other storylines for the two remaining buttons, linking GPIO27 and GPIO22 to respectively Philips Hue bulb and your MicroBot Push.


Step 8: INSTALL AND TRY IT OUT
That’s it, your remote control is ready. Make sure your RF switch, Hue bulb and MicroBot Push are ready to do their job. Plugin your Raspberry Pi next to your bed and try to turn everything off.
This instructables has two goals
- Show you how simple home automation can be
- Show you that you can make a remote for literally anything!
Once you’ve tried this project, we highly encourage you to go further and try adding/testing new features. Here are some leads:
- Add LEDs to your breadboard to let you know if each light is either ON or OFF
- Why not setting a bot that gives you a complete report of all your lights at home? Depending on the lighting system, that can be very easy to do! Check out how you can set up a bot with your new Prota OS in this guide.
- Use your buttons for something else, like one to start your coffee machine in the morning (with a MicroBot Push on it), another to bring the blinders up (like here)), the last to ask a bot to send you a report on the day’s weather forecast.
Your imagination is your limit! Don’t hesitate to share with us how you adapted this project!
We hope you liked reading and testing this Instructables. Don't forget to "favorite" it and to follow us on Instructables and on Twitter!
Any question? Please use our forum.
BETA PROGRAM
You like Prota OS and want to test our newest apps before their release?
Subscribe your email address here to enroll or get further information on our Beta program.
You like our projects? Make your own!
We are currently (and until July 30) running a maker contest. Show us the creative projects you can do with Prota OS and win awesome prizes!
More info here - https://support.prota.info/hc/en-us/community/top...
