Introduction: Darkade - Bartop Arcade Cabinet


For a long time I wanted an arcade cabinet to relive the old classic games from my childhood. Got a lot of inspiration for building mine from people posting on Instructables. Most of the materials used were recycled or upcycled, a lot of the electronics scavenged from old devices.
I was torn between using the Raspberry Pi or my old computer for this project but finally decided on the old computer parts because I hated parting with them and they worked much better with emulators.
Design was based off the plans I found here on Instructables, though adjusted a bit to fit my own needs.
Step 1: Tools and Matrials Used

Hopefully I listed everything needed, if I forgot something please don't hold it against me.
Tools used:
- hand saw
- pliers
- hammer
- knife
- screwdrivers
- power drill
- angle grinder
- soldering iron
- rotary tool
- clamps
- various drill bits
- sanding paper
- brushes
- masking tape
Materials:
- palette wood
- plexiglass
- MDF board
- hinges
- iron-on edge tape
- USB SNES controller
- happ buttons
- 8-way joystick
- 4,6 mm female quick spade connectors
- 19" 4:3 LCD monitor
- atx power supply
- motherboard, graphicx card, processor, RAM, HDD
- power extension box
- speaker driver
- 3w speaker
- 50cm 12v LED strip light for computer case
- piece of aluminum
- screws
- wire
- paint
- wood putty
Step 2:


This is how it started, building the base and the side panels. Make sure that the bottom is sturdy because the construction is going to be somewhat heavy. I used a lot of screws since the wood wasn't straight, otherwise I would just use wood cement.
Step 3:

Added the front and the control board parts, did a lot of sanding. Also on some joints I used U-shaped pieces of wire along with wood cement. You can see the construction starting to look like a proper cabinet now.
Step 4:


Glued together the front pane, screwed it to the bottom. Started using wood putty. Again a lot of sanding after.
Step 5:


Used a couple of hinges to make the top open like a car hood. You will definitely want easy access to the inside of your cabinet in case you need to fix or adjust something later.
Step 6:


Next thing was the monitor mount. I added a couple of boards on the sides to make it sturdier since the screen I'm using is somewhat heavy.
Step 7:


Attaching the marquee, screen stand and cutting the plexyglass to fit the marquee.
Step 8:


Hooking up the speaker to the driver board, connecting to the case and testing everything. My first idea was to put it up in the marquee but decided against it since I'd have to drill holes in the plexy to get the sound correct and the volume knob would be difficult to get to. This way if I decided to adjust the volume later, just lifting the hood was enough. The sound board used is a LM386 mini amplifier board that works from 3V-12V, and the speaker is 3W 4ohm, salvaged from a broken bluetooth speaker.
Step 9:


Made the fixture for the plexy and tested the LED. I was considering a few other ways to attach the plexy but ended up with this somewhat simple solution.
Step 10:


At this point I took apart the SNES controller and pulled the wires from it. Sandwitched the panel between two MDF pieces to keep them from moving. There is an instruclable for this from MrHermito, please check it out the details for details:
Step 11:


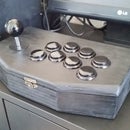
Drilling the holes for the arcade style buttons, also installed the power button. More wood putty and sanding before painting. Lots and lots of sanding.
Step 12:


Basic paint job. First I transferred some graphics to the wood via baking paper technique, then did 3 coats of paint and was happy how it came out.
Step 13:


Installed the LCD screen and the buttons.
Step 14:


Next came the red trim, which I ironed on. The 8-way joystick arrived at this point to I put it in it's place.
Step 15:


The tricky part, getting the motherboard, power supply and HDD securely on the MDF. Decided to make a hole under the processor so it wouldn't lie on the wood and had more air circulation under it. The HDD is screwed in from the bottom, motherboard from the top and the power supply secured with zip ties.
Hardware for those interested:
- AMD Athlon II X2 270
- GIGABYTE GA-M68MT-S2P Micro ATX Motherboard
- Apacer 4+2GB RAM, DDR3
- Sapphire Radeon HD6670 1GB DDR5
- Seagate Barracuda 7200 160GB
- OCZ CXS-500W
Step 16:


Made a aluminum mount for the LEDs, mounted it in the marquee. The sign is printed until the vinyl one arrives, which might take some time.
The OS was booted up at this point, decided on Lakka for it's simplicity. Decided for this OS since it already has all the emulators built in and supports a wide variety of joystick. All you need to do after installing it is to load up your ROM files and you're good to go.
Check out http://www.lakka.tv/ to see more about this simple Linux distribution.
Step 17:


The front USB panel was installed and buttons were being tested before I closed it up.
Step 18:


Added the power extension box in the back and made the back cover. There's more than a few holes to ensure air circulation and more than enough room to add a 12cm fan later if I notice it starts to heat up in the summer. Also made a hole for easy access to the extension box's power button.
Step 19:


Last but not the least, having my significant other thoroughly test it. Hope you find this instructable somewhat helpful if you decide to build an arcade cabinet of your own.

Participated in the
Gaming Contest

Participated in the
Hand Tools Only Contest 2016


