

Introduction: Design Your Own Chess Piece

This Project Unit is designed around the mathematics of chess. Professors of mathematics study chess, offer variants, and look at the implications of the rules to find hidden rules. There is no reason that the same inquiry cannot be taught at a secondary level. This projects seeks to do this as well as give your classroom a stack of unique chess boards, unique chess pieces, and a portfolio of rules for these pieces to show of your student's learning.
Context for the Creation of the Project
I teach a unique class called Intro to Technical Mathematics. This course is entirely Inquiry Based and Project Based. It is designed for students who fit the following criteria at our school:
- Students who have failed math and have become discouraged by traditional math classes centered around the Notes-Quiz-Test formula.
- Students who are jointly enrolled in the high school and the Vocational Technical School that we share a campus with. These students study vocations such as Machine Technology, Automotive Repair, Cosmetology, and Sports Medicine, among many others.
- Students in the Special Education program either through our Life Skills Program or otherwise have an IEP with specific modifications. These sorts of modifications tend to align to this course with little to no changes to the daily routine.
- Students that need the last minute academic intervention, are credit deficient, or require any kind of support before graduation. This course earns them a STEM credit.
Each step listed below will align to the sequence of tasks and lessons I made. The summative assessment at the end requires, at the minimum, student's having made an original piece to add to chess. This way they can playtest the piece and create an info card for it.
Standards Aligned
This project is also aligned to the eight Common Core Practice Standards.
- Make sense of problems and persevere in solving them.
- Reason abstractly and quantitatively.
- Construct viable arguments and critique others'.
- Model with mathematics.
- Use appropriate tools strategically.
- Attend to precision.
- Look for and make use of structure.
- Look for and express regularity in repeated reasoning.
These are also in accordance with the following Common Core Academic Standards for Science and Technology.
3.2.10.D Inquiry and Design; Identify and apply the technological design process to solve problems.
3.2.12.D Inquiry and Design; Analyze and use the technological design process to solve problems.
3.6.12.D Technology Education; Analyze physical technologies of structural design, analysis and engineering, personnel relations, financial affairs, structural production, marketing, research and design to real world problems.
3.7.12.A Technological Devices; Apply advanced tools, materials, and techniques to answer complex questions.
3.7.12.B Technological Devices; Evaluate appropriate instruments and apparatus to accurately measure materials and process.
I think it is also important to speak to the Productive Struggle, referenced in places like the NCTM Mathematics Teaching Practices. This project is designed to force students to work through that productive struggle in steps like Designing a Chessboard and Assigning Values to Chess Pieces. They will need to fit an irregular shape to a grid of squares as well as devise their own grid system for the board. They will need to synthesize information and context to pinpoint the value of an irregular chess piece. By leaving each step of this project open ended, students are required to create something and reason through the problem, therefore making it mathematical.
Attachments

Supplies
- Assigning Values to Chess Pieces slide show. (Attached to this Instructable)
- Students will need their own computers. Either desktops or Chromebooks.
- www.TinkerCAD.com
- You can also use Onshape.com, but this software is more advanced. If your students are more advanced, then maybe this is the appropriate program to use.
- Inventor by Autodesk is also an option if you have that, but that requires a download to a desktop.
- 3D Printer
- We have two, a Creality Ender V3 and a CRV.
- www.canva.com
- Construction paper, light colors you can write on (big sheets)
- Markers or Color Pencils
- Scissors
- Rulers
- Note cards, one for each student roughly
- Compasses
- Chess sets. You want a number of chess sets equal to half the number of our largest class roster.
- I have 9 chess sets, and have been lucky to not need more.
- You can find them cheap and used at Thrift Stores and Dollar Stores.
- Any website that offers chess. Here are the ones I used:
- https://www.mathsisfun.com/games/chess.html
- Chess.com
- Pychess.com
Step 1: Practice Playing Chess
First, students need to know who to play chess. There are plenty of chess games online, but the ones we used are the following.
- https://www.mathsisfun.com/games/chess.html . With this one, two students can play chess on the same computer.
- Chess.com is great and lets kids create accounts and friend request each other to play games. We ran into issues with friend requests interfering with the school internet filter, but in theory should work great.
- Pychess.com has variant pieces and variant games.
I gave students a day to play and experiment. The trick in this step is to let new players figure out how the pieces move without any instruction. This is only possible in digital versions of the game because it will not allow you to make an illegal move.
The Teach
If I have students playing chess for the first time on a board, I explain how each piece moves and captures in the following ways. I move the pieces on the board to show what they do as I explain.
- Pawns, you got a lot of them but they are weak. They move only one space forward, and attack diagonally. When they kill a piece, they take its spot.
- Knights, dudes on horses that leap over people. They move in an L-shape. Either two spaces, then one space. Or one space, then two spaces. They are the only piece that can jump over other pieces.
- Rooks move in straight lines. Forward and backward, left and right, as far as they want.
- Bishops are like Rooks but only go diagonal. They are sneaky because they are good at getting between pieces.
- The Queen is the best piece in the whole game. It is a Rook and a Bishop combined.
- The King sucks. He only moves one space at a time in any direction. He is not meant to attack; instead you want to defend him. If he dies, your opponent wins.
That is all a student needs to get started in a casual game. I leave out the Check, Checkmate, en passant, castling, etc. These rules will follow as kids play. They will hone their strategy to understanding that you must always mind where the King is, make moves that are both offensive and defensive, etc. They will also naturally learn that Trading Pieces means you sacrifice one piece for one of your opponent's; as well as Forking Pieces meaning that you force your opponent to choose between losing this piece or that piece.
Continue Practicing Chess
This could take 1 or 2 days, depending on your group of students. You can also assign it for homework if you want to subvert their expectations of what homework can be. I find that a flash of theater like this every so often keeps them bought into the content.
Chess is Math?
A critique I've always expected from this activity is "Playing games isn't math." By having students play chess and figure out the rules of movement is mathematical and should be defended. When speaking about the project, I offer this alignment to the following Common Core Practice Standards.
#1 Make sense of problems and persevere in solving them.
#2 Reason abstractly and quantitatively.
#7 Look for and make use of structure.
#8 Look for and express regularity in repeated reasoning.
Step 2: Knowledge of Chess Quiz and Secrets of Chess Research
Knowledge of Chess Quiz
After having learned how to play chess, students will need to know for sure how the game works as we move forward. I assign students a google form of nine questions about how the game works. I allow them to retake it to earn a better score and research answers. I require them to know this, so if a student has to look up how a piece moves, then they can do so.
Secrets of Chess Research
I also assign students a research task. I expect them to use google to search up solutions and answers. These questions are more about the strange rules of Chess that follow the main rules. For example, I ask students to explain why certain Bishops cannot capture each other.
Attached here are documents of these two assignments.
Lesson Extensions
You can break some of these Chess puzzles into their own lessons.
- How many Queens can you place on an empty Chess board such that none of them can capture each other?
- Place a Knight on its starting position. Given enough moves, can the Knight move around the board and reach every space? Can the Knight do it by only touching each space only once? Does it work if you change the starting position?
Step 3: Assigning Values to Chess Pieces
Chess Values
Each chess piece has a value that is used to keep score while playing some timed formats of chess. Each piece you capture scores you so many points so you can rate how well you performed at the end of the allotted time.
We will use these values as a way to compare the power of each piece. The values of each piece tend to vary slightly depending on the source, but the values I use are as follows.
- Queen - 9 pts
- Rook - 5 pts
- Bishop and Knight - 3 pts
- Pawn - 1 pt
The purpose of this lesson is to force students to compare and draw a conclusion based on evidence and conjecture. The attached slide show will show modern and ancient chess pieces and students, after learning how the piece works, must assign it a similar value while comparing it to the existing point values of modern chess pieces.
Before starting the slides, I tell students to write down the chess pieces and the values they assign to them as the lesson goes on. Then I collect them at the end for two reasons; to ensure they do it and to gather data.
Slide Show Outline
Below are the talking points for each slide.
- Introduce the lesson.
- Explain the math we are doing in this exercise, even though it doesn't involve operations or graphs or what students traditionally think of as math.
- Ask students which is better, the pawn or the knight? All answers must have an explanation attached. The Pawn is of course the worse piece in chess, so ask students "Since the Pawn is the worse piece in chess, what should its value be?". They should say one, not zero. The value needs to be small, but still needs to be nonzero for scoring to make sense.
- Ask students which is better, a knight or a bishop? All answers must have an explanation. After students are done giving their answers, explain that they both have the same value. They are both different and powerful, but for different reasons because their mechanics are different.
- Ask students which is better, two rooks or a queen? This one is harder for kids to defend. Students usually say the queen. Then I ask them a new question; Three rooks or a queen? Four rooks? Five rooks? This way I can see when they change their mind. Truth is two rooks are worth 10 and one queen is worth 9. So two rooks are marginally better. This usually makes sense to kids, but if not, ask them to think about power in numbers. The fact you have two pieces doubles the value of the piece.
- All true piece values in a list and number line. Point out the disparity between each piece, the largest being between Rook and Queen.
- Introduce Shogi as Japanese Chess, which it is. As Chess travelled the world, it evolved differently in different places. This is a picture of modern Shogi. Ask students "What do you notice?" referring to the differences between this set up and the chess set up. Note the size of the board too.
- Lance. Point out this piece is a rook but it can only go forward, so it should be worth less than a normal rook. Then I explain that I want this list of pieces and the values they assign to them written neatly down the page.
- Golden General. Compare this one to a king, then point out that the king has no value assigned to it. Ask the students to think of reasons why. Good answers include:
- The King never actually comes off the board during a game of chess.
- The King is not used offensively so his movements are not made to be offensive.
- The King getting captured awards no points because it causes the game to end.
- Chatrang. This is the Indian and Persian ancient chess variant. There isn't much difference other than the size of the board and how they represent the pieces on the board.
- Minister. Compare this piece to the King and the Bishop.
- Elephant. Compare this piece to the Minister.
- Tamerlane Chess. This guy, Timur the Conqueror, was both the leader and the chess champion of Central Asia. He created and popularized this variant of chess.
- Vanguard. Compare this to the Bishop. Ask the question "Since this is slightly more limited, is it much less than the value of a Bishop or not a whole lot?"
- Camel. Compare this to the Knight. Even though it goes farther, does it make it better, worse, or nearly the same?
- Vizir. Compare this to the King and Minister. Notice that the Vizir can reach every space on the board, but takes two moves to reach where the Minister can in one turn.
- War Machine. Compare this to the Elephant and Bishop.
- Giraffe. Compare this to the Knight and the Camel, and kind of the Rook too. The official instructions for the Giraffe are clunky, but you can more easily explain it as "the Knight moves up 1, over 2. The Camel moved up 1 over 3. The Giraffe moves up 1, over 4 or more."
- Metamachy. This is a rare and not so popular chess variant but it offers some new pieces to analyze.
- Eagle. Compare this to the clunky movement of the Giraffe. Compare it to the Queen.
- Lion. Compare this to the Knight. The Lion can move to all the places a Knight can, and then some.
- Generally accepted chess values. Use this to check what students have values pieces at so far. The next pieces don't have readily available values.
- Soldier. Compare this to the Pawn.
- Prince. Compare this to the King and Pawn. It essentially functions as a Soldier that promotes into a second King. Get students thinking about the value of this piece as it pertains to its other parts of game play, not just how it moves and captures.
- Buffalo. Compare this to the Knight, Camel, Elephant and Giraffe.
- Rhino. Compare this to the Eagle. It works the same as an Eagle, but instead it swaps the use of "diagonal" and "orthogonal" in its directions.
- Sorceress. Compare this to the Queen. Since it requires a piece to jump over to capture, students tend to value it low. Remind them this means she can jump over a row of Pawns and capture as early as the first turn.
- Duchess. Compare this to the Knight, Elephant and Lion. Notice if moves to the same number of available spaces as the Lion, but can move farther as a sort of trade off.
- Cannon. Compare this to the Sorceress. It is a strictly more limited than the Sorceress. This is like comparing a Bishop to a Queen.
- Crocodile. Compare this to the Cannon. Get students thinking of this like a Rook and the Cannon like a Bishop.
To wrap up the lesson, you can have students calculate class averages based on everyone's assigned values. I did this by making a google form for students to fill out, and programmed the spreadsheet to display a bar graph and calculate the mean of all values.
Attachments
Step 4: Designing a Chess Piece


Students now need to go to TinkerCAD.com to start designing their piece. Prior to this project I already had students get familiar with how TinkerCAD works and make accounts. I had my students do it using their school emails.
Drafting
First, I have students create a draft of their piece.
- Their drawing must contain the Front View, Side View and Top-Down (all three orthographic images)
- Straight lines where necessary, curved lines and details included
- Angles are accurate to the angles of the finished product.
- Lengths must be labeled like height, width, radius, diameter, measurements of individual parts
I require that my students use a ruler and compass when drawing these. Using these mathematics tools is integral to understanding shapes and how they are created. ie: Not all curves are circles.
3D Modeling the Piece
Then, I have students create their piece on TinkerCAD.com.
- Must look simplified like other modern chess pieces.
- Must have a circular base with ½ inch (14 mm) radius.
- The piece must look something like the name.
- Must be made of Basic Shapes.
This should take 2-3 three days if students are experienced with TinkerCAD.
While these are getting 3D printed, have students work on the Step 5, Designing a Chess Board.
Project Extension
You could extend this part of the project by having students model modern chess pieces, like a Pawn, Bishop or a Rook. The Queen, King and Knight are much harder to model but might serve as a nice challenge to students who are already proficient in the software.
Proxies (Substitutes)
If your are not done printing everyone's pieces by the time Playtesting starts, it may be necessary to have kids start using proxies. These are substitutes for the real pieces. I have students use dice and other miscellaneous board game junk at this point. I have had students try to make a proxy that looks like their piece out of some junk and glue, but it takes too much time and always comes out too big for the chess boards.
Step 5: Designing a Chess Board

For time management, I chose to do this section while students projects were getting printed. In my case, I am limited by the number of printers, print time, and my daily schedule so letting this Step take longer than usual is a nice luxury.
Lesson Start
Students will be creating a chess board in a unique shape. Students will make it out of squares, create a grid system for it, then use that grid system to describe the exact staring positions for a full 32 piece chess set to start on.
I introduced the students to the idea by showing them this picture of a Settlers of Catan board, and explain the board is all we are looking at, not how the game works.
Show them this and ask them what they notice about the board. This is a form of Ground-Up design. The mechanics of of the tiles fitting together perfectly is first and the most important. This makes the game symmetrical, easily understood, and visually appealing.

Then I show them this board of a Settlers of Catan: New York. I ask them this:
"Does the regular Catan board fit perfectly onto the state of New York" They of course say no.
Then I ask, "But does this look like its going to be a more interesting game than the normal board?"
They almost always say yes.
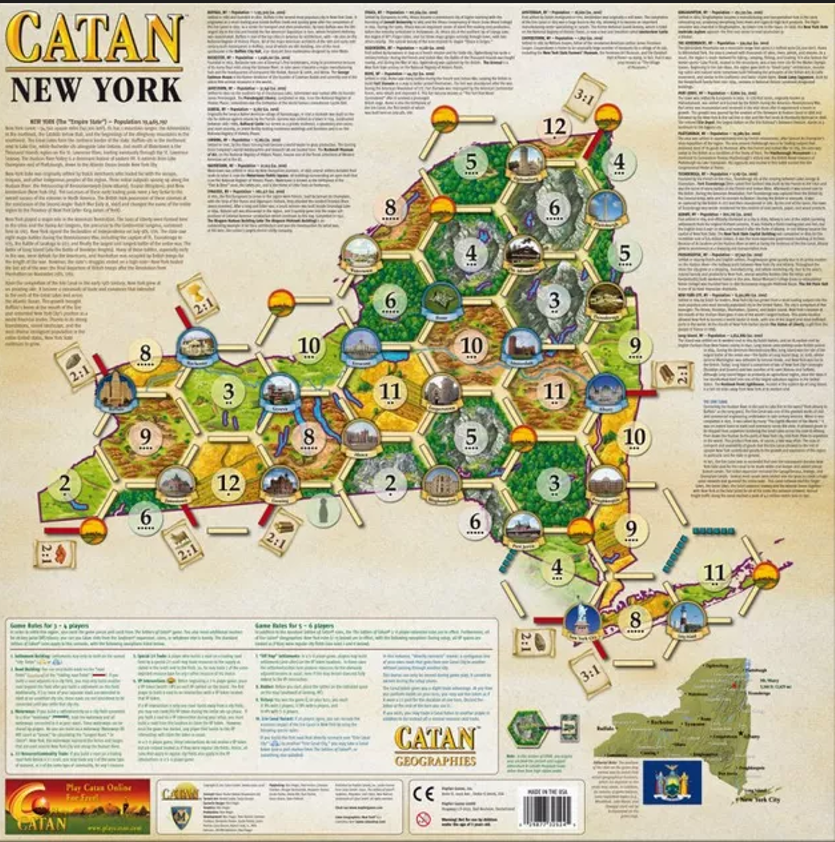
This is their jumping off point. They need to pick a shape first, then force the squares of a chess board to fit inside of it. This is a form of Top-Down design; (I chose the theme of New York to be the main focus, then made the mechanics to fit it later.)
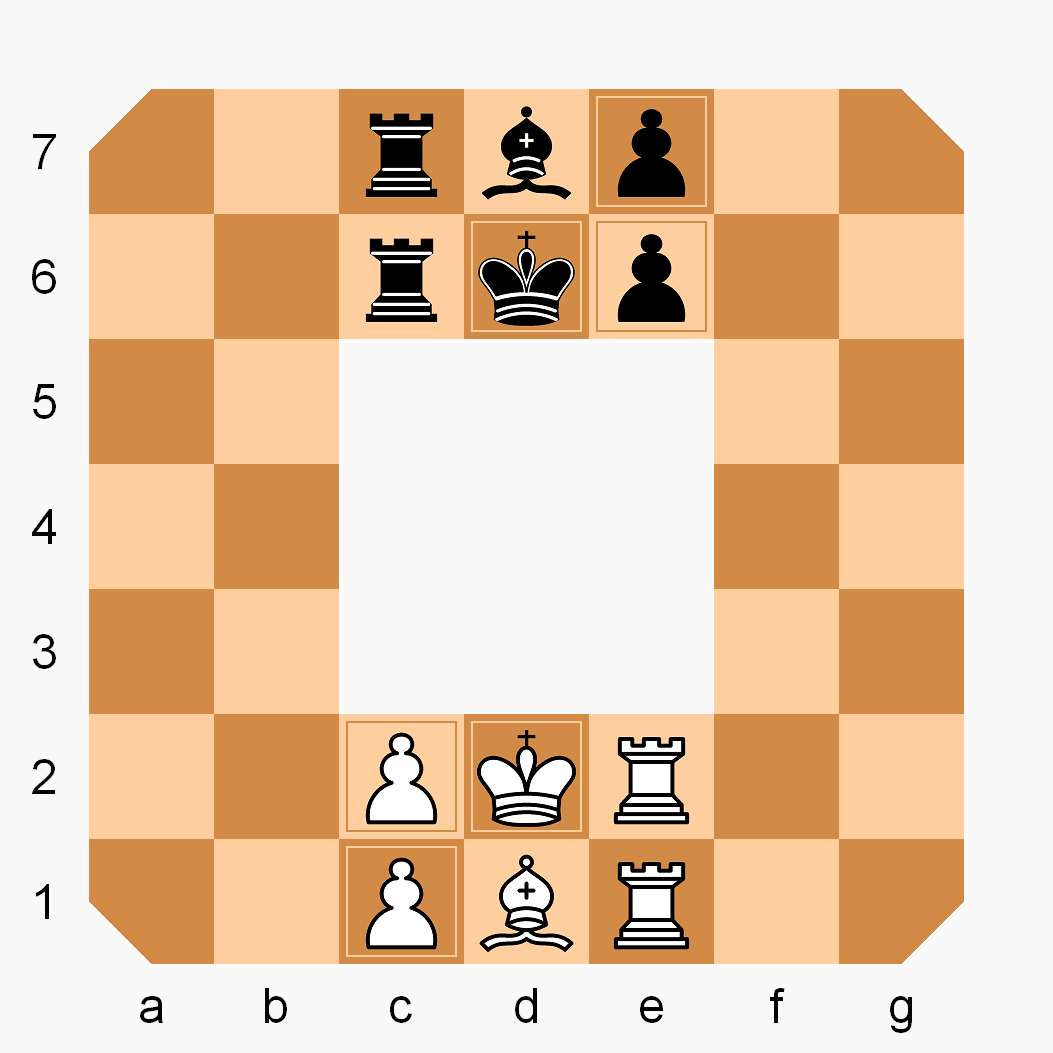
I also show the students these two chess variants:
Rollerball
Hexagonal Chess
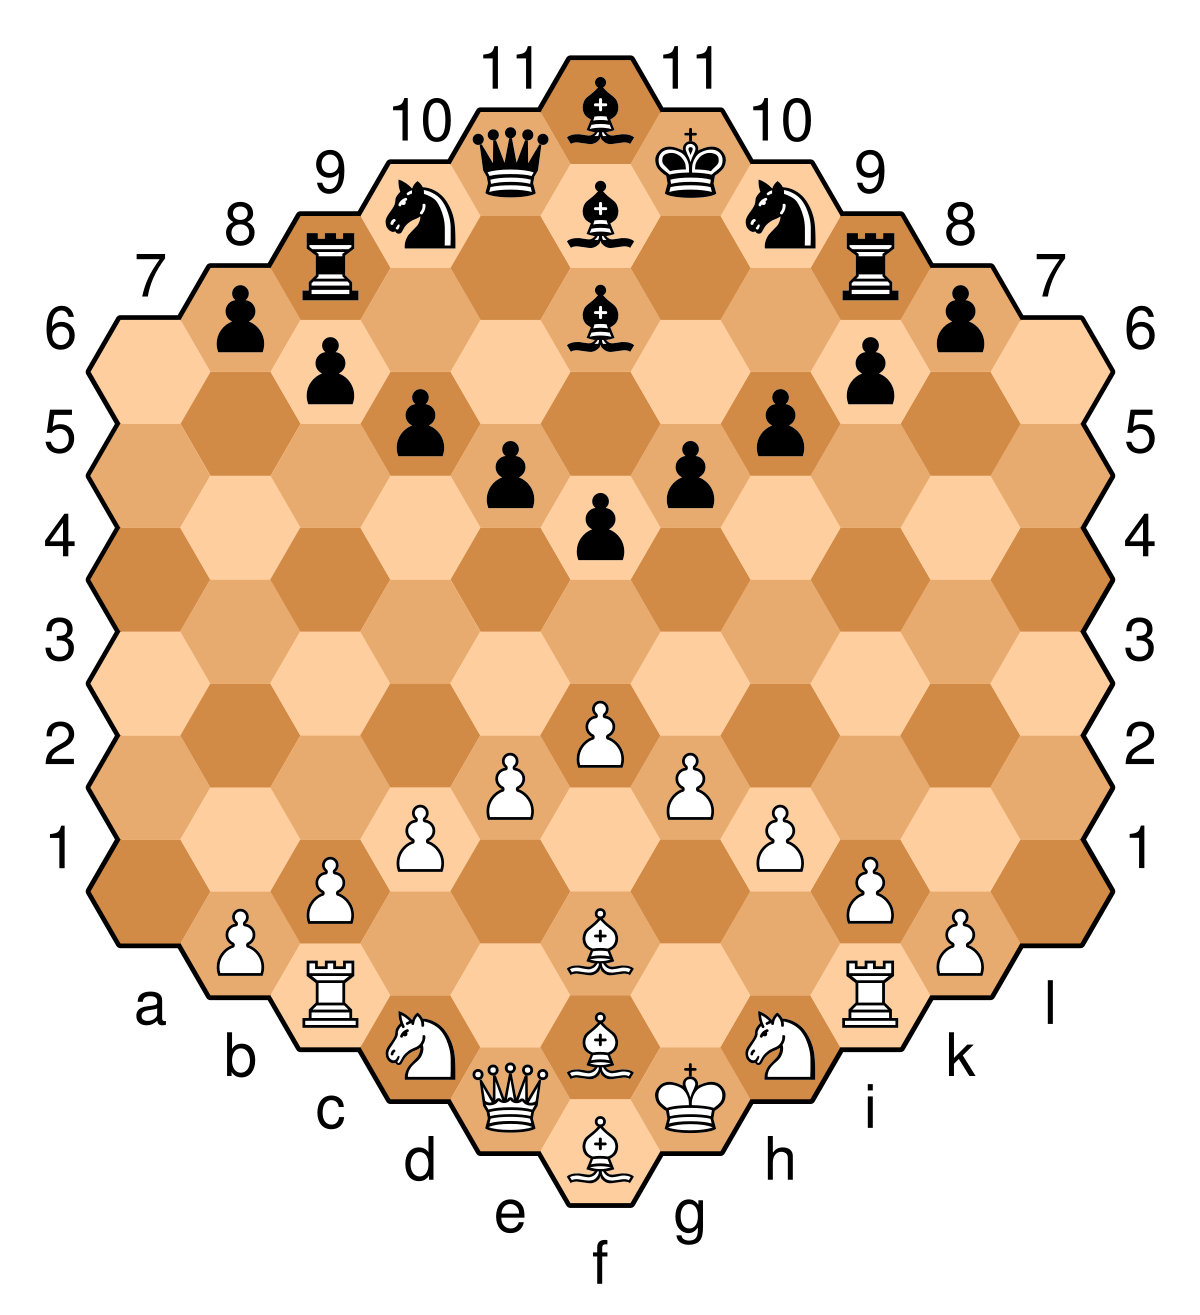
These two boards are also Top-Down. Rollerball requires that all chess pieces move clockwise around the board while the movements of individual pieces remain the same. Hexagonal Chess requires that all pieces get new rules on how they move. There even needs to be a third Bishop to accommodate for the third color the board requires.
I use all of this as a lesson on making sure the students' board, no matter how weird it may be, is fully understood. I allow students to make any shape with any additional rules, just as long as they can answer any question I have about how to play it. For example, if a student makes a hexagonal board, I am going to ask how the knight moves in order to poke holes in their understanding, then force them to patch up these holes in their rules explanation. If there is any simple question I can ask that the student cannot immediately answer, they are not finished yet.
Grid System
Just like the above examples, each student's board needs a grid system. Most boards will have a sort of Cartesian Plane and use the same grid system of Modern Chess with extra rows and columns. Others have created a donut shape so instead of rows, the board has concentric rings. In this case, each ring has a name, and the columns around the board have names. To test students, I point to a random space and ask what the coordinate is.
Just to clarify, the Hexagonal Chess above uses letters for columns, and the rows are actually V-shaped. The V's get smaller as the number of row increases. For example, the white Queen starts on E1. The black King starts on G10.
Assigning Start Conditions
After I know student have fully labeled out their grid system and it is written on the edge of their board, they must now type up a rules explanation. We print these, cut them out, and glue them to the bottom of the boards. The following are the requirements.
- Each piece, including each pawn, must have a precise starting condition listed in the rules.
- There must be a row of pawn in front of all other pieces.
- Rooks must start in the back corners.
- The King and Queen must start beside one another, and in the center.
- Bishops on the same team must start on opposite colors.
- Include the start conditions for both sides of the board, White pieces and Black pieces.
- Give your board a name at the top of your rules.
- Give yourself credit by putting your name on your rules.
This portion of the project teaches students to rely on tools they themselves create. The clarity of their own directions depends on how well they understand their own grid system. The students must rely on themselves
I allow students to arrange their pieces generally anywhere they want as long as they fit the above criteria. If they have a good reason for deviating from the criteria, I let them.
Project Extension
By the end of this project, you should have a full stack of custom chess boards with custom rules printed on the back. If you still need time to print projects, you can have students play chess on their boards against classmates.
Step 6: Iteration, Playtesting, and Trial & Error
If student pieces are not done printing, now is when I give them Proxies to play with. I have a collection of old board game junk and dig out two pieces that look the same and give it to the students that need it.
Students must play at least 5 partial games of chess with their piece and document their thoughts and adjustments. Make sure you know what your piece is like at the start of the game and at the end of the game. Attached below is the sheet of questions students need to answer while and after they play a game of chess.
Terminology
They also need to change up the game they play each time, so they need to experiment with where the piece starts and solidifying what the piece does. Each time they play they should be honing in on what the piece needs; whether that is a Buff or a Nerf. Students are usually familiar with these terms through modern exposure to videogames. Below is a sort of guide to how mechanics in games are talked about in modern culture.
- Buffing something in a game is changing its rules so it is more powerful. Buff refers to buffing something up.
- Nerfing something in a game is changing its rules so it is less powerful. This refers to Nerf guns being a softer, more childish alternative compared to the original.
- Something in a game is Broken if it is so powerful, it is impossible to compete with. This is also referred to as OP meaning 'over powered'. Stress to kids that this may be fun for a time, but a piece that is OP is not sustainable.
Expected Obstacles
Students will likely be confused with what you are asking them to do in this leg of the project overall. Reiterate the following in order:
- The student must choose the starting conditions for their piece for this game. They will change this every game. It could replace a piece, replace a pawn, start in front of the row of pawns, replace only the Queen, etc.
- They can choose to both play one players piece, or choose to play with their own pieces. They also do not need to have the starting conditions.
- Ex: Billy is playing his Rabbit piece he made and replacing the Rooks. Sally is playing her Tank piece and replacing the two pawns on the end of the pawn rows.
- Students may also need a refresher on how the pieces in chess work so be prepared for that. They can also just look it up if that suits your classroom better.
- Then, after their game (or even during) they will answer the questions on the page attached below. Each question is to help them think through the design process. After each game, they should use this information and make a tweak to their piece.
- When a student makes a tweak, it needs to be precise. Students cannot get away with "it needs to move less" or "it needs tweaked". An exact tweak would be "my Assassin piece can move 3 spaces forward instead of 2. And it only moves 1 space left or right. It cannot move backwards any more."
Expected Outcomes
If students have not bought in to the lesson yet, this is normally when they are all in. I saw a huge spike in engagement when they needed to start competing with their peers. They also seem to offer feedback to their opponent on how OP their piece is, even if the feedback is unwanted or even if the piece is not OP. When students started debating like this, I tell them the truth lies somewhere in between. Split the difference between the power level the creator wants it at and the power level the opponent says it should be.
Students Playtesting Other Student's Pieces
Students will playtest their own pieces, but if you have time, it is valuable for students to learn how to give feedback on other's pieces. Give each student a note card and have them write the piece name at the top. In the lines below, they need to write the rules of the piece in pencil. These rules need to be short and sweet and easy to read. This way, as the pieces change and evolve, the note card can easily be edited. After each game, when the student chooses to play their piece again, they need to edit the note card.
When someone plays another student's piece, they need to provide some sort of feedback in written form. They need to provide specifics, writing "it was good" is not acceptable. If there is a change that needs made, suggest something like "the piece moves too far and doesn't have a lot of options to move too most of the time". If there is no change to be made, offer feedback on what they did well like "it is fun to jump over my opponent's pieces and capture them that way instead of landing on them to capture them."
For example, the note card could say something like this:
Grasshopper
The grasshopper jumps exactly 3 spaces way Diagonally and Orthogonally.
Whatever piece the Grasshopper jumps over is captured.
The Grasshopper starts the game by replacing both Knights.
But after a game of playtesting, the student should edit their note card to make it more balanced. Perhaps the Grasshopper moves too far and should move a shorter distance. And perhaps the start conditions need edited for a more balanced game.
Grasshopper
The grasshopper jumps exactly 2 spaces way Diagonally and Orthogonally.
Whatever piece the Grasshopper jumps over is captured.
The Grasshopper starts the game by replacing the pawns in A2 and G2, A6 and H6.
Whatever the notecard says after all the playtesting and editing is what the student will use when they start finalizing the rules in Step 7.
Attachments
Step 7: Rules Explanation Info Card


The last leg of this project is the create an Info Card using Canva.com, a free and professional graphic design website.
Using Canva
Students will need to create an account.
- Open Canva. Under the list of documents in “You Might Want to Try…” click on the Poster 18x24.
- Name your file at the top like this:
- [YOUR NAME] [PIECE NAME] Chess Poster
- Pick a Template off to the left that you like.
- Start Editing with your information.
Requirements
The Poster must include the following information.
- The name of the piece.
- Your name, give yourself credit.
- At least 5 pictures. Two must be of your piece from TinkerCAD from different perspectives.
- Where does your piece start? What does it replace on the normal starting chess board, if at all? Why do you have it start there? How many of these pieces are there?
- Describe the Flavor of your piece. This is the explanation of why your mechanics connect to the name of the piece.
- How does your piece move?
- How does your piece capture? How does your piece get captured?
- What is the Point Value of capturing your piece? Compare your piece to the power and Point Value of the following and assign your piece a value. Explain your reasoning.
- Pawn - 1 pt
- Knight, Bishop - 3 pt
- Rook - 5 pt
- Queen - 9 pt
- The general strategy that you will use while playing with this piece.
- Why you chose to design it the way you did?
Canva is Math?
This leg of the project always gets my students to ask "How is this math?". Since I am largely not showing them how to use the software, discovering how it works is in itself problem-solving. As for the typing, mathematics is more than numbers and symbols. One needs to communicate their work to others, write concise definitions, and clearly communicate proofs and explanations without gaps in their reasoning. The Common Core Practice Standard this fits best is #6 Attend to precision.
The requirements above include the content the info card must include, but they will only receive credit for it if they can communicate it clearly and concisely. For an example, see the Grasshopper in Step 6.
Ending the Whole Project
By the end of this whole Project Unit, students should have the experience they need to design a chess board and a chess piece. You should have a whole stack of chess boards and a portfolio of info cards of alternate chess pieces, each with their own comprehensive rules.

Third Prize in the
Project-Based Learning Contest


