Introduction: Doorbell Using Arduino


In this project, a Buzzer is connected at pin 13 and push button is connected at pin 2. Buzzer will produce alarm sound as long as push button is pressed by the visitor standing at the door. Pull down resistance of 1K ohms is attached with the push button.
About
Arduino Uno - The Arduino Uno is an open-source microcontroller board based on the Microchip ATmega328P microcontroller and developed by Arduino.cc. The board is equipped with sets of digital and analog input/output pins that may be interfaced to various expansion boards and other circuits. It can supply 5V or 3.3 V and current of 40mA.
Buzzer - It have two terminals, Vcc and GND. Piezo buzzers are simple devices that can generate basic beeps and tones. They work by using a piezo crystal, a special material that changes shape when voltage is applied to it. If the crystal pushes against a diaphragm, like a tiny speaker cone, it can generate a pressure wave which the human ear picks up as sound.
Push Button - It completes an electric circuit when you press on it. When it's on, a small metal spring inside makes contact with two wires, allowing electricity to flow.It is a momentary switch having four terminals.
Step 1: Components Required
For this project, you will need: -
1. Arduino Uno - https://amzn.to/32jAMUA
2. Buzzer - https://amzn.to/3k8PGTG
3. Push-button - https://amzn.to/3m7yKit
4. 1K resistance - https://amzn.to/2ZuPNRN
5. Jumper wires - https://amzn.to/3iqdBxM
Step 2: Circuit Schematic
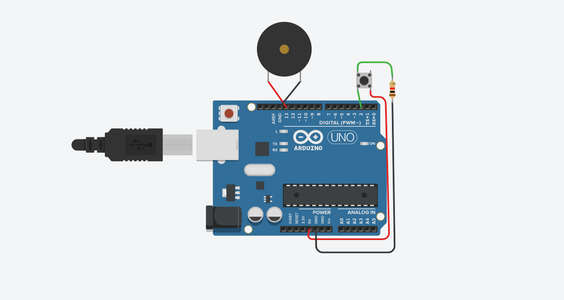


Pin 13 - - > Anode of Buzzer.
GND - - > Cathode of Buzzer, Terminal 1b of Push Button
Pin 2 - - > Push Button terminal 1a.
5V - - > Vcc of Push Button(2a terminal)
Step 3: Arduino Code
void setup()
{
pinMode(13, OUTPUT);
pinMode(2, INPUT);
}
void loop()
{
if(digitalRead(2)==HIGH)
{
digitalWrite(13, HIGH);
delay(1000);
}
else{
digitalWrite(13, LOW);
delay(1000);
}
}


