Introduction: Funky Flickering Steamlight
Hello everybody
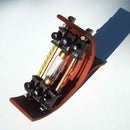
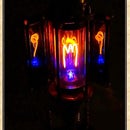
Today I´d like you to present a very funky object which is totally easy to build an looks very funky.
It is called "The flickering steamlight" and it has a little story before starting.
Some days ago I took a daytrip with my smallest son (14) from Hamburg, Germany to Denmark youst to spend the day at the north sea. In a supermarket where we bought some lemonade to drink, my eyes caught this little gadget beside the bottles which is called in danish: "party-propper". Its a sort of "plastic-cork"-Plug which you put in your open bottle after switching it on and it makes a flickering light. I was so fascinated that I bought two packs of them and started this project after a very good day at the beach ;-))
Now I will show you the secret of this gadget and what you can do with it for your steampunk ideas. I also made a small film for demonstrating how the light works.
Step 1: What Do You Need
First you see the empty bottle with this "plug-in". Then you need a special preform made of PET. From this preforms the plastic bottles will be blown in the beverage industrie. At least you take a special brass socket you already know when you read about my object the Steamlight-Pharo. But I also show it once again here (see pictures in this step)
It is very funny to see that the plug perfectly fits in the preform and the preform also fits in the brass socket as if it was only made for it ;-))
After switching on the light and put togther all seen parts you start to blow some air with your mouth as if you want to blow a small fire to make it bigger. The more you blow the brighter gets the light ;-))) as you can see in this film:
Step 2: Second Step to the Stampunk Light.
In the step before you have created a small funny light for your pocket.
Now you need the steampunk holder for your new electric selfmade candle.
At the bottom you take a wooden salat-bowl (e. g. from ikea) a small plate of "vulkanfiber", you already know this stuff from my other projects and I really love it!! Fix the plate on top opf the turned salat bowl with glue for wooden pieces.
No you need some similiar parts from the garbage box of your plumber, You can ask him for help to find the right things. You need a 3/4" straight-run globe valve made of brass with some centiometers of copper tube as seen on the pictures.
Step 3: Build the Holder
Stick the fittings and the valve/tubes together. Turn the valves as you can see and place this part on the salat bowl. Then you can mark the two holes you have to drill next .
After drilling the two holes with the right diameter (here an18 mm "Forstner-driller") put the tube ends in the holes and that´s it!!!
Now the holder is ready and longs for the new candles.
Step 4: Put the Light Into the Holder
If you carefully screw the brass socket into the hole of the valve you will experience that it fits although the two screw threads are different. For your steampunk electric candlelight holder it doesn´t matter.
And now it`s time to disclose the secret of the plug:
Inside there is a microfone which reacts very sensitive to sounds and vibrations. So the light flickers to the beat of the music, to the sound of the wind and voices and so on. If take a closer look to the las t picture of this description, you wll see the small hole in the brass socket If you blow into this hole you light up your new steampunk candle. It is very impressive!!!
Have a lot of fun with it!!
Yours Aeon Junophor
Step 5: About the Electronic
To answer your questions about the electronic I use, I srewd one these plugs and now you can look inside;-))


