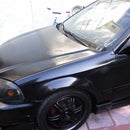
Introduction: $70 Paint Job (color Change From Silver to Black)
One of the coolest projects I have seen here is the $70 dollar paint job.This method uses Rustoleum as a substitute for expensive car paint thats why is so cheap. Who does not want to get a really nice car to be an incredible car just for $70, right? Well also the number one question everybody has in those instructables is…how can I make my car black? Is it hard to change the color of the car? Is it true that paint a black car is harder? And so on. A lot of people imagine how good would their car look with a new paint job and some would love to paint their cars a different color especially black, well I decided to take the risk and try it myself. I thought the worse think it can happened it’s that I have to sand it all down and start all over again.
So I decided to take the project in my own hands and hopefully help anybody that decides to take on the project too.
I have always love my car and even with the paint all faded I always saw the potential it had if I could only save enough money to get it a new paint job. Also I always believed that it would look really good on black (and I was right).
Step 1: Read Me First...
This job can be performed in different ways:
1. Spray the paint (I decide that I want to spray the paint just because I believe is the easiest way)
Spray it’s the easiest but is the one that requires the most prep work of all.
2. Rolling the paint is great and it gives almost the same results as spraying if you do it right, and its involves normal amount of prep work for this kind of job.
3. Brushing the paint is the original method, I believed that is the hardest and the one that is going to give you the most flaws but it has worked great for the people that have done it with care and patience also it has normal amount of prep work.
In my instructable I’m going to concentrate in explaining the process in spraying black paint and changing the color of your car.
I am not an expert in spraying paint, its actually my first time doing this, so all inexpert reading this can feel better. If I did it you can do it to.
This is the link for an intructable that used this method by brushing, rolling would follow the same steps but use a high density foam roller instead.
https://www.instructables.com/id/The-Poor-Mans-Paint-Job-or...-How-to-paint-your-c/
Disclaimer: I am not in any way responsible for what you chose to do; this is an informative instructable and here I’m explaining my methods and my own way of doing things. If you car looks in any way like my car did there is no way at the end would look worse that before.
Step 2: What You Will Need.
If you are spraying:
Rustoleum high gloss paint - 2 Quarts if rolling or brushing you might need 3 = $16 (whatever color you want, It could even be flat color)
Odorless mineral spirits – 4 Quarts = $14
Rustoleum primer spray paint - 1 Can = $4.99
Sand paper all grits from 60 to 2000 = $ 20
Painter's tape - 1 Roll = $5.84
Tack cloth 3 = 4.99
the price is only for the materials that you will need to make the project, tools like the compressor and a spray paint gun if you are spraying you can rent i borrow from a friend.
My compressor was a little 15 gal so i had to take breaks between spraying i wish i had this great compressor from Craftsman is a 26 gal just what i need it for this job and pretty much for any other job.
http://www.craftsman.com/shc/s/p_10155_12602_00916770000P?vName=Power+Tools+%26+Equipment&cName=Equipment&sName=Compressors+%26+Air+Tools&prdNo=5
If you are brushing or rolling:
Paint trays - 3 ea. = $3.21
Foam rollers or brushes, 3 = $5
Step 3: Prep Work... Before the Paint.
Before you do anything on the car first thing is WASH IT REALLY GOOD. This step is important because here is where you are going to get rid of the dirt and grease that is on your car.
After you are done washing you can star with the preparing of the car. The prep work of the car is the most important step, how good your paint looks and how long stay on your car depends on the prep work.
NOTE: MAKE SURE YOU USE A MASK WHEN SANDING!!!
The first step is sanding, the amount of work you are going to have depends on the conditions of your actual paint. My paint was really bad, most of the clear coat was faded and I had bubbles under the clear coat. I had to sand the clear coat to get it to the same level of the paint and get rid of all the bubbles, you can get away with a little sanding if you are painting the car on light colors but on dark colors like black the flaws are more noticeable that others.
I started with a 100 grit and went down to a 60 grit because the 60 grit was going to take forever (big mistake, the 60 grit left scratches on the metal that I was not able to take out and they were a little bit noticeable on the paint, so don’t go under 100 grit just be patient and take your time)
After you are sanding the worse parts they should not feel rough when you slide your hand over.
The next step is to wet sand the whole car with 400 grit, wet sanding it’s just applying water to the surface that you are sanding as you sand. The more water you keep running as you sand the easer it is.If your paint job its not bad you can skip the first step and just do the whole car with 400 grit, every surface that its going to be painted needs to be sanded. Remember the purpose is not to take out the paint its just to get rid of the shininess of it so the new paint can adhere to it, remember you cant paint over shiny surfaces.
When done with all the sanding wash your car again to get rid of all dirt.
Be careful when sanding on edges or corners you get to bare metal really quick, if you see some bare metal spots when you are done sanding and washing again just spray some primer on the spots where you see bare metal.
Remember primer sticks to metal and paint sticks to primer.
Step 4: Prepare for Paint.
At this point take out or cover with tape every single part that you don’t want paint on like gaskets, windows, wheel, lights, etc, make sure you keep everything together.
The taping of the car is really important too. If you are changing the color of your car and you do a good job here you car its going to look as if it was always that color.
Remove all the parts that you don’t want paint on, the more parts you can take off the better because you won’t be able to see traces of the other color anywhere not even if you take those pieces off. I took out all the gaskets in the sides of the door and covered all the stickers you see when you open the door. In my car everywhere you look you see black so unless you know you could never tell the car was another color.
If changing color you dont want to see a different color when you open your doors so i also painted the inside and sides of the doors, all the accessible parts on the engine bay, under the hood lid, and under the trunk lid.
if you are keeping the same color you can leave the inside of the doors untouched and paint with the doors close.
Step 5: Body Work.
Not everybody has to do this step, if you dont you are lucky if you do well here is what youll need:
Bondo body filler and hardener $14
Bondo spreading spatulas 3 for $1.99
Mixing trays $1
One 60 grit sand paper sheet 8 by 12” $1
8 by 12” sanding sheets, one of each, 80 grit 120 grit 320 grit $3
12” Sanding block $6
If you have any dents you have to fix them before you paint. If they are bumps you have to hit them with a hammer to make them go in, don’t get them deeper that ¼ of an inch.
If you have dents deeper that ¼ of an inch youll will have to pull them to get them to be a ¼ of and inch deep or less.
I did not have to pull any dent but here is and instructible that shows you how to get this done.
https://www.instructables.com/id/Pulling-dents-from-your-old-hearse-or-classic-car/
Now if you have to fill a dent the first thing you have to do is sand until you get to the bare metal around the dent to get from 2 to 4 inches of metal all around it. You do this by sanding with the 60 grit sand paper; I used my dremel which it was a great idea because I got it done really quickly.
Now prepare you bondo, the mixing instructions are on the can but the ratio is about a golf size part of bondo and a 4 inch line of hardener. When mixing bondo you have to do it in a folding motion to try to avoid getting air in the mix and mix until the color is even.
Don’t mix too much because you only get about 4 minutes of working time when start to feel tacky you have to stop and throw it away and mix a new batch.
Apply the bondo to cover all the bare metal, try to do it in one fluid motion and the keep repeating until the dent is all fill and you have a little bondo above the level of the car. This will then be sand down to feel all even with the car.
When sanding star with the 60 grit and work your way up to 320 grit to obtain a smooth finish, use the sanding block and move on and "X" pattern over the dent. When feeling the dent to see if is done close your eyes or look away from the dent that way you brain gets away from what it sees and you really feel if you need more sanding.
Step 6: Paint Time.
The first thing you need to do before painting is thin the paint. For this you are going to use the mineral spirits. The ratio is going to be about half to half (half paint half mineral spirits) the consistency you are looking for is something in between the consistency of milk and water. Make sure you don’t shake the paint just mix it really soft so you don’t get to much air on the paint.
When applying the paint star on the top and end on the sides, you don’t want to have to reach to paint the roof when the sides are already painted and you might touch them with your legs.
If you are rolling or brushing make sure to check out this intructable for better details on the process.
https://www.instructables.com/id/The-Poor-Mans-Paint-Job-or...-How-to-paint-your-c/
The spay gun should have various knobs usually 3, they regulate the air pressure, the amount of air flow to the tip of the gun when painting and the amount of paint flow.
Study your gun and the settings before stating, paint in another surface and try to find the setting that is going to give you the best covering but with not too much paint to avoid runs ( If a run happens don’t worry just sand it with and 800 grit when dry)
My gun was bottom feed ( paint cup on bottom), but if you can get a gravity feed one (paint cup on top) is better. Craftsman makes a great gravity feed gun that i wished i had.
http://www.craftsman.com/shc/s/p_10155_12602_00915531000P?keyword=paint+gun&prdNo=2
When you are painting in places that are hard to reach or you can get good coverage on one pass, like the door hinges, increase the air pressure and decrease the paint flow this will allow you to stay on the same area and get many passes with out getting runs.
The paint should be allow to dry for 8 hours ( depending on weather if is cold allow at least 12 or more on hot weather from 6 to 10) before you apply another coat. depending on color and the setting of your gun and even the way you spay and the color of the car and the new color it depends the number of coats you have to apply.
You should apply between 2-6 coats or untill you are happy with the results, if you get to 3 coats you should wait 12 hours on hot weather and 16 on cold for the paint to dry and then wet sand the car with 800 grit.
After you are done with all your coats, let the paint dry for at least 48 hours before you put it back together.
Step 7: Put It Back Together and Enjoy.
Now just out the car back together and enjoy.
Well at the end I love the results, the paint is shiny and strong, there is no need for a clear coat but if you want to put if you can experiment with the products out there.
My experience was amazing and there is no bigger reward for me that looking at my car and getting comments and know that I did it all myself and that’s the drug of the diyer “self satisfaction” . All and all it took me about a week to complete and I can wait to paint another car again.
I put this instructable in very short notice so im going to be editing it when I get a chance and if you have any questions of feedback please don’t hesitate. Don’t forget its my first time attempting these so my methods might not be the best but they all worked for me perfect.
Step 8:
Participated in the
Craftsman Tools Contest
Participated in the
Joby Transform It! Challenge


