Introduction: Haptic Lens - a 3D Scanner. Introduction


This was a project I started back in ~1986 when I was first diagnosed with hyperthyroidism - an over-active thyroid commonly known as Grave's disease. My endocrinologist did a lot of testing on me, including manually palpating my thyroid to try to guess at the size and density of that organ. I wondered why technology hadn't invented an instrument to do this as it later played a big part in how much radioactive iodine I was to get to ablate part of the organ to make me normal again. Well, it's 30+ years hence and I'm happy I'm normal. Anyway, I and my co-researchers at Georgia Tech patented the idea (the patent has run out now) and I'm on to other things. The device is very simple, low cost and easy to build and is capable of digitizing a 3D object in real-time at fairly high resolution. The device produces a gray-scale still image or video where the gray value is proportional to Z-axis depth. All you need is gray-scale image to 3D processing to convert it to an object. See the two gray-scale images of a drill bit and coin and one of a DB-15 connector shell. I've also included a Siggraph Conference presentation I made. The Haptic lens is capable of 3D digitizing a single-valued 3D surface and also able to evaluate the underlying mechanical modulus (hardness/softness of the material IE- human tissue) if desired.
Step 1:
Step 2:


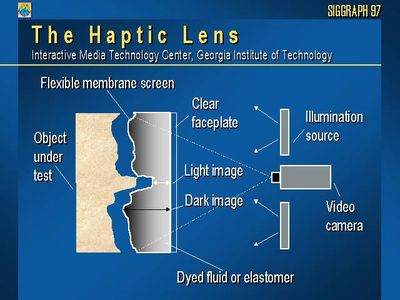

As the attached images show, it's a fairly simple device. What I will describe here is the simplest form of the haptic lens to be used on a flatbed scanner so no separate still or video camera or illumination source is required. The attached images show how the device works.
You start by building a vessel capable of holding a liquid or soft elastomer, out of a clear plastic disk, about 3" in diameter. Having access to a lathe is handy. Acrylic or polycarbonate work well. Make sure the circumference is without sharp edges and without tooling marks. I recommend you also put at least one ~1mm deep groove in the outside rim to allow an exterior cord to help make a better seal with the flexible membrane. For the flexible membrane I used a near-flat section of a large white latex balloon. Drill and tap a 4-40 tap hole (or small metric equivalent) in the disk, normal to its surface, near the edge. This will be used to inject the liquid or uncured polymer gel. Stretch the balloon material over the clear plastic disk and seal it tightly against the outside rim of the plastic disk with small cord, like fishing line. For the liquid version (good to start out with) mix up a small quantity of distilled water and a water-soluble black dye (like ink). Add enough ink so that when you dip a small strip of white paper in the solution, the end of the paper just disappears at around ~1" of depth. Inject the liquid through the hole into your sealed container of clear plastic and balloon with a syringe or similar device. put in enough liquid to a maximum ~1" bulge in the middle. Quickly insert a screw about one turn, to partially seal the hole. With the disk being held vertically and the tapped hole up, tap the balloon side, dislodging any air bubbles and force them out through the screw+hole. With all air bubbles removed, tighten the screw so that no leaks remain.
Now you should see if you were successful. Look at the haptic lens, through the clear plastic side. You should see black. Now poke a finger into the membrane side, dislodging some of the dark liquid, revealing a white or light fingertip. You have just converted 3D depth to a grayscale image in real-time! I typically get around 1mm or less resolution, depending on the thickness of the balloon material and Z-axis depth of coverage. You're now done with the device :-)
You can vary the scale of the device by varying the optical density of the liquid. You want the range of grayscale that's captured by the flatbed scanner or camera to be in the depth range of your object to be scanned. The images captured of the surface profile of the coin uses very dense liquid as the profile was very small in Z. For other objects, I use a less optically dense liquid solution.
If you want to use a still or video camera, create a light proof housing (3" PCV pipe painted flat black on the inside) and place the camera, along the centerline of the disk. Illuminate the device from the camera side with a ring-light or ring of LEDs, being careful not to cause unwanted reflections - sometimes hard to do.
Good luck.


