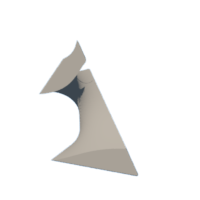
Introduction: Helical Dissection Puzzles
A collection of helical dissection puzzles with instructions of how to make your own in Fusion 360 (a sample puzzle created using this method is provided - a trisected tetrahedron). This project is inspired by George Hart's screw puzzles:
You can find some 3D-printable versions here:
Five screw-puzzles by George Hart
What's so amazing about helical dissection puzzles? Well, on first sight, they seem quite counter-intuitive and make for a quirky challenge!
Attachments
Step 1: Design Principle and Parameter Setup
As George Hart states in one of his puzzles descriptions, these puzzles can be thought of as objects that have been cut by a propeller passing through them. By changing the number of blades, how fast the propeller is revolving, its direction of motion, or its left- or right-handedness, we obtain a variety puzzles. So, before we begin designing, we will parameterise the propeller motion, to easily make puzzle variations. This motion can be expressed as a line sweep along an axis perpendicular to it. Our line sweep will produce a half-helicoid (motion of a propeller with a single blade) and our final cutting object will consist of copies of this half-helicoid in a circular pattern. Let's add the following parameters by going to Modify > Change Parameters and clicking on the "+" icon:
- name: axis_length, unit: mm, expression: <some number, e.g. 40.0>
This is the length of the axis along which we will cut our form to make the puzzle.
- name: helix_extra_height, unit: mm, expression: <some small number, e.g. 1>
We must make the helix slightly longer than the object we are cutting to ensure clean cuts; this parameter specifies how much longer than the object the helix will be.
- name: helix_height, unit: mm, expression: axis_length + helix_extra_height
The helix height.
- name: blade_length, unit: mm, expression: 2*helix_height
We must make sure that the helix will be wide enough to encompass the object in the x and y dimensions: 2 is a safe number for the polyhedra tested, but you can adjust it accordingly if needed.
- name: blades, unit: no unit, expression: <some integer, e.g. 2 or 3>
The total number of half-helicoids that make up our cutting object.
- name: twist_angle, unit: deg, expression: <some number >= 360>
The twist angle of the line sweep.
- name: tolerance, unit: mm, expression: <some number>
This is the tolerance of your printer for printing interlocking parts. Our helix will be a surface which we will then thicken to our printer's tolerance. 0.1-0.15 would be a reasonable starting point for experimentation (I used 0.1 for my FDM printer).
Now we are ready to start our design!
Step 2: Helix Construction
Let's begin by constructing the helicoidal object which will cut through our polyhedron. We will create a half-helicoid by sweeping a line along the z-axis, and place copies of the half-helicoid in a circular array to get our final object.
Switch to top view and create a sketch on the xy plane. Draw a horizontal line of length blade_length starting from the center of the grid, and finish the sketch.
Then, switch to front view and create a sketch on the xz plane. Draw a vertical line of length helix_height starting from the center of the grid and extending towards positive z, and finish the sketch. This is all we need to create the half-helicoid.
On the Surface > Create tab, select Sweep and edit the following inputs:
- Profile: select the line on the xy plane
- Path: select the line on the xz plane
- Twist angle: type twist_angle
Now we need to turn this surface into a solid with a thickness equal to our printer's tolerance. On the Surface > Create tab select Thicken and edit the following inputs:
- Faces: select the surface body we just created
- Thickness: type tolerance
- Direction: select Symmetric from the dropdown menu
To construct the final object, on the Solid > Create tab select Pattern > Circular Pattern and edit the following inputs:
- Objects: select the solid body we just created
- Axis: select the z-axis
- Quantity: type blades
Select all solid bodies, then on the Solid > Modify tab select Combine and set the Operation to Join. Our helicoidal object is ready! Now we only need to adjust its position, so that it slightly protrudes from the top and bottom of the object to be cut. Select the helicoidal object, then on the Solid > Modify tab select Move/Copy and edit the following inputs:
- Move Type: Translate
- Z distance: type -helix_extra_height/2
Step 3: Puzzle Form Construction / Import and Placement
With the cutting object in place, we can construct or import a form to turn into a puzzle. It just needs to have a symmetry axis aligned to the z-axis, and be slightly smaller than the helicoidal object to achieve a clean cut. As an example, let's do this by constructing some polyhedra.
3.1 Tetrahedron
We can easily construct a tetrahedron with a symmetry axis already aligned to the z-axis. First, we add another parameter expressing the circumradius of the tetrahedron face as a function of the already defined axis_length. With a being the length of the tetrahedron edge, since the circumradius is a/sqrt(3) and the tetrahedron height is sqrt(2/3)*a, the expression for the circumradius will be axis_length/sqrt(2).
Switch to top view and create a sketch on the xy plane. Then select Create > Polygon > Inscribed Polygon, and set its center on the grid center, set its number of sides to 3, and type the circumradius parameter name in the radius field. Now finish the sketch.
Next, create an offset plane at a distance equal to the tetrahedron height. Select Construct > Offset Plane, select the xy plane, and type the name of the axis length variable in the Distance field. Create a sketch and project the midpoint of the triangle we just drew by going to Create > Project / Include > Project, and finish the sketch. Finally, go to Solid > Create > Loft and choose the triangle and the point.
3.2 Cube
We can construct a cube using the built-in solid, and it will have a symmetry axis already aligned with the z-axis, but let's use another symmetry axis for our puzzle instead: an axis passing through the midpoints of two opposite edges. In this orientation, the cube edge equals axis_length/sqrt(2). Switch to front view and create an offset plane at a distance equal to half the edge length. Create a vertical construction line of length equal to axis_length starting at the grid center and extending towards positive z. This is a face diagonal, which we will use to draw the face. Next, draw a line at the upper left quadrant starting at the grid center and at a roughly 45 degree angle with respect to the x-axis - the exact length and angle don't matter, as we will place constraints later. Draw another line joining the end of that line with the end of the construction line. Now constrain these lines to be equal and perpendicular. Do the same in the top right quadrant and finish the sketch. Go to Solid > Create > Extrude and extrude the face towards the grid center by axis_length/sqrt(2) (or type in the name for the cube edge parameter, if defined).
Step 4: Puzzle Pieces Construction
On the Solid tab, go to Modify > Split Body. Select the form you wish to cut as the Body to Split and the helix as the Splitting Tool. Make sure that Extend Splitting Tool(s) is checked; this will ensure that all puzzle pieces are separate bodies. This operation produces the puzzle pieces and an additional body, the intersection of the object to be cut with the cutting tool.
That's it! Our puzzle is now ready for printing. Select a piece, right click, and select Save As Mesh from the dropdown menu. The piece can now be imported into your slicer.
Step 5: Conclusion
Now that you've gone through this tutorial, I have grave news: there's still something left puzzling, and that's how to solve them! Sometimes, I've had to go back to the design for a hint.

First Prize in the
Puzzles Challenge


