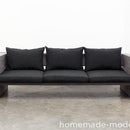
Introduction: HomeMade Modern DIY the ZipStich Chair
Step 1: Supplies + Tools
4'x 8' Sheet of 1/2” Thick Plywood
Available at Home Depot
There are a lot of different types of plywood. I used ¼” plywood which is strong enough to hold my weight but might not stand the test of time. 3/8” or ½” thick plywood would provide superior durability. I had the plywood cut into strips at Home Depot.
Zip Ties
Available at Home Depot
Zip ties – also called cable ties or tie wraps – come in a variety of different sizes. I tried both large 10” ties and thinner 4” ties. The thinner ties are much easier to work with.
RYOBI 18 Volt Cordless Drill
Available at Home Depot
RYOBI 18 Volt Circular Saw
Available at Home Depot
Husky 7" Diagonal Pliers
Available at Home Depot
Husky 8" Long Nose Pliers
Available at Home Depot
Box Cutter
Available at Home Depot
Step 2: Measure and Mark the Plywood Strips
Measure and mark the plywood with a pencil.
Step 3: Cut the Pieces
I used my RYOBI 18 Volt Circular Saw with a plywood blade to make the cuts. The laser guide makes it really easy to follow the lines. If you don’t have a laser then clamp a guide to the plywood.
Step 4: Sand the Edges
Smooth the edges with 120-220 grit sandpaper.
Step 5: Mark the Holes
I measured a line 1/2” from the edges and marked an X every 1" inch down the line to indicate drill marks.
Step 6: Drill the Holes
I clamped 2 to 3 boards together to drill the holes on multiple pieces at the same time.
Step 7: Loosely Stitch the Boards Together
I zipped a series of loops into the drilled holes in the first piece. Then I strung zip ties through the holes in the second piece and the zip tie loops in the first piece. This creates a zip tie to zip tie connection/link. Keep the links loose for now.
Step 8: Shape and Tighten
Shaping and tightening the zip ties is an incremental process that requires a bit of patience. The good news is that you can always cut and redo zip ties if you make a mistake. Use long nose pliers to tighten the ties and diagonal pliers to cut the long ends.
Step 9: Add Supports
Method A: I used giant, 3 foot zip ties to make tension supports for the chair. Simply drilling two holes through the plywood and using a box cutter to carve out the area between the holes, I was able to create a rectangular hole large enough to strap part of the zip tie through. I then cut the head off of a second tie to cap the other end. I used the same method to make vertical supports that keep the back from reclining too far.
Method B: For the second chair, I cut some scrap plywood into supports and zip tied them to both the leg and back pieces of the chair.
Step 10: Done!
Good luck making your own ZipStich Chair and please email or tweet photos to @benuyeda or ben@homemade-modern.com. For more detailed instructions, dimensioned drawings and different variations of the project, check out our soon-to-be-released book.
36 Comments
7 years ago on Introduction
very cool chair! would probably make a great piece out of steel too
7 years ago on Introduction
This is basically the way many modern plywood boats are built.
It's called "stitch and glue" boat construction.
7 years ago on Introduction
I wonder if i could replace the zip ties with leather strips
9 years ago on Introduction
cool!
9 years ago on Step 10
I would make a hole jig that could be clamped to the edge of the ply and eliminate a lot of layout work for the holes, plus more accurate.
9 years ago on Introduction
looks like a stealth fighter...
9 years ago on Introduction
To reduce the wear on the holes, you could try either putting grommets/ferrules in the holes.
9 years ago on Step 10
that is a great idea man good work am going to have to make some of these for camping
9 years ago on Introduction
thats awesome man! didnt think they would be that beautiful when i saw the headline "zip tied chairs". excellent work. one suggestion is to use flush cuts on those ties. i work with these everyday. an unsuspecting visitor might reach under and snag them selves. they can be sharp. awesome ible though man, i got a left over sheet of ply i might do this with. thanks.
9 years ago on Introduction
Kudos on a clever design--I love clever!
Lots of pattern options with colored ties and holes, the possibilities are endless.
You could also do a faux wicker on the seat area with ties (get the cheap ones at Harbor Freight)
One of the "issues" with this sort of design is the strength of the edge joints. You could protect the plywood with grommets, in fact, brass grommets would add a design feature. You want the ties to have a bit of give, the dilemma being that if they have too much give then the chair will look sloppy and be unstable. The goal is to have just enough tightness to insure that the chair holds shape and is stable, but enough give that the ties work together to distribute the loading.
A well-done Instructable!
Reply 9 years ago on Introduction
Another interesting idea, more complicated but interesting - use even thinner layers for some of the wood, but create curved contours by laminating with resins and vacuum bagging. Additional strength and rigidity for similar relative thickness, possibly more comfort.
Reply 9 years ago on Introduction
Possibly...but the moment I hear "resins and vacuum bagging" I get antsy--getting away from the delightful simplicity of this Instructable.
What about the "wicker with cable ties" idea. The ties need not be confined to the joints. More pieces more ties more flexibility.
9 years ago on Introduction
B E A U T I F U L
Ditto the Fiberglass tape & epoxy joint of stitch & glue, could also lace just lace it up with string or rope of your choice.and use some cabocil (spelling) filler & leave the lacing exposed in the finishing. If you alluminum foil the inner seating surface and put a glass jar painted on the outside with black paint and sit it facing the sun you might get the water up over 165 F to sterilize it. Just spitballing, could work though.
9 years ago on Introduction
they look really good but they don't seem sturdy
the thickness of the plywood does not convince me,
i would have gone thicker with angled edges,
and the zipties joining wood to wood not tie to tie like you did
9 years ago on Introduction
I have to say I never considered using zip ties to hold the chair together. I've always used them to restrain things IN the chairs. Great idea!
9 years ago on Step 10
why a zip tie to zip tie connection?
Why not one zip tie to connect?
9 years ago on Introduction
Have you thought about Painting over the chairs with some polyurethane resin? you can get it a gallon for $30 at home depot. I don't know how many chairs that would make, but after 2-3 layers, those babies would be solid as a rock
Reply 9 years ago on Introduction
it's similar to making a "stitch and tape" canoe
9 years ago on Step 10
very good great for young grand kids to get their teeth into thanks
9 years ago on Introduction
Or even do a brown chair with white zip ties to resemble a football. :)