Introduction: Homemade FX Makeup
NOTE: There is an improved recipe for latex substitute on my site now--see Fauxtex.
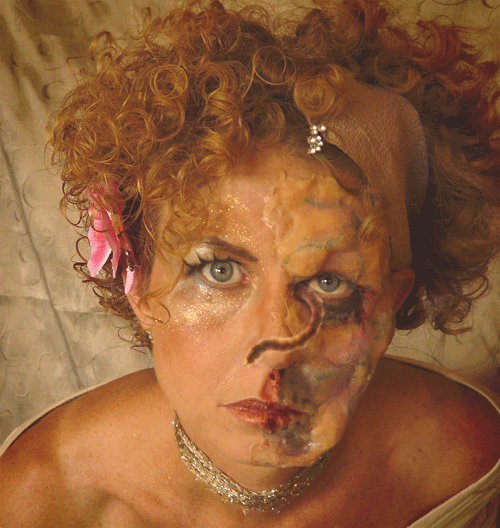
Here is a cheap alternative to real latex FX makeup. I used it for a Zombie costume and wanted to show you how to use it in a Beauty and the Beast mask.
My standard Halloween costume for the past few years has been a tongue-in-cheek Beauty AND the Beast outfit (I paint my face to look like a Beast and then put on a princess dress for the Beauty part). This year I've decided to combine Beauty and the Beast in my face as well.
To do that, I spent weeks testing out different homemade concoctions that would behave like latex makeup and finally came up with a homemade "latex" recipe using tapioca flour. Cheap, easy, quick, and useful in various proportions of flour to water for making fake skin, scars, breasts, etc.
For this Beauty and the Beast FX makeup Instructable, I used:
* 6 1/2 LEVEL Tbsp tapioca flour
* 1 cup water
* Liquid foundation makeup
* Fake eyelashes
* Blue food coloring
* Various beauty makeup products
FOR THE ZOMBIE EFFECT:
Step 1: Make Tapioca FX Makeup
In a saucepan, measure out 6 1/2 tablespoons of tapioca flour (which you can get in the health food section of most supermarkets).
Add one cup of COLD water and stir until all the tapioca flour is dissolved into the water. Tapioca flour behaves like cornstarch, so if you stop stirring, it will start to clump on the bottom of the pan.
Add several squirts of liquid foundation to give the FX latex an initial skin tone.
Turn the heat on to medium low and stir constantly until the tapioca mixture turns into a gummy mass. This takes about two minutes.
You now have homemade FX makeup.
Step 2: Prep Your Skin
Before you apply this homemade FX makeup, you will need to wash your face to remove all oils.
I applied a liquid foundation to my skin after washing using the same color that I put in the tapioca recipe so my face would be uniformly colored.
The 6 1/2 Tbsp tapioca to 1 cup water ratio used in this I'ble was nice and firm, but slightly difficult to "attach" to my skin (as opposed to the 6 Tbsp/cup that I used in this Zombie makeup), so I painted my forehead with liquid bandage for added stickiness.
If you are going to cover your eyebrow with the FX makeup, be sure to put a piece of scotch tape over it.
Also, before you paint yourself with liquid bandage, pull your hair out of the way! Any hair that gets caught in the liquid bandage will be lost when you remove your makeup later.
Step 3: Apply FX Makeup
Apply fake eyelashes. I applied fake eyelashes on my "Beauty" eye before putting on the fx makeup (but that's because I was doing it all myself and I needed glasses to apply the eyelashes. If you have someone helping you, you can do that later).
Once the tapioca recipe has cooled, you can apply it directly to your skin with a plastic knife. Since it sticks to your skin, if you use your hands to apply it to your face, it'll be a battle to get it from your hands to your face. So, use a plastic knife and just press it into your skin, pressing the edges down firmly.
This part takes a little patience, but the payoff is great. Work it, work it, work it.
Once the makeup is on like you want it, give it a good dusting with a powder foundation or more tapioca flour to "cure" the surface of the FX makeup.
Step 4: Paint the Beast
Now it's time to get gory and paint the "Beast" side of your face.
I used blue food coloring and a toothpick to draw veins on the FX makeup. To soften the veins, I powdered over it with a mixture of tapioca flour and powdered skin-colored makeup.
I added a dark circle under my Beast eye with black eye shadow, and painted some blood here and there with Halloween fake blood (that I got at Goodwill).
Step 5: More Makeup
Now just go to town with an assortment of makeup to add a contrasting Beauty to the other side of your face. Sparkles are a must!
You don't have to spend a lot of money on makeup for this. Almost everything I used I bought at The Dollar Store.
Have fun.
Step 6: Photoshop Your Makeup
Last, but not least, photoshop the heck out of your FX and non-FX makeup to enhance the contrast between the Beauty and Beast side of your costume.
Add a gross animated worm in photoshop 

Finalist in the
Halloween Props Challenge

Participated in the
Halloween Epic Costumes Challenge


