

Introduction: How to Make a Sci-Fi Inspired Terrarium


Are you a huge Sci-Fi fan?
How about gardening? Ok, ok, did I lose you? that seems like a strange turn for some I'm sure, but for me, I have a strong passion for both. I love terrariums but never made one because they wouldn't match anything else I own. I didn't want a normal terrarium in a room that was anything but normal. Then I had an idea, a Sci-Fi terrarium would fit perfectly, and it would also be a really fun project to work on in my free time. So I went to the internet to find some inspiration and hopefully maybe even a tutorial, and when I looked I couldn't find anything. There were dozens of pictures of video games, and even a couple of sci-fi environments inside of terrariums, but nothing even close to what I was picturing in my head. It was almost nothing at all. So I decided to make one myself.
This instructable is a step by step guide on how I built my own Sci-Fi inspired terrarium.
Supplies
- 1kg PLA 3D-Printer Filament (or filament of your choice)
- Epoxy/Super Glue
- 5.5in x 0.5in x 8ft Primed MDF Board
- Black Paint (or color of preference)
- 1in Wood Screws (I used hex head screws for a Sci-Fi look but normal screws are fine)
- 2x4ft whiteboard sheet
- Grow Light LED Strips (or LED grow lights)
- 3in x 9in Glass Cylinder Vase (I used this one)
- 12 x 12 in 1/8in acrylic (Lexan, Optix, plexi, any clear plastic)
- 5mm plywood (optional)
- terrarium supplies (explained below)
- soil
- activated charcoal
- small gravel or stones
- plants
- decorations
Tools:
- 3D-Printer
- Wood Saw
- Drill (including bits and drill bits appropriate for your selected screws)
- Paint Brush
- Rubber Mallet (optional)
- Laser Cutter (optional)
Step 1: Get Printing!


First and foremost start printing, there is a lot of 3D printing in this project and it is easily the longest part. luckily it is also the least labor-intensive. you can wait until all parts are finished or you can move on to step 2 while you wait on everything to finish printing.
You can organize the prints any way you want but you will need in total:
- 4 x base stl
- 4 x cap stl
- 8 x mount guide stl
all parts can be printed support less on a good printer though, on the cap specifically I experienced stringing around the lip of the inside but this can just be clipped away later with ease.
It is important to orient the prints so that the narrow side is on the print bed as this allows for the pieces to be printed without support. Additionally, remember that when printing large flat pieces like the mounting guide that it may warp or bend if removed when the bed is still too hot. This will cause it to not lay flat and in my case was very annoying to work with.
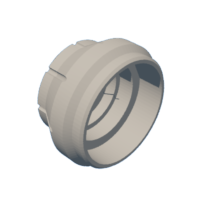
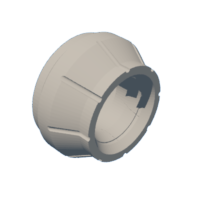

Step 2: Cutting the Lids


Each cap piece requires a lid. The lid seals off the cap, and importantly allows light to pass through. The cap has a lip inside it for this cap to seat in. Push the lid pieces into the caps from the top (this is the side facing up in the photo). This is a tight friction fit and the two pieces should snap together tightly. If the fit is too tight, do not force it or you could break the acrylic. Instead, you should sand the edges down until you can comfortably press it in.
you will need:
- 4 x lid pieces
For this step, I used a laser cutter and if you can do this it is much easier. If you can't, you can print out the template and cut the pieces down to size by hand. This can be tedious and should be done with caution as most ways of cutting will shatter or crack the acrylic. What I recommend for those cutting out the lid by hand is that you have your acrylic cut into 3 x 3in squares and sand it down to the circle. Most places that sell acrylic will have a way to cut it in-store for free or very cheap. You may want to have more than 4 squares cut just in case you break one, as driving back to the store and asking for them to recut a piece is never fun.
Attachments

Step 3: Filling Your Terrarium

This step is highly dependent on what kind of terrarium you want to make. The most basic general order for a terrarium is gravel, mesh, activated charcoal, and soil.
In that order you take your materials and stack them into the glass vases. You want to have twice as much soil as you have gravel. Also make sure that all the vases have an equal amount of material in them so that they are level with each other.
Like with most things when it comes to gardening everybody has their own formula for this. I encourage you to research what type of terrarium you should make for the plants you wish to use as well as good plants to use in a small terrarium. Some plants require more or less drained soil, different mixes, and not all plants are compatible.
For my terrarium, I have gone with some small herb plants but you can go with anything you like. Terrariums are just as much an art form as a science. Take your time, make a little world that you like to look at. You can organize these in any way you want. If you find your hands are too large you can use long tweezers or chopsticks to organize plants. You can include sticks or rocks to build an environment or provide structures for plants to grow on.
The most important part of this step is to go crazy with your creativity. You could make 4 terrariums that are all a continuation of each other. You could make 4 different environments where one is a little desert, another a little forest, and another small flowers, etc. Make anything you want out of each terrarium, embrace your imagination.
Step 4: Assemble the Terrariums


Now that you have printed all your pieces, and filled all your terrariums it is time to do the final assembly of the terrarium body, which I'm going to refer to as the canisters.
Take the base pieces and fit it to the bottom of the vases, in a perfect world these are a press fit and for some of mine this worked fine but others were loose. If the base pieces are loose a simple fix is to put between 1 to 3 layers of tape inside the base. You know that it is fit correctly when the vase is pressed completely into the base piece and can not be removed with ease, make sure that is is sitting level when you do this. If you feel the need you can also add glue to the base but I did not find this necessary.
Next add the cap pieces to the vase, if you intend to permanently close the canisters you can seal them in the same method mentioned above for the base. You could also add a silicone seal along the top but I can not recommend this unless you are extremely confident with making terrariums. A fully close ecosystem is very difficult to get right. In my case, I left the top loose so that each canister could be opened and altered as needed.
Once you have completed this step you can set all 4 canisters to the side and move on to the frame.
Step 5: Cut & Paint the Frame


Next it is time to start building the frame that will hold your canisters for this you will need to take your board and cut it down to the required lengths.
You will need:
- 3x 19-3/4in boards
- 2x 15-3/4in boards
Next take your cut boards sand smooth and prime if necessary.
Paint all sides with as many coats as necessary to achieve the color you want. I have used black paint for mine but you may use any color you wish.
Step 6: Assemble the Frame


Once your paint has dried you are ready to start assembling the frame. This might sound a little complicated but don't panic! it is very simple carpentry. Don't be afraid to reference the photos if you are not understanding.
Start by assembling a rectangle. Take your 2 shorter pieces and set them out parallel. Then take 2 of the longer pieces and set them between the shorter pieces to form a rectangle. The corner should be arranged so that the longer pieces butt up to the end of the shorter pieces (reference photo).
Starting with one corner, make sure it is square and hold the pieces together firmly. Drill into the board and continue until you have drilled through and into the end of the board behind. Use a drill bit slightly smaller than the thickness of the screw. Then Screw the two boards together.
Repeat this process twice for every corner. If you find that you need additional strength you can apply glue to the joints before screwing them together.
Next, place the canisters inside the rectangle along the longer board, and place the third remaining board on top of them to measure how high it has to sit, you can persuade it into place with a rubber mallet if it is to tight. For mine, this board needed to be 12 and 7/16th inches from the bottom.
Drill through the sides into the board and screw together in the same way as the corners.
Finally take your 2ft x 4ft white board sheet and cut it down to be 21 1/4 inches by 15 3/4 inches. Line it up with the back of the frame and drill a hole through the white board along the edges every 5 inches then screw it to the frame to create a back board for the frame.
On mine I have two pieces of wood on either side of the backboard, this is because I accidentally cut my white board wrong and had to fill in the space with scrap wood.
Step 7: Adding the Canister Mounting Points

Next you need to add the brackets that will hold the canisters in place inside the frame. This step is easy but it will take some time and focus
Mark the center on the top and bottom frame, place a bracket 3/8th of an inch to either side of the center measuring from the edge of the brackets, and pushed all the way to the back of the frame. Glue down (this may require clamps or weights if your brackets are warped like mine were). Then glue down a bracket on both sides of the previous 2, spaced 3/4 in apart from each other. You should end up with a pattern similar to what is in the photo.
Repeat for the top row of brackets using canisters to check alignment each time. It should be noted that the brackets have a small bump on each side so that canisters will gently click into place, so a small amount of resistance is expected.
Step 8: Drilling Ports for the Grow Lights

Once all the brackets are glued in place, find the center of each semi-circle and drill a hole large enough for light to pass through. This can be accomplished with a large spade bit or a hole saw. When you are done make sure to vacuum up any sawdust.
Step 9: Adding the Grow Lights


Now Its time to add the grow lights.
First drill a hole in the back of the top compartment large enough to pass any power cabled through. Then use the adhesive backing of your LED strips to attach them to the top of the compartment trimming any extra and passing the power cables through the back.
In my case I used little LED boards epoxyed into the top but this was very uneven and did not work as well as LED strips would have.
Now that you have your LEDs in place test them to make sure they work before you seal everything up. If they work then you can move on to the final step of cutting a 17 3/4in x 3 1/4in piece out of your remaining whiteboard, and gluing it in place over the front of the top compartment.
Step 10: Now What?


At this point you are done.
But its important to remember that you can always add to a project to make it your own. For mine I laser cut some accent pieces. In my opinion they just add to the look and make it less monotone. That is just one example, many things could be added to make it more your own, you could cut out some geometric pattern panels and put them on the sides, or extend the frame and make one that holds 10 terrariums or a small one that holds just one, you could add doors to the front or labels. Don't be afraid to expand on the project and make it something unique to you.
Attachments


Participated in the
First Time Author Contest


