Introduction: How to Make a Wooden Toy Zebra by Andrew

This is the final product of constructing my wooden zebra toy.
Step 1: Step 1: Gathering Materials
Supplies:
- Scrap wood of Douglas Fir (material your toy is made out of)
- Wood glue for wheels and axles
- Drill bit for drill press
- Safety glasses for safety
- Paint for your animals Axles/wheels
- Template for toy
Tools:
- Drill press for drilling axle holes
- Band saw for shaping your toy as the template
- Router Table with ¼” round over bit 1”
- Belt sander for smoothing out the edges of toy
- Orbital sander for making the toy smooth to hold
Step 2: Step 2: Find an Image Online of the Animal You Want to Do

This is the animal that I chose, due to its simple color pattern, though it can easily be mistaken for a horse when doing a template for it.
While browsing the internet for an animal, keep in mind of this important tip:
- Finding an image of an animal from a side view will work best when making your template and eventually wooden toy
Step 3: Step 3: Printing the Image

After printing out a zebra image, I made some adjustments to determine how tall my toy can be and how steady the wheels/axles would be with the height, so I folded up a bit of its hooves to compensate for that.
To print, simply copy and paste the image into a word document on the computer. Also note the size you want it to be, as it will influence the size of the wooden toy, so adjust accordingly. Make sure that it doesn’t extend the size of being able to hold it easily in a child’s hand as well as not making it too small.
Step 4: Step 4: Making a Template

I drew the outline of my picture onto the template shown. While it is off screen, I did not include a tail due to zebras having a very small size for their tails so it was deemed unnecessary to add it on. Also, through the looks of it, many can tell that it closely resembles the shape of a horse, so keep that in mind with your animal when cartoonizing the shape of it.
Before tracing the picture onto the template, make sure to cartoonize the image, due to being able to only trace the outline of the animals.Think about what you want the final product of your toy to look like and add tails/horns if necessary. Since the majority of animals have 4 legs, you would usually want to combine two legs into one when tracing it. Also, make sure to place a mark on the legs to indicate where the axles/wheels would go. After tracing, be sure to cut your template out to the outline you designed for it to be. Use scissors to cut out the outline of the template.
Step 5: Step 5: From Template to Wood
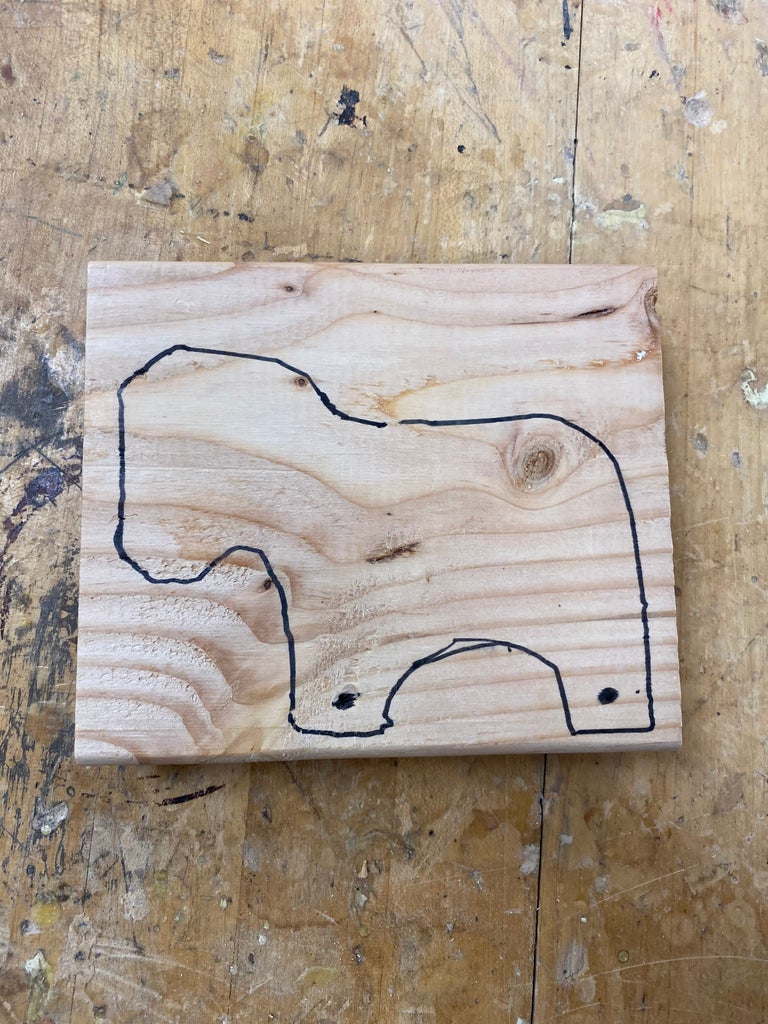
This is what my template looks like on the scrap piece of wood. I traced the outline onto it and marked where the wheels/axles will go.
It is best to trace the template close to the edges as possible so that you have less to cut. DO NOT cut out the middle of the wood. Use the bandsaw to cut out the wood into the outline of your animal from your template.
Step 6: Step 6: Drilling Axle Holes Into Toy


For the drilling process, I used the axle to see which drill bit would drill the perfect hole into the toy to where the axle will fit it and stay there after gluing it. While most people would do the drill bit in this step, as you will see in the later pictures, I did mine after the step where I sanded the toy.
First, use the axle to determine the size of the drill bit that will create the perfect hole for the axles to fit inside of your toy. Next, find the drill bit that matches the size that the axle fits in. Then, using a punch or something similar, put a dent on the mark where you will drill the holes for the axles so that the drill doesn’t walk. Before drilling, place a scrap piece of wood underneath your toy on the drill press table to stop the toy’s movement from tipping or shaking from the drill. Now, you can proceed to drill the holes for your axles.
Step 7: Step 7: Sanding


While the first image is too small to see the outer edges, there still is tool marks left from the band saw that needs to be smoothed out, especially, between the legs. The middle image is the belt sander, a nifty machine that will be able to smoothen all of the edges of the toy that it can reach easily within a few seconds. The orbital sander is used to smoothen out the body of the toy in the front and back.
When using these machines, make sure to get rid of all the tool marks before moving on to routering the edges. Use the belt sander to sand the edges and the orbital sander from sandpapers with the amount starting at 80 and working up to 220. Make sure that the toy is smoothened out on the body and the edges before moving on.
Step 8: Step 8: Router Edges of Toy


This is the router table used to router the edges of my toy. Looking at the second photo, the edges look completely smoothed out.
Make sure that before routering, that the round over bit is placed on the router table, if not, replace the current bit and place the round over bit into the router table. After the router bit is placed into the router table, test it on a piece of scrap wood first to make sure that it is the right bit. Make sure to adjust the router bit to the height of your toy. You will router the outside of your toy, making sure to rotate it around the edges of your toy to cover every outside part of it.
Step 9: Step 9: Paint the Toy

The drawing on the paper resembles how I will paint my toy and I traced every part of the toy I will paint onto the wooden toy itself. The main paint colors I will use are black and white.
Depending on what your toy is, you can paint it however you like, with the exception of not overpainting it, due to the part that people still need to know that you made it out of wood, so you have to leave some of the wood unpainted.
Step 10: Step 10: Gluing on Wheels and Axles


The first image is the wood glue I used to glue in my wheels and axles, and the second picture is the final product after gluing in the wheels and axles.
Before gluing, make sure to dry fit to make sure that the axle is able to fit into the hole nice and firmly. If it doesn’t fit all the way, now is the time to drill it. Put the glue into the axle hole, not the axle itself. By doing this, your wheel will be able to spin afterwards. Put the axle through the wheel. After applying glue, put the axle and wheel assembly into the hole. Make some room for your wheel so that it can spin. Repeat this process for all four wheels.
Step 11: You're Done!
This is the final product of my wooden zebra toy.
This project took around 2-3 weeks to complete in class. The part I found out to be the hardest is the painting part, as I messed up the eyes. The wheels have to align with each other otherwise, not all of them will be able to move at once. I could’ve improved around those areas, but otherwise I did alright. I definitely am proud of the sanding and routering process as it made the wooden toy very smooth.
By following the steps and avoiding the mistakes that I made, your toy zebra should come out nicely and function perfectly with all the four wheels.


