Introduction: How to Rebase Interactive With Eclipse (eGit)

20180718 - I "think" I've sorted out the issue with the images. If they appear zoomed in or don't make sense, try clicking. If you encounter an issue fire me a message and I'll try to help out.
This instructable provides the step-by-step details to perform an Interactive Rebase in Eclipse (eGit). The screenshots are based on Eclipse Neon.3 (on Windows), however the process has been nearly identical through Eclipse Mars and other earlier versions as well. The Linux GUI exposes slight variations, however, the details here should still be close enough to get you through the process. (Still applicable as of Eclipse 2022-12 [v4.26.0].)
The steps in this process are based on use of Github for both origin and upstream remotes. (I haven't worked with git in any other manner, but thought I should mention it just in-case it matters to a reader somewhere along the way.)
Step 1: Show Your Project History View
In the Package Explorer use the right-click context menu to 'Show in' > 'History'
Step 2: Start Your Interactive Rebase (from the History View)
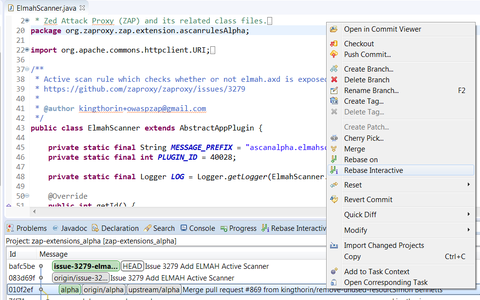
In the History view right-click on the commit before yours and select 'Rebase Interactive'.
Step 3: Select the Actions for Your Commits
Assuming you want to "Fixup" the latest commit(s) into the original one [merge them all together]. Select the most recent entry(ies) and set them as "Fixup".
You may also want to use "Squash" in the case that you want to merge commits together but also edit the commit message(s).
Details pertaining to other 'Actions' can be found here:
- https://www.kernel.org/pub/software/scm/git/docs/git-rebase.html#_interactive_mode
- https://wiki.eclipse.org/EGit/User_Guide#Interactive_Rebase
Step 4: Apply Your Actions


Click the 'Start' button to apply your actions.
After your actions are applied note that your project is now decorated indicating that it is both ahead and behind of the associated Remote.
Step 5: Push Your New Commit
From 'Package Explorer' use the right-click context menus to 'Push' your commit.
Step 6: Set the 'Push' Destination

In the 'Destination Git Repository' dialog, leave the 'Origin' remote selected.
Step 7: Choose the Branch to 'Push' To


Enter the 'Source' and 'Destination' ref, or use ctrl-spacebar to open the recent list and select from there.
Step 8: Add the Branch Specification for Your 'Push'
Click the 'Add Spec' button.
Step 9:


Once the 'Specification for Push' is added, check the 'Force Update' checkbox. Click 'Finish' to push the new commit to the remote ('Origin').
Step 10: Review History
If you once against 'Show In' > 'History' as you did in step 1 you should now note that there is only one commit for your changes.


