

Introduction: I Used Toit to Build a Temperature Controlled Fan With ESP32.


Summer is here! And with summer comes heat...especially in my bedroom. The problem is that when it is time for bed after a sunny day, the temperature in my bedroom is north of 30 °C, but when I wake up in the morning it is freezing. Solution: Temperature controlled fan! The idea is to have a fan that maximises air circulation in the evening and gradually decreases speed as the temperature drops. In addition, it would be nice to have a display showing the current temperature as well as a temperature history.
Instead of wasting precious time setting peripherals and communication up, we'll go for Toit on this one. This adds a unique responsiveness to the build. With the Toit platform, you can treat the ESP32 as a regular computer, installing multiple apps in parallel using the OTA functionality built in to the system. Since Toit uses a high-level language, it is easy to test functionality and applications while the Toit platform ensures that the device keeps functioning no matter what.
Step 1: Getting Started With Toit

Firstly, you need to get a Toit account and provision your ESP32 with Toit.
Get a free Toit account at toit.io, by clicking "Start now". Once you are logged in, go to documentation and follow the Quick Start guide to install Toit on your computer: https://docs.toit.io/getstarted/quick_start
Note that you can provision your ESP32 super-easy using the web user interface: https://docs.toit.io/getstarted/quick_start
Note: Once your ESP32 is provisioned, it goes online and does not need to be connected to your computer, unless you want to power it via the USB. All communication takes place via the Toit cloud.
Now you are ready to hook up some HW!
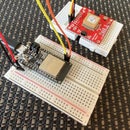
Step 2: Hooking Up the HW

Above you'll see a Fritzing circuit with everything connected. Note that the 5VEN jumper on the L298H board should be closed. This means that the board will be powered from the 6V battery pack. In addition, add a 0.1 uF capacitor between the terminals of the DC motor. This reduces electrical noise induced by the motor.
The following ESP32 GPIO pins are used:
GPIO 16 - IN1 pin on the L298H motor driver board
GPIO 17 - IN2 pin on the L298H motor driver board
GPIO 19 - ENA (Enable) pin on the L298H motor driver board
GPIO 21 - SDA on the BME280 sensor board and OLED display
GPIO 22 - SCL on the BME280 sensor board and OLED display
Step 3: DC Motor Control, Temperature Sensor, and OLED Display

The IN1 (Input 1) and IN2 (Input2) on the L298H controls the direction of motor rotation as illustrated above.
The ENA (Enable) starts and stops the motor. If a PWM signal is applied to this input, the motor spins at the corresponding speed. Note that if the PWM is set very low, the motor will not start and you might hear a ticking sound from it, since the power put into the motor is not enough to spin it around. For this setup, a PWM > 0.16 is enough to start the engine.
The BME280 sensor and the ESP32 communicates via I2C and since Toit provides a driver for this sensor, using it is really simple: Just hook it up to the corresponding GPIOs.
The same goes for the OLED display: Just connect the SDA and CLK to the corresponding GPIOs and your should be fine. However, there is a plethora of SSD1306-based OLED displays out there and they may have different power requirements. The board used in this build need 5V to Vin. 3.3V will NOT suffice. Read more here: https://learn.adafruit.com/monochrome-oled-breako...
Step 4: Overview of Toit Code

First of all, install the required packages for the OLED display and BME280 sensor by running the following CLI commands in the folder where your Toit code is:
$ toit pkg init --app
$ toit pkg install pixel_display
$ toit pkg install ssd1306
The code for this project is relatively straightforward; the entire code is available at GitHub. The excerpts below are shown for clarification of specific functions. The BME280 sensor and the OLED display share the same I2C bus, using two different addresses: 0x77 and 0x3d respectively. Note that your HW may use different addresses and if so, the code must be altered correspondingly.
scl := gpio.Pin 22
sda := gpio.Pin 21
bus := i2c.Bus
  --sda=sda
  --scl=scl

oled := SSD1306 (bus.device 0x3d)
thp_device := bus.device 0x77
The pin used for fan speed control (GPIO 19) must be set up for PWM:
pwm := gpio.Pwm
  --frequency=50
chan1 := pwm.start
  gpio.Pin 19
Also, the pins controlling the fan direction (GPIO 16 and 17) should be set up as output pins:
in1 := gpio.Pin.out 16
in2 := gpio.Pin.out 17
//Set direction of fan
in1.set 0
in2.set 1
To achieve the variable fan speed, we map a suitable temperature interval, e.g. 25°C to 30°C to the PWM duty cycle interval [0.0 ... 1.0]:
input_start  := 25.0
input_end    := 30.0
output_start := 0.0
output_end   := 1.0
df = (temp - input_start) / (input_end - input_start) * (output_end - output_start) + output_start
Also, to get a nice-looking histogram of temperature history, we map a suitable temperature interval [20 ... 35] to a certain histogram height, before we add the temperature reading to the histogram:
histo_input_start  := 20.0
histo_input_end    := 35.0
histo_output_start := 5.0
histo_output_end   := 50.0
histo_data = (temp - histo_input_start) / (histo_input_end - histo_input_start) * (histo_output_end - histo_output_start) + histo_output_start
histo.add histo_data
Toit uses a .yaml-file to schedule when the Toit code should be executed on the ESP32. In this project the app should run continuously immediately when we install it, and also if the ESP32 reboots. We give the app the name "Fan Control" and point to the file containing the Toit code:
name: "Fan Control"
entrypoint: tempfan.toit
triggers:
  on_install: true
  on_boot: true
To install the app on your ESP32, you simply deploy your yaml-file:
$ toit device -d dark-luck deploy tempfan.yaml
The complete code including .yaml-file can be found at GitHub: https://github.com/nilwes/tempfan
Step 5: Assembly Up and Running!
Here's a video of the assembly. The fan is programmed to start if the temperature goes above 26 °C and will reach its maximum speed at 30 °C.


