Introduction: Interfacing Tilt Sensor With Arduino


A Tilt Sensor recognizes the orientation of an object and provides its output High or Low respectively.
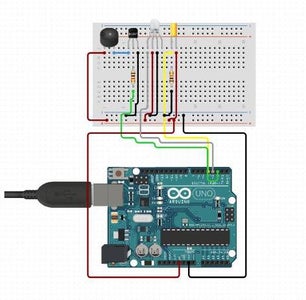
Supplies
Hardware Components
Tilt sensor
Arduino Uno
Buzzer
LED
Register 220 ohm
Connecting wires
Software Components
Arduino IDE
Step 1: About Project

Tilt Sensor
This Mercury switch-based tilt sensor module provides high at its output pin when tilted. It needs a 5V of DC input. The switch is a three-terminal device that contains input, ground and output. It also has a glass tube that contains two electrodes and a liquid mercury ball.
Tilt Sensor Working
1. In case of Not tilted When the switch is in a NOT tilted position, it shows LOW output due to the liquid mercury complete the circuit by attaching the two electrodes. When the output is LOW on-board LED rest ON.
2. In the case of Tilted When it is tilted in a specific direction or angle, the liquid mercury disrupts the contact between the metal electrodes and the circuit becomes open. Hence, we receive HIGH output in this state and the onboard LED turns off.
Internet of Things Course Training will give you a thorough view on various IoT Concepts.


