Introduction: Introduction to Programming Raspberry Pi Without Hand Coding


Hi,
this instructable will show you how to turn your Raspberry Pi into a fully programmable automation device compatible with graphically oriented programming language for PLCs called Function Block Diagram (part of IEC 61131-3 standard). This can be achieved by installing REXYGEN. The REXYGEN software tools are extensively used in various fields of automation, process control and robotics.
The goal of this introduction is to help Raspberry Pi users to overcome the transition from hand coding (python, ...) to graphical programming using the so-called function blocks and accelerate the start of using REXYGEN software tools.
The tutorial will guide you through REXYGEN installation (both development tools and runtime core for Raspberry Pi) and very simple example on integrating DS18B20 as a simple thermostat without hand coding.
Supplies
- Raspberry Pi (B+/2/3/3B+/Zero W)
- SD card with latest Raspbian according to your choice (https://www.raspberrypi.org/downloads/raspbian/)
Step 1: REXYGEN Installation
Development Tools Installation on Windows 7/8/10:
- Download the installer from: https://www.rexygen.com/software-download
- Run the .exe file and follow the installation guide. The Full install option is recommended.
Runtime Installation on Raspberry Pi:
Your Raspberry Pi is running fresh & latest Raspbian according to your choice - if not see https://www.raspberrypi.org/downloads/raspbian/ for image download and Raspbian Installation guide.
On your Raspberry Pi, update the APT installation packages repository:
sudo apt update
Afterwards install GIT:
sudo apt install git
Go to your home directory:
cd
Download the latest revision of installation scripts:
git clone https://github.com/rexcontrols/rex-install-rpi.git --branch v2.50
Change the working directory:
cd rex-install-rpi
Run the installation script for Raspberry Pi:
sudo bash install-rex.sh
Great! REXYGEN is already running on your Raspberry Pi. That you don't see it? Don't worry!
Right after the installation the RexCore runtime module is started automatically in the background as a daemon. RexCore also automatically starts upon system (re)start.
The free DEMO version is limited to 2 hours runtime. After every restart, you have another 2 hours for your experiments. You can buy permanent licence starting at 45€ per device.
Step 2: First Project - Raspberry Pi As a Simple Thermostat


Let's build a Thermostat!
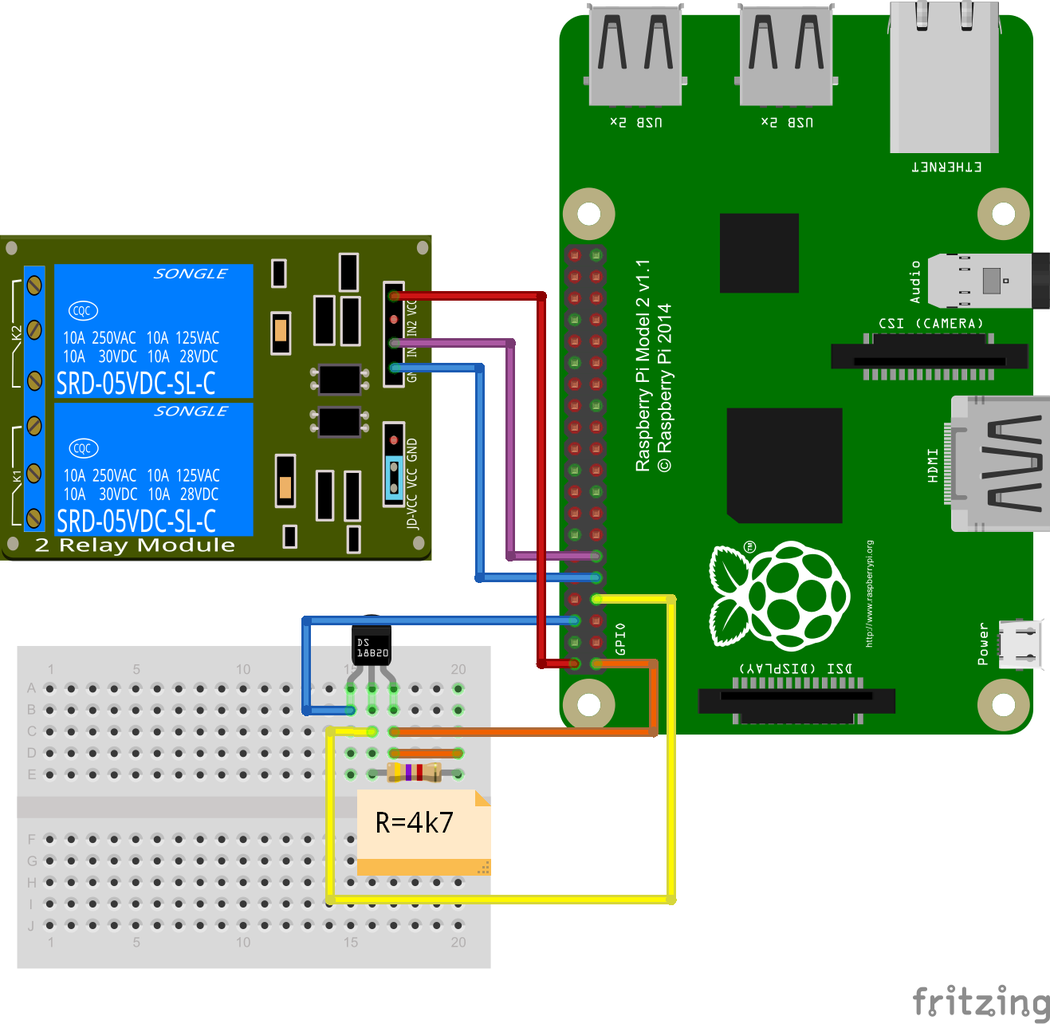
In this example the Raspberry Pi is configured to act as a simple thermostat. The temperature is measured by the 1-Wire DS18B20 sensor and the GPIO pin 17 switches a relay on and off with a hysteresis of 0.5°C.
Be sure to connect the DS18B20 temperature sensor and 5V relay according to the wiring diagram. Don't forget to use 4k7 resistor between DATA and VCC pins of DS18B20.
Once the wiring is ready run the REXYGEN Studio program. Select Start from an Example Project and choose 0120-22 Simple Thermostat example. Select a folder to save the project files in (e.g. D:\FirstProject).
Any function block can be configured by double-clicking on it. Don't know what does any specific function block do? Select it and hit F1 for instant documentation.
There is only one thing which need to be configured - DS18B20 64-bit ROM ID in order to read the temperature.
List the detected 1-Wire devices by the owdir command. The output should look like this:
/28.551DDF030000
/bus.1
/bus.0
/uncached
/settings
/system
/statistics
/structure
/simultaneous
/alarm<br>
The first line is the DS18B20 device ID - copy it.
Function block OWS is configuration and timing of 1-Wire communication. Double-click the OWS function block and click on Configure button.
1-Wire Driver configuration dialog will appear. Find and replace the DS18B20 device ID with the one of your DS18B20. Close the dialogs by OK buttons.
Optional: You can also change the temperature setpoint by editing CNR_temperature_sp function block where you can specify the desired temperature. Or change hysteresis by editing the parameter of CMP_THERMOSTAT function block.
The project is ready now. Let's Compile it and Download to the Raspberry Pi. Select Project ->Compile and Download (or hit F6) and confirm saving before compilation.
Once the project is compiled the Download dialog will appear. Be sure to specify IP Address of your Raspberry Pi in Target line and hit Download button. For the first time you will be asked for licence for your Raspberry Pi. If you want to try 2 hours DEMO just choose Request a free DEMO LICENCE. Otherwise you can buy permanent licence at https://www.rexygen.com/raspberry-pi-rexygen-pricing/.
As soon as the download is complete it is possible to switch the REXYGEN Studio to the so-called Watch mode and watch the control algorithm in real-time – click Watch.
In the Watch mode, the background of all files goes gray and you cannot move or delete any blocks or connections. Right-click the OWS_temperature flag and select Watch selection in the menu to watch the item online. You should see current temperature measured on DS18B20.
Curious about temperature trends? No problem! Just double-click one of TRND_* function blocks while still in Watch mode and see the historical data of given time period.
Step 3: Conclusion


The Thermostat example is just a starting point to the REXYGEN capabilities. I would mention few features which I consider as a key ones:
- built in HMI - one type automatic generated (WebWatch), one type Simple Buttons and Displays (WebBuDi) and last fully editable with REXYGEN HMI Designer
- REST API - all project constants, variables and signals can be read/write using REST API
- various communications available - 1-Wire, GPIO, Modbus TCP/RTU, MQTT, Database, Siemens S7, ...
- extensive example database
- comprehensive documentation available - see https://www.rexygen.com/documentation-and-support...
Don't know where to start? Head to the examples library and look around or just try to make this example on your own from scratch :)

Participated in the
Sensors Contest


