Introduction: Japanese and Shaker Style Desk With Jyuji Mechigai Tsugi Joint


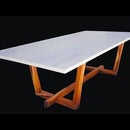
I've been needing a desk for a newly renovated office space in the house and wanted to do a shaker style writing desk, because I've always been a fan of the shaker simplicity, craftsmanship, and functionality.
This desk was inspired by a video I saw from Jon Peters on making an entryway table, as well as a joint I learned from Japanese carpenter Dylan Iwakuni through the Florida School of Woodwork. It's not a large desk but at the end of the day I'm not a large guy. I went with a singular, tray style drawer because I'll be spending a lot of time editing at this desk and most of my external hard drives, cables, and memory cards are low profile. Also, I like the idea of having it like a tool chest drawer where things aren't stacked on top off each other, but rather are laid out like a surgeons table.
Shaker furniture is known for its minimalist design, and this desk lends itself to that for the most part, with hard maple as the primary wood. A few slight embellishments break away from tradition, with some contrasting pieces in rosewood and ebony.
The joint, jyuji mechigai tsugi, is eerily reminiscent of a castle joint, except it joints two vertical pieces as opposed to two perpendicular pieces. Traditionally, it's used to replace rotted feet of vertical beams. However, after learning the mechanics of it, I saw it as an opportunity to do a unique asymmetrical accent.
If you follow me on YouTube or even here on Instructables, you know that I've been on a bit of a rosewood kick lately, and more of that leftover rosewood is being used to do my accents on this piece.
Supplies
Mandatory Dovetailing Supplies:
Dovetail Saw (Western Backsaw or Japanese Pull Saw) Dividers (Two is optional, which I prefer) Marking Gauge (Two marking gauges is helpful at times too and also optional) Coping or Fret Saw Sharp Chisels Something to Knock said Sharp Chisels Marking Knife or Sharp Blade (Razor Blade or Box Cutter Works)
Optional Dovetailing Supplies:
Layout Board (I use the bench hook of my shooting board) Low Angle Jack Plane and Low Angle Block Plane Medium or Fine File or Rasp (A knife file is amazing without teeth on the edge. I don't own one yet but it's on the wish list.) Painters Tape Dovetail Marker or Sliding Bevel Gauge Paraffin Wax (Great for saws... I actually even use mine on the fret saw... and plane soles)
Wood Species:
Maple: Half a "stick" of 8/4 maple. At my lumber yard that's about 5 feet long. Two 4/4, 12 foot boards. I had one that was 6 inches wide and another that was 8 inches wide.
Rosewood: I used scraps. Just enough for the one leg accent and drawer sides. You can use any contrasting accent wood. Or you don't even need an accent wood and the joinery itself can speak freely.
Ebony: Again, this was a pull so it's an incredibly small turning blank and I only used a small portion of it.
Plywood: one 1/4 inch project panel measuring 2' x 4'
Other Tools:
Circular Saw, Track Saw, Domino, Drill and Driver, 3/4 Forstner Bit, 3/8 Brad point bit, sanders, hand planes, glue, glue brush, spray paint (optional), CA Glue, miller dowel kit, figure eight fasteners, Router and quarter inch straight bit
Please also note that not all of these tools are mandatory and some can be subbed out for others. For example, a domino is not necessary. Jon Peters brought his entire entry table together with pocket holes. A doweling jig also can work if you're not into mechanical fasteners.
Step 1: The Beginning of an Apron


The apron and desk top is constructed primarily from 3/4 maple. In an effort to have one continuous grain front, I started by ripping down all four aprons and then cross cutting what will be the front apron into two apron pieces and a drawer face.
You might notice on my table saw that I have this base for a magnetic dial indicator. I use that as a stop against my fence to be able to make repeatable cuts without worrying about my workpiece binding between the blade and fence, and potential kickback.
Since I cut my apron into three pieces, it’ll need to be mounted to a substrate, so I’m ripping two strips which will be glued to the back of the apron with the drawer face removed. The width on that is up to you. I went with one piece at 5/8 and the other at 1 inch. I kept them the same thickness as my aprons. The idea is that the opening you're going to create is going to be the depth of the drawer for the most part.
Now this is a recipe for having glue squeeze out taint your end grain, so a bit of extra diligence in clean up will serve you during the finishing process later. (As an editorial note: the glue squeeze out ended up tainting my end grain but not where I had expected. I taped the middle drawer which was fine. However, the apron pieces had glue on the end grain that could have been avoided. With that being said, based on the snug, almost piston fit of the drawer, and the fact that the drawer has the drawer stop, this is completely concealed.) And you can also note here that I’m using the drawer face as a positioning block in the middle, to ensure that I nail the spacing of the apron components for that continuous grain look.
Step 2: The Legs and Jyuji Mechigai Tsugi


As an accent, I attempted to complete jyuji mechigai tsugi for one of the front legs. This Japanese carpentry joint is extremely reminiscent of a castle joint, except it actually joins two vertical pieces in a cross shaped mortise and tenon. As another break from tradition, Japanese carpenters use pen to do their layout, whereas I’ll be using a marking gauge and marking knife to scribe lines into the wood. The idea for both sides is that you’ll be marking out an equal 9 square grid on the end grain, and a corresponding 3 square grid on the faces.
Layout is honestly key for this joint. The first joint I learned to do was spent primarily marking. The Japanese method has you noting two reference faces and doing all your marking off of those reference faces. I, being a heathen westerner, didn't do that and for the most part, it was fine because the piece was square. I went with a 7/16 measurement for all the outside tenon components. It wasn't a perfect split of three equal measurements... because that would have been something like .444444444444 repeating till infinity. But using that 7/16 measurement on the outside was fine because it naturally made the middle mortise and tenon component equal on all faces.
I sawed the male tenon first, doing a nibbling cross cut just to the middle lines. You can see that as I’m sawing, I’m stopping to blow out dust so that I can make sure I’m staying true. Then switching to a rip tooth dovetail saw, I’ll do a similar cut but vertically. I like to use my thumbnail in my marking line which forces my saw kerf into the waste. As another break from tradition, I'm using western saws here. Japanese saws are thinner kerfed and likely easier to get started in the work piece and would work here.
To remove the waste, I chopped down across the fibers with a chisel, and then into the end grain to pop out the bulk, all while respecting my layout lines. Starting from the outside corner and working your way in and down is easiest as those will have less connection to the rest of the piece due to your saw lines. With that roughed out, I’ll starting sawing out the mortise side. I started with one channel mortise, sawing from both sides at an angle, until I reach my baseline. When you flip to the other side, the general idea is to have your saw lines meet at an apex in your end grain. After that, you can saw straight down to get the remaining material in the kerf line. And much like before, you’re going to chop out your waste across the wood grain and pop it out from the end grain. I would also suggest going halfway and flipping to preserve the integrity of your faces. With the waste hammered out, you can start sawing your next channel, and I did that in the same way as before.
The waste is again removed similarly. As you’re approaching the middle you have to be really careful to minimize tear out. If you’re biting off more than you can chew, big chunks will come out. I ended up with a little bit myself. In traditional style, this joint doesn’t get any glue, so those tear out spots could lessen the integrity of the joint. However, since this is for furniture, I’ll add glue to the joint and it’ll be no worse for wear. I went with every day titebond 2 here, not epoxy or any other adhesive. Hide glue might be helpful if you're a little tight and don't want to risk expansion from the water content. I was pretty snug to begin with so really the glue was just more of a practical aspect rather than a structural component. It's pretty wild to think they'll use this to replace vertical beams in an old house with no glue and only a friction fit.
To fine tune everything and keep my 90 degree jig from sliding (it's just a block of wood with square sides people), I learned this trick from Dylan Iwakuni where you can spray the bottom of the jig with water before clamping it to your surface. Then it’s just a matter of working your way lightly down to your baseline. When working the base of the mortise, again, work halfway down and rotate to protect your faces. The tenon is similarly pared down from all sides and the joint is then brought together.
Step 3: Finishing the Aprons


Back to the front apron, I’m just going to trim the ends up close on the table saw and then flush them up with the low angle block plane. Then using the front apron as reference, I’ll cross cut the rear apron. For the side aprons, I want to gang cut them, so I’ll stick them together with double sided tape and cross cut them. After the table saw, I’ll flush the edge grain to get it square, then break them apart and work on the faces with a smoother. Then the front apron, with the drawer face in place gets planed as well, and then the rear apron.
I prefer hand planing as opposed to sanding, but if you're not proficient with hand tools, a sander works fine here.
Step 4: Fine Tuning the Legs


Back to the legs, I’m going to crosscut everything to final dimension, and I’m using that trusty magnetic stop against the fence to make sure that I’m safely nailing the length.
These legs are a little thicker than my taper jig can handle, so I’m using a stop block with double sided tape on the back, and a quick release clamp to lock the workpiece to the jig. Then, I’ll take a pass, and as soon as the waste is released, shut the saw off as opposed to pushing through destroying my clamps. This is one of those times I wish I had that big shutoff switch for my knee to bump. Just be careful and have your clamp set as far back as possible while still remaining solid, and let the waste fully release before shutting the saw off. Also wait till the saw is actually off before bringing it back otherwise disaster abound.
Then it’s a quarter turn and repeat and voila, tapers. I’ll repeat on all the legs. The process leaves some pretty rough saw marks, so I smooth everything out with a high angle iron in the low angle jack plane on the hybrid leg. I switched back to my smoother for the maple only legs and made some shavings perfect for the toilet paper crisis of 2020. Then with the low angle block, I’m going to add the tiniest of chamfers to break all the edges. I don't really want those chamfers to be wildly noticeable. I just want a lightly softened edge.
Step 5: Preliminary Assembly


To join the apron to the legs, I use the domino. To create a very slight and subtle offset between the legs and the apron, I adjust the positioning of the mortise in the legs just a few millimeters toward the center of the leg and then drill on two adjacent faces. Essentially the faces that bear the tapers.
Then everything gets brought together with the tenons and glue. I brought the front and rear aprons together first before joining the rear to the front with the side aprons. With that being said, there’s really no necessary order of operations here.
The singular tray style drawer needs runners, so a piece of maple is butt joined to the end with miller dowels. That’ll be mounted to the rear apron, and join to the front apron by being pinned between strips of the reinforcing substrate.
Step 6: Dovetailed Drawer


The drawer will be dovetailed with through dovetails in the rear and half blind dovetails into the drawer face. I’m not going to spend much time going through the mechanics of through dovetails as I’ve got a pretty detailed article on how I hand cut dovetails here on Instructables.
The router plane rabbet on the inside of the tails is a bit of a new move for me. It’s extremely small and subtle but helps hide any imperfections from the inside and gives a little ledge to assist in laying out pins on the end grain. Also I like to chamfer the inside of the tails as well to allow for an ease in fit. That chamfer actually starts just past the end to maintain the squareness from the outside, but allow for a little ramp in to the tails.
For the half blinds I mark off the length of the tails and scribe that into the end grain of the drawer face. I had a dopey snafu, where basically I started attempting to chop out the waste without sawing my pins first. Thankfully I caught it before I started really going to town. And much like on the leg joint, I’ll saw at an angle and stay within my layout lines.
The technique for popping out the waste is pretty similar to that joint as well. It’s also reminiscent of Christian Becksvoort’s method for through dovetails. That’s a great video if you haven’t seen that before. I’m actually waiting on a fishtail chisel to be able to get better into the back corners of the pins. However, for now, I’ll just use a smaller chisel to try to carefully get back there without bruising my pins.
The runner is then mounted to the rear apron. That’ll be pinned at a slight angle with miller dowels. And then pinned from the underside of the front apron with a miller dowel as well.
The runners need a bottom for the drawer to actually run on, so that’ll be mounted to the bottom with glue and some brass twist nails just to pin it in place while the glue cures. Since the drawer is long it has some vertical play. I’ll eliminate that by mounting a thin strip of maple into the top of the runners toward the front apron. That’ll be screwed in and will also serve as a catch for the drawer stop which will keep the drawer from being pulled all the way out.
To take a drawer bottom, the insides of the drawer will have a dado routed in with a quarter inch straight bit. I’m using a trim router with an edge guide to keep everything straight. And then the drawer bottom is just cut out from some 1/4 inch plywood on the tablesaw and that’ll get painted with some matte charcoal spray paint on the show side. Then the drawer is assembled.
Step 7: The Pull


For the pull I’ll mark the center of the drawer front and then using a forstner bit and a brad point pit, drill a two step mortise for the pull to sit in.
The pull is turned out of some ebony that was gifted to me from a friend. I haven’t used the lathe in a while so it was nice to have some time spindle turning the pull.
I’m essentially turned down two sections for that double stepped tenon, so that the pull can be fit into the drawer face, but have a slight reveal between the pull and the hole drilled by the forstner bit. I went with a more trumpeted look because I felt it would be more ergonomic. And candidly, I always have a tendency to have that flare out on my turning products.
For finishing I chucked it up like a really tiny bowl and then sanded and burnished with shavings. With a little glue I was able to set it in with a perfect friction fit.
Step 8: Fitting the Top


The top are three maple boards, cut out of my previous stock, that were planed down to about 3/4 thickness. I started by trying to orient the grain in an appealing way and also get the grain flow as best as I can in one direction. Interestingly enough, this was going to be the top and then I changed my mind and it became the bottom.
I’m marking out for the domino, where I’ll use the wide mortise setting on one side and the tight setting on the other to allow for ease in alignment. This will inevitably make my finish work easier with the hand planes. To explain this better, the tenons go in the small mortise side. The glue is really what is providing strength to the edge joint and the tenon itself will be fixed in the mortise to the top and bottom of the mortise and the gaps on the sides won't be integral. However, for the purposes of a glue up, I can shift left to right to make sure I maintain my drawn triangle at all points. It's just a much less stressful procedure.
With the top in the clamps, I drill a countersunk hole in a piece of scrap for the drawer stop and pre-drill a hole for the corresponding screw in the outside rear of the drawer. The drawer stop is designed to be adjustable so that the entire drawer can be removed if necessary. I adjusted it with the desktop off here, but it can also be done from the underside of the desk as well when the top is mounted.
In preparation for the desk top, I’m drilling with a forstner bit to accept a figure eight fastener. I’ve used these fasteners before, but it had been quite a while and I forgot that they needed to be opened up a bit with a chisel on the corners to allow for enough range of motion to accommodate for seasonal wood movement. These are only drilled into the side aprons as wood expands and contracts along its width. You can see in the video that when you don't nibble off those corners, the movement of the fastener is extremely constricted so biting those off is a must and allows for a pretty substantial swing.
Then the underside is flattened with the jack plane, and as I said before this ultimately became the top after some flip flopping on what looked better. I then switched from the jack plane to the low angle jack with a 50 degree iron to deal with some squirrely cathedral grain with some unruly direction changes. The high angle iron is kind of like cheating and acts as more of a scraper which allows it to plow through those tough to handle areas. With that being said, an extremely sharp smoother iron at a standard bevel can handle it similarly. I should also add that since it's a 50 degree iron, I actually have the secondary bevel at 55 degrees.
The ends are trimmed square to the sides at a 15 degree bevel with the track saw. Then using a bevel gauge, I match that angle and transfer it to the table saw to rip the long edges. You might have seen me spraying the end grain before planing earlier. That’s denatured alcohol which softens it a touch and makes it easier to plane. That’ll help me get rid of these burn marks from the track saw with the low angle block. The denatured alcohol trick is a great trick I learned from Christopher Schwarz's book on workbenches. I use it all the time when working end grain. If you have a shooting board it's pretty great too.
Step 9: Finishing


The finish is my often used maloof finish, equal parts boiled linseed oil, pure tung oil, and wipe on poly with a splash of mineral spirits for penetration. I’ll apply multiple coats of this, wiping on and wiping off excess to prevents runs and sags.
Now this darker pic is a good demonstration of how to assess the need for continued coats. This is 24 hours after my initial application, and from where the light is hitting you can see where the wood is sufficiently saturated, and the more matte or dry looking areas are where the finish has really penetrated, which require more coats. You’re going for an even sheen across the whole surface before moving on to stage two of the finish which is this tung oil, linseed, and beeswax blend.
I'll also add that I use pure tung oil as opposed to say, formby's or other store bought brands, because it polymerizes in the wood. I'm a big fan of Real Milk Paint Company's specifically, but there are a few other brands out there. Tung oil purchased at a big box store has other solvents in it usually or even other oils and it doesn't penetrate and polymerize in the same way.
To assist with the drawer movement along the runners, the drawer sides and runners will get a pretty heavy dose of paste wax to allow for a softer glide since everything is friction fit. Then the top is mounted via the figure eight fasteners and we’re done.
Step 10: You're Done! Rejoice! YAAAAAS QUEEN.


This desk, while deceptively simple, is chock full of technique and detail. I’m pretty thrilled with the final product and candidly keep finding myself rubbing on the glassy hand planed surface. I’ll be spending a lot of time at this desk, editing videos and doing computer work, so it’s nice to have something classic and timeless that I can work at.
Also, based upon it’s small size, it can eventually transition to an entry table should the need arise. While this is not a pure shaker writing desk by any stretch of that definition, I will say that the principles behind the craftmanship are quite the same. that desire and labor of love is what I hope you find here. In the words of Christian Becksvoort, Joy is in the details that make a difference.
I hope you're able to pick up some pretty cool techniques from this article and the video. If you have any questions regarding the build, please feel free to hit me up in the comments below, on Youtube, or DM me on Instagram.
Happy building!


